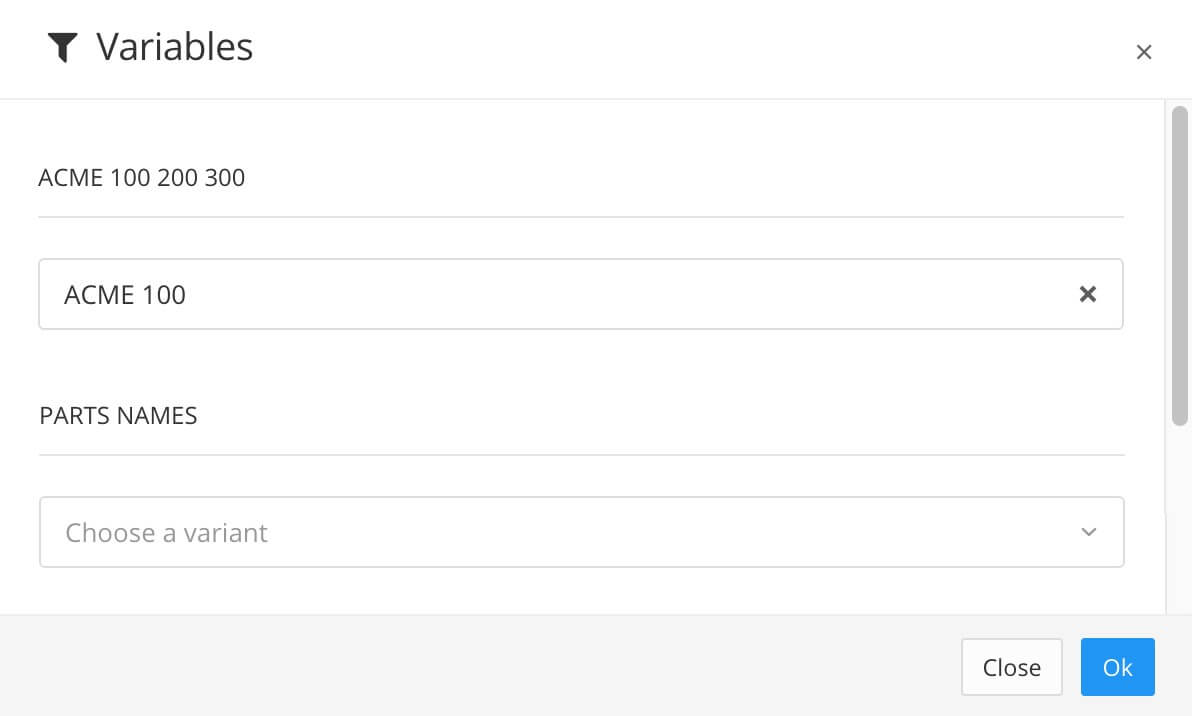
Zendesk Integration
Paligo can publish directly to Zendesk, so you can use Paligo's powerful authoring features to create content, while still using your Zendesk help center to support customers.
To publish from Paligo to Zendesk:
Make the necessary preparations, see Preparations for Zendesk Integration.
Connect Paligo to Zendesk so that it can communicate with your Zendesk instance.
Make sure you understand how the different Zendesk Layouts work. There are several different types of Zendesk layout you can use, and each "maps" the Paligo content to Zendesk's Category > Section > Article structure differently. So it is important that you choose the right type of layout for your requirements.
Note
We use the term "mapping" for the conversion of Paligo topics into sections and articles in your Zendesk help center. For example, if you have a top-level topic in Paligo that is going to become a section in Zendesk, the topic is "mapped" to a section. You can find out more in Map Content from Paligo to Zendesk.
When you publish your Paligo publication, choose HTML as the output type and select the Zendesk layout that you want to use. You can also use the publishing settings to control variables, filters, etc. To find out more, see Publish to Zendesk.
Use JavaScript and CSS customize the appearance and functionality of your content in Zendesk, see Customize Zendesk Articles Using Javascript and Customize Zendesk articles using CSS.
Note
Paligo does not support publishing articles that use “content blocks” in Zendesk.
Note
To import Zendesk content into Paligo, see Import from Zendesk.
Before you can publish from Paligo to Zendesk you need to have:
A Zendesk account that has access to the "Managed By" feature, also known as user permissions.
One or more categories in Zendesk.
To learn about Zendesk categories, see the official Zendesk documentation.
A Paligo publication that is organized so that it can be published using a Zendesk multi-section, single-section, or enterprise layout, see Zendesk Layouts.
Set Paligo to connect to Zendesk (see Connect Paligo to Zendesk ).
Tip
We recommend that you set up a trial account or a draft category in Zendesk. This will allow you to test your Paligo-to-Zendesk publications without making the content visible to your customers. When you know everything is working as you want it to, you can start publishing to your live help desk knowledge base.
Paligo can publish directly to Zendesk, so you can use Paligo's powerful authoring features to create content, while still using your Zendesk help center to support customers.
Depending on the plans you have purchased, you can connect Paligo to Zendesk and set it up to publish to:
A single Zendesk domain (or brand). This article explains how to set up Paligo to connect to a single domain Zendesk.
Multiple brands (subdomains) on the same main domain. For information on setting up Paligo to connect to a multi-brand Zendesk, see Connect Paligo to Zendesk Multibrand.
Note
Paligo does not support publishing articles that use “content blocks” in Zendesk.
To set Paligo to publish to Zendesk for the first time, make sure you have made the required preparation, and then complete steps 1-4 below.
To connect to Zendesk, Paligo needs an API key. You can generate the API key in Zendesk and then copy it to Paligo.
Log in to your Zendesk account.
Note
You need to log in via a user account that has administrator permissions.
Display the Zendesk Admin Center. (Select the Zendesk Products icon and then select Admin Center).
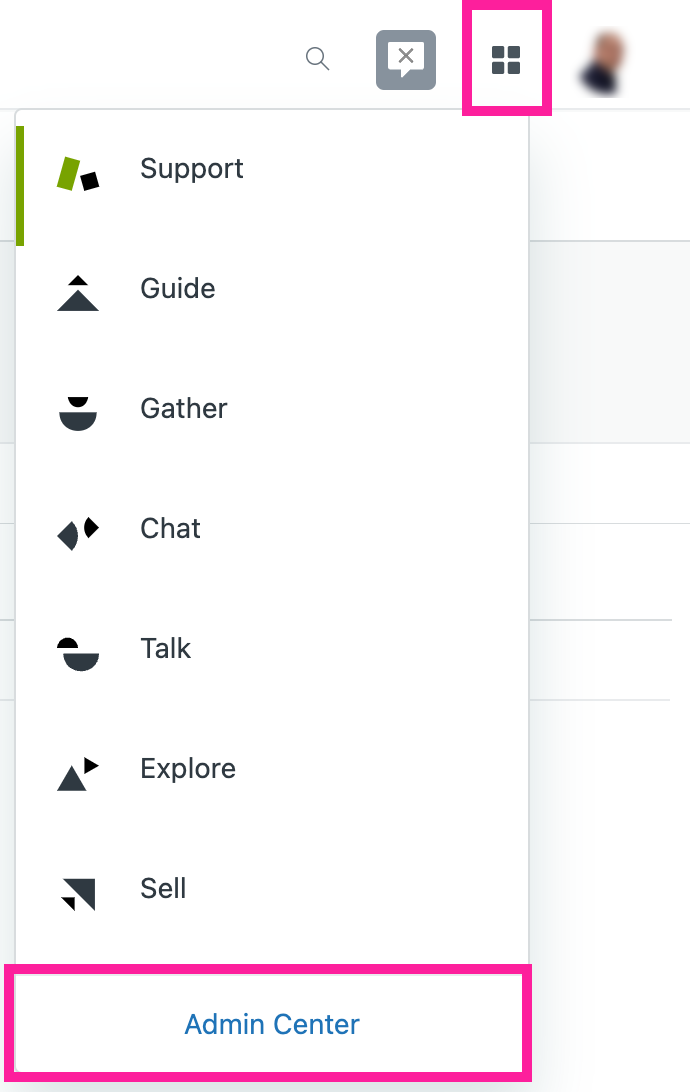
In the Apps and Integrations section, select Zendesk API.

On the Settings tab, set Token Access to Enabled. This allows you to create API tokens.
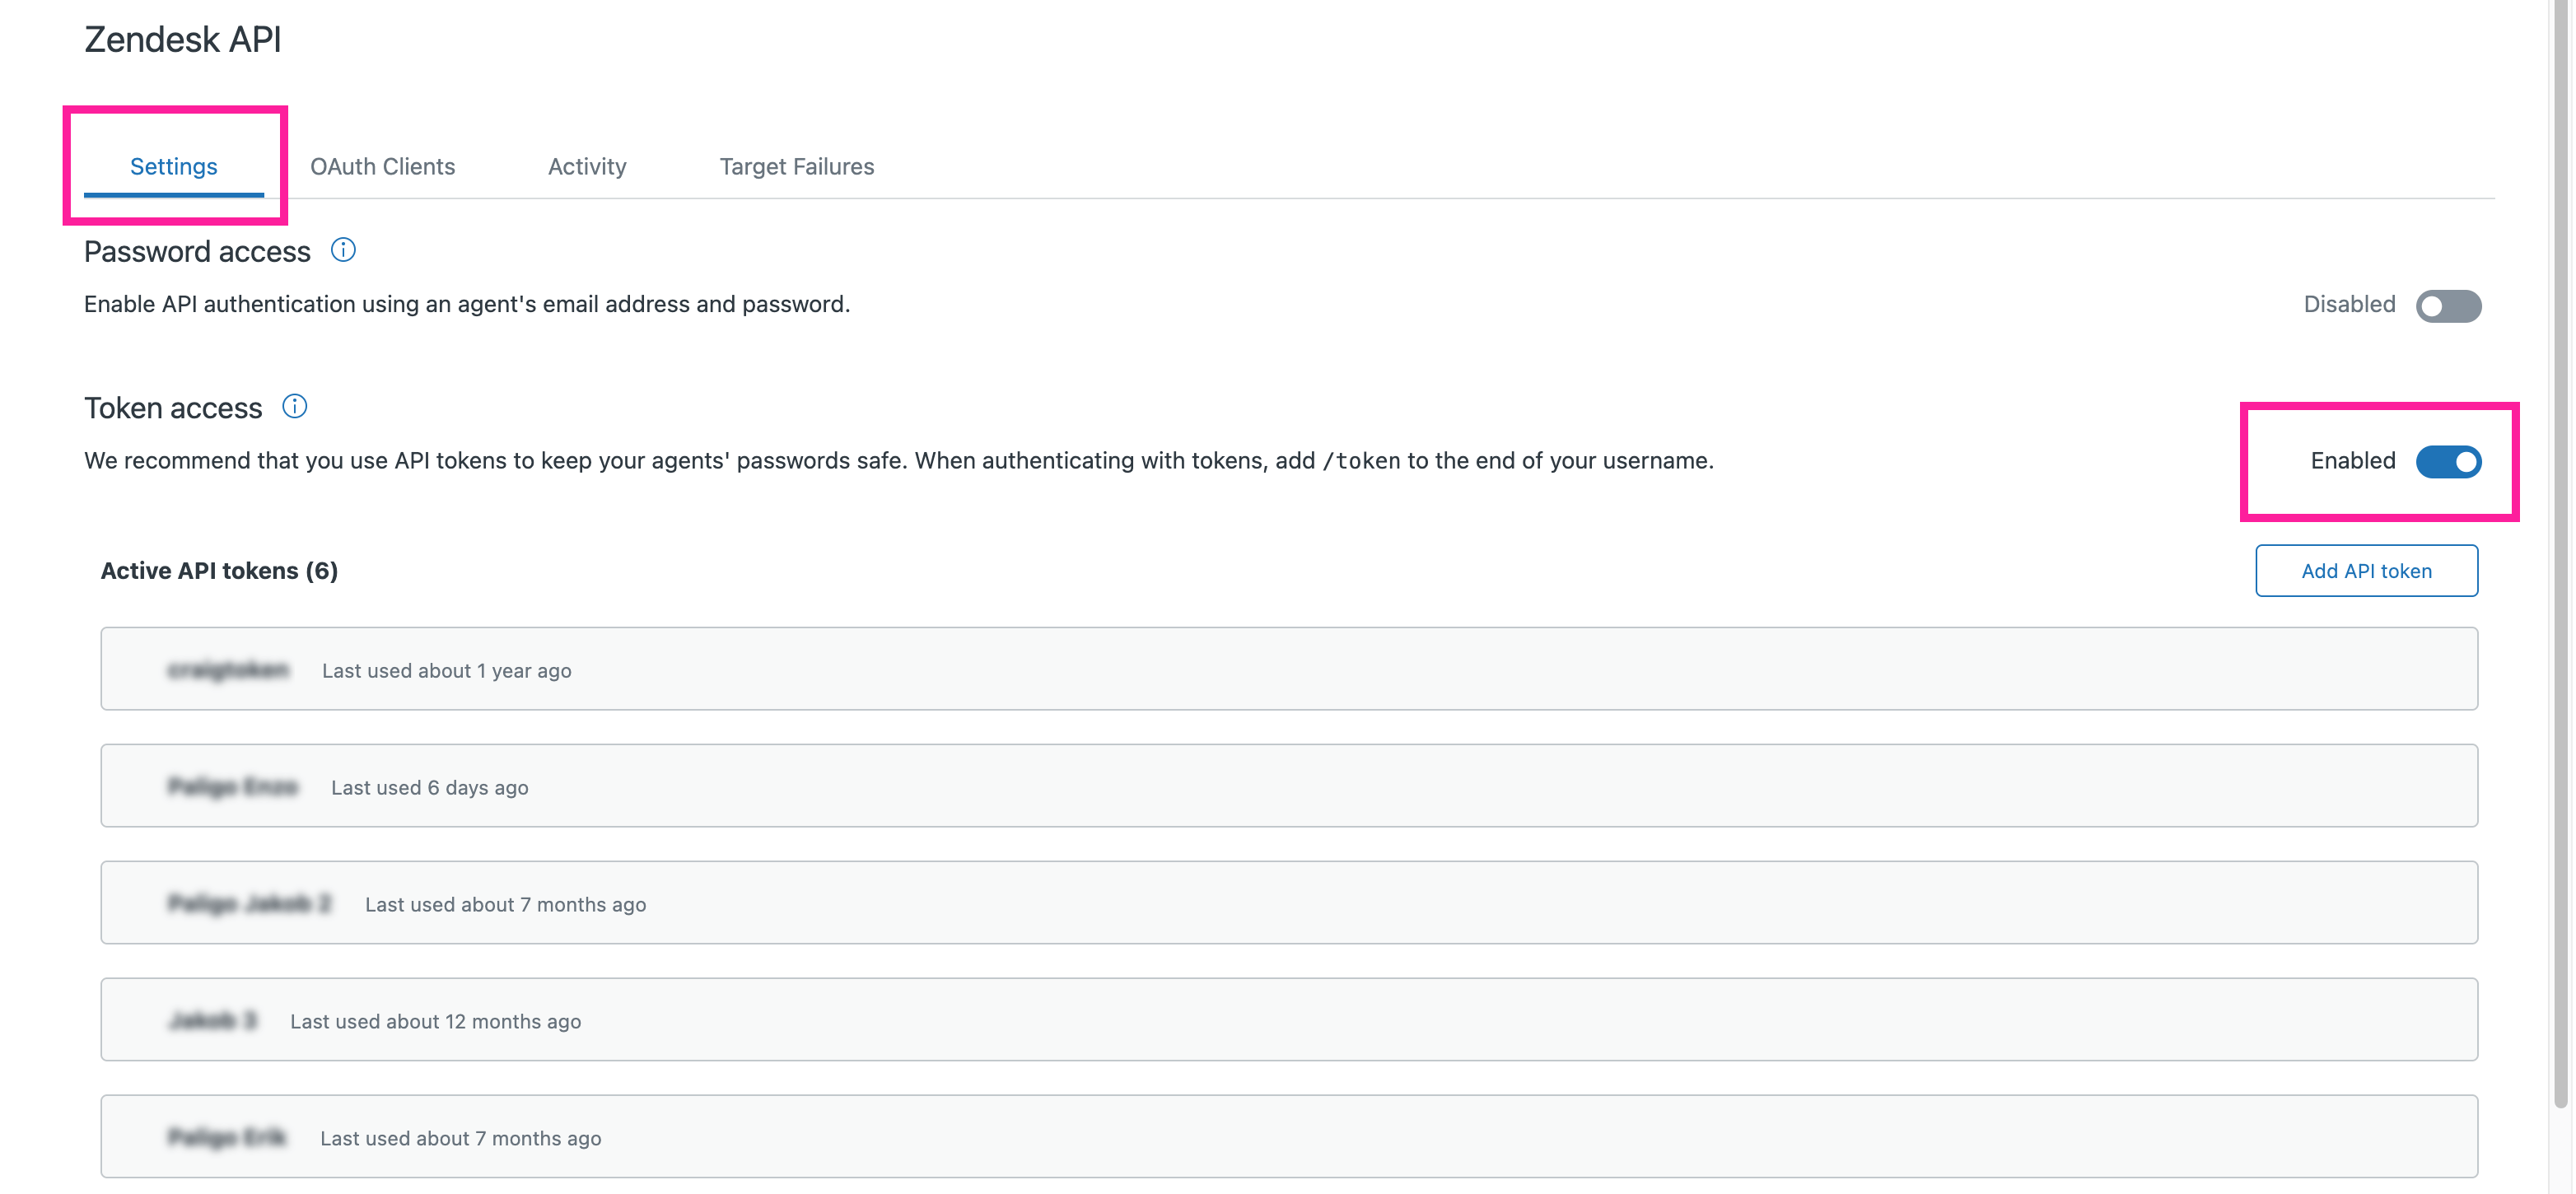
Select Add API Token.
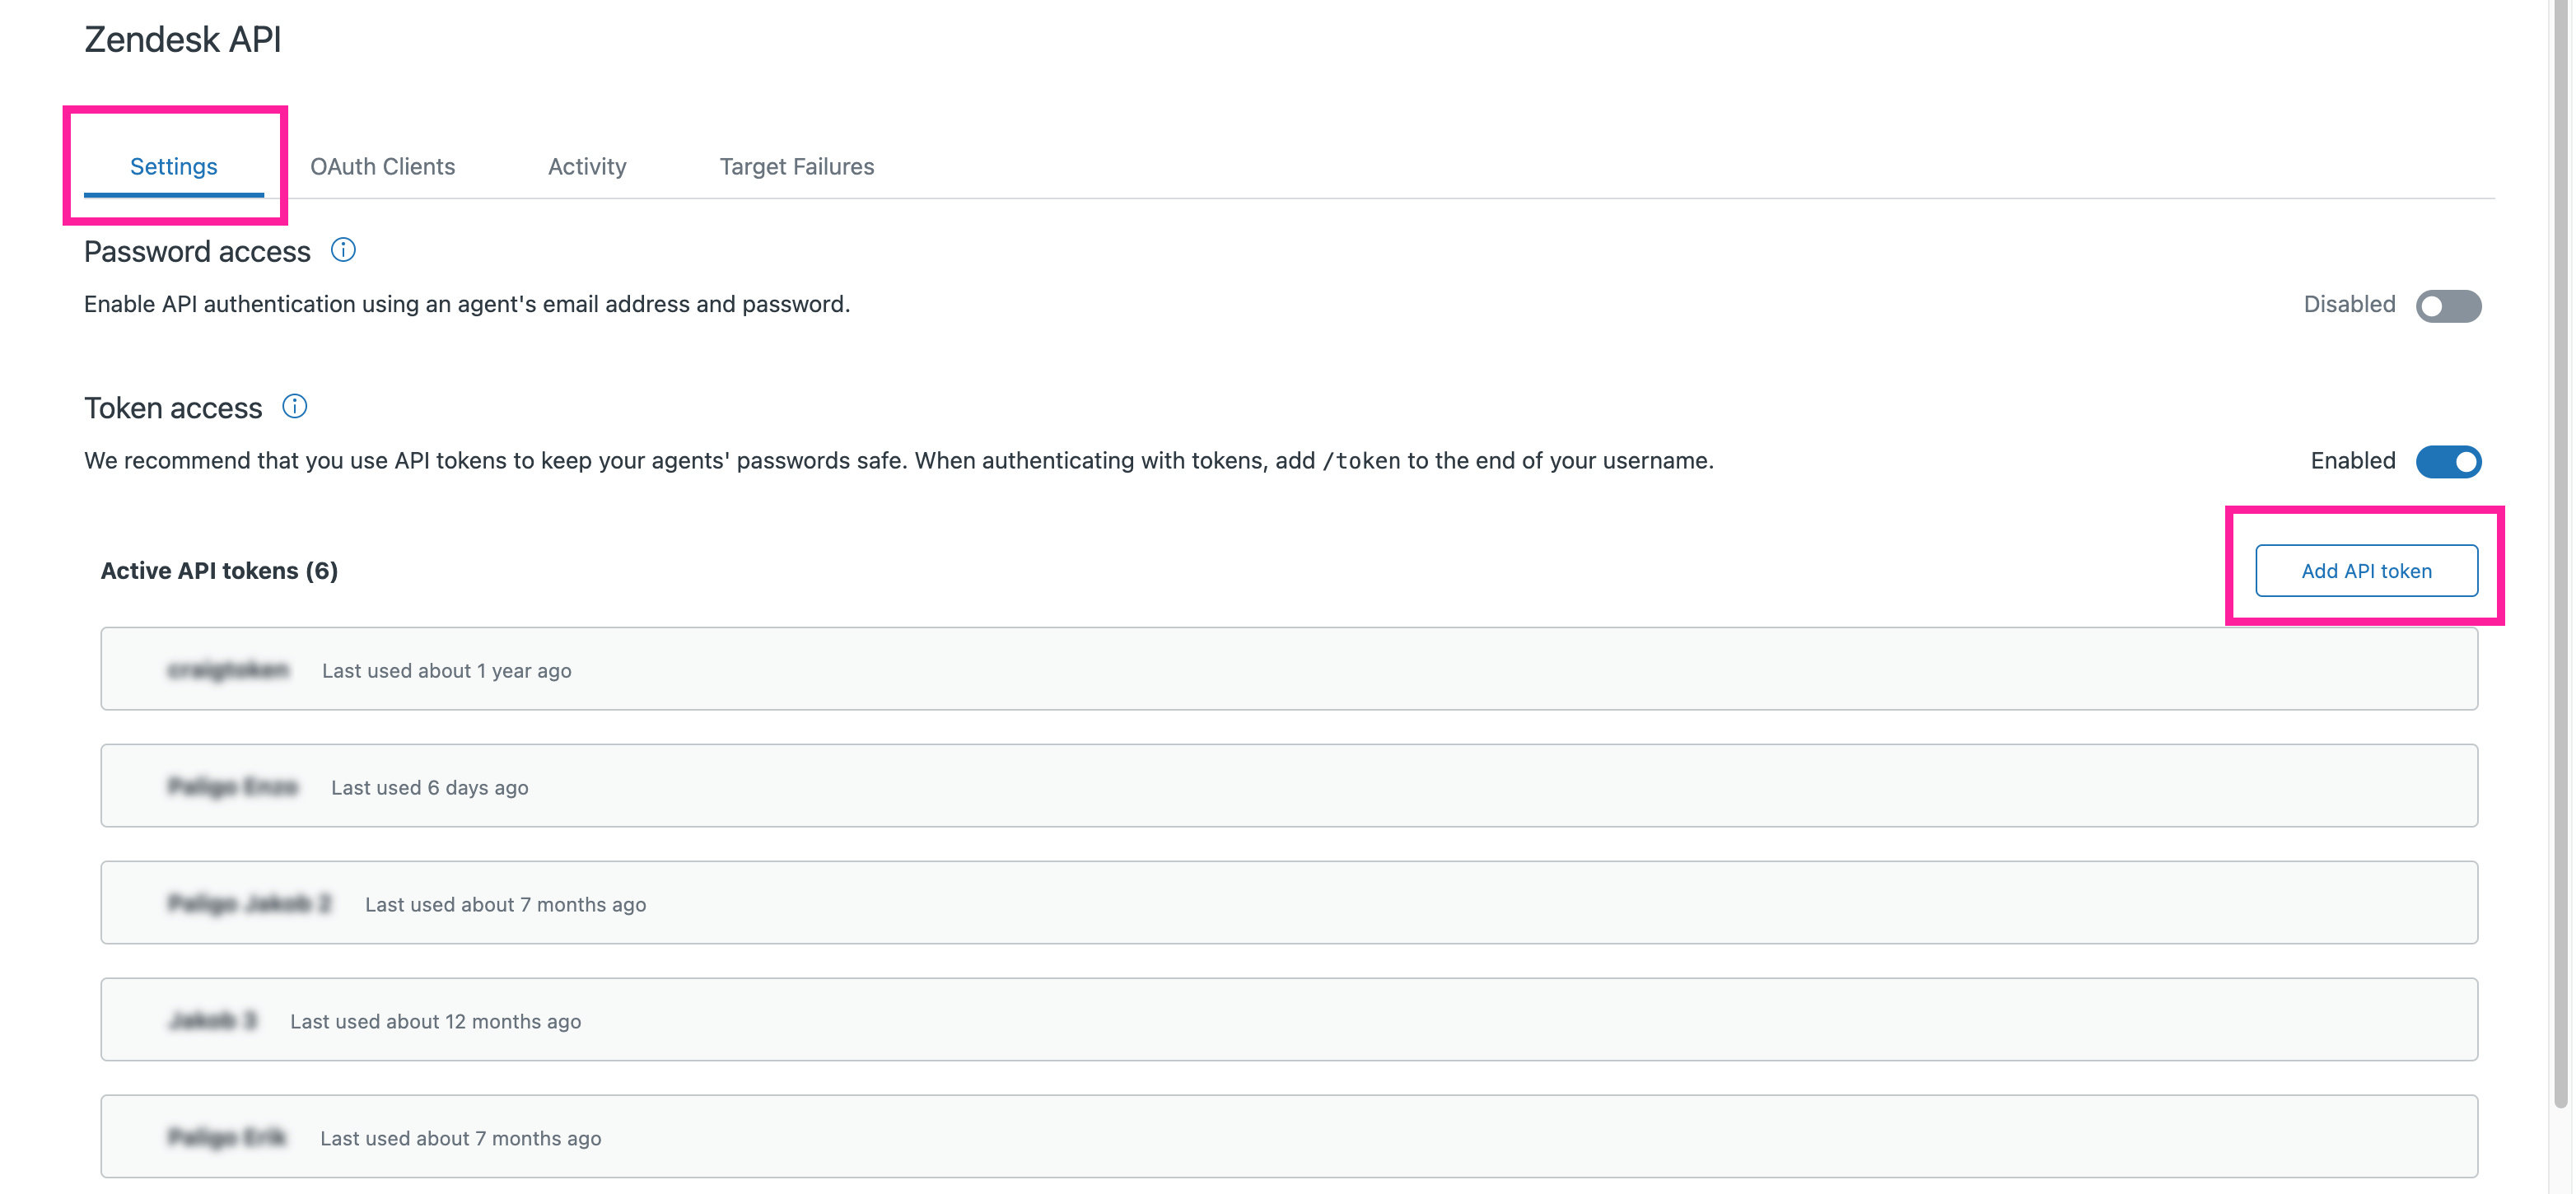
Enter a name for the API token in the API Token Description field.

Select Copy to copy the API token to your computer's clipboard.

Important
You must copy the API token as it is not shown again after you exit the page.
When you have an API token from your Zendesk account, you can set up an integration in Paligo. The integration allows Paligo to connect to your Zendesk and:
Import content when you first migrate from Zendesk to Paligo
Publish content from Paligo to Zendesk.
To connect Paligo to Zendesk:
Sign in to Paligo using a user account that has administrator permissions.
Select the avatar in the top-right corner.

Select Settings from the menu.

Select the Integrations and webhooks tab.

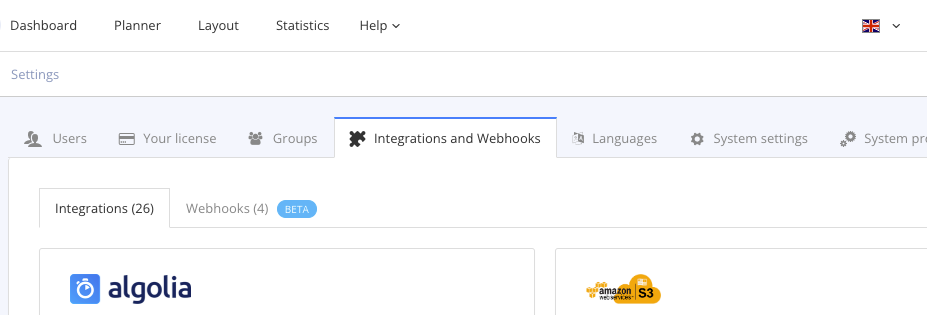
Enter the connection details for your Zendesk:
Note
The user needs to have "Manager" permissions in your Zendesk Knowledge account.
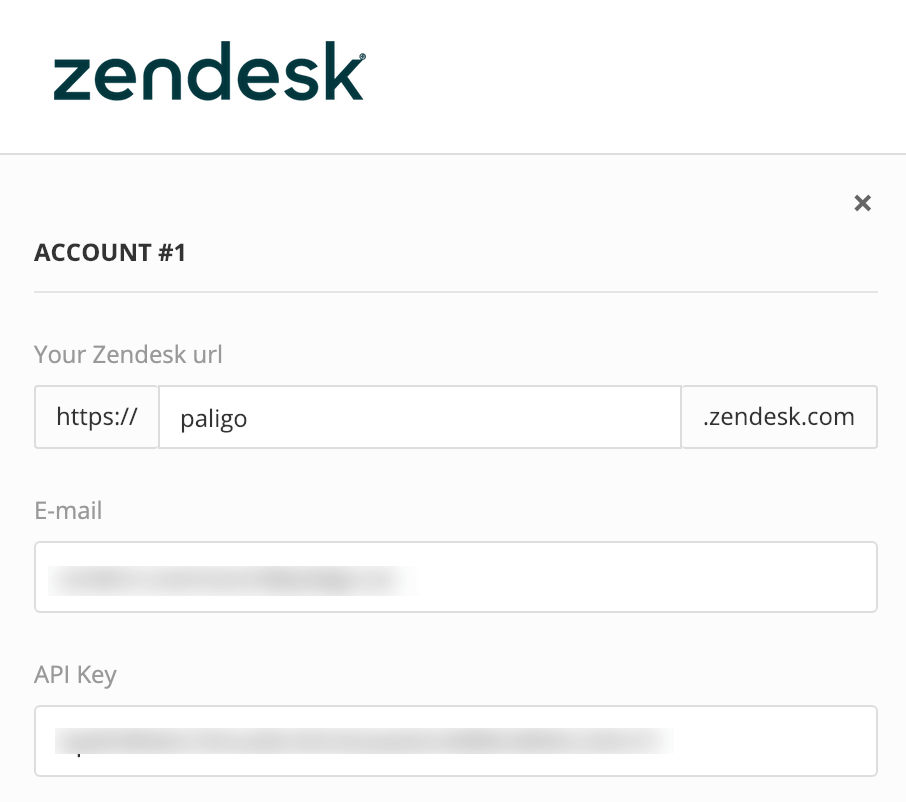
Your Zendesk URL: Enter the web address of your Zendesk.
E-mail: Enter your e-mail address.
API key: Paste the API key into this field. Paligo and Zendesk use the API key to authorize the connection.
Use the Visible to setting to choose who can see the articles that Paligo creates or updates in Zendesk. The Visible to group is sometimes called the User Segment Group in Zendesk. Click on the Visible to field to select from the groups configured in the selected account. Multiple groups can be selected. Use the x button to remove any unwanted groups.
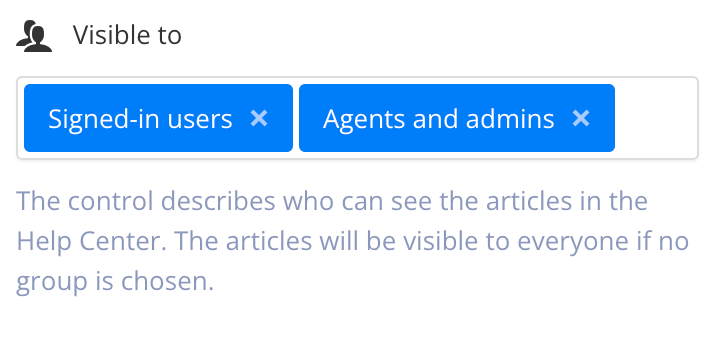
Note
Paligo uses the Visible to settings configured in the integration as the default for all articles when you publish to Zendesk, unless you configure specific groups in the Publish window.
The Zendesk Preflight feature has Visible To settings for each article. The article settings take priority over the default settings, as well as those configured in the Publish settings.
Note
If the Visible to field is left empty in the configuration (as well as in the Publish settings), the output will be visible to everyone.
Select the Change button for the integration.
Select Test Settings to run a connection test.

If the settings are:
Correct, Paligo shows a green success notification.
Incorrect, Paligo shows a red failure notification.
Check each connection setting carefully, to make sure you have not made any mistakes and try again.
If the connection test continues to fail, contact Paligo support for assistance.
Note
If you have a multi-brand account, the connection test checks all of the accounts provided. The test will fail if Paligo is unable to connect to any of the accounts.
You have now set Paligo to connect to your Zendesk(s).
Now let's publish your content to Zendesk.
Select the dotted menu (...) for the topic or publication in the Content Manager.
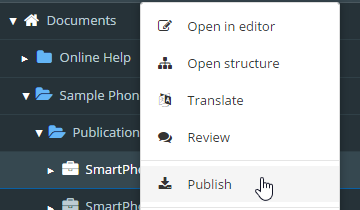 |
Select Publish.
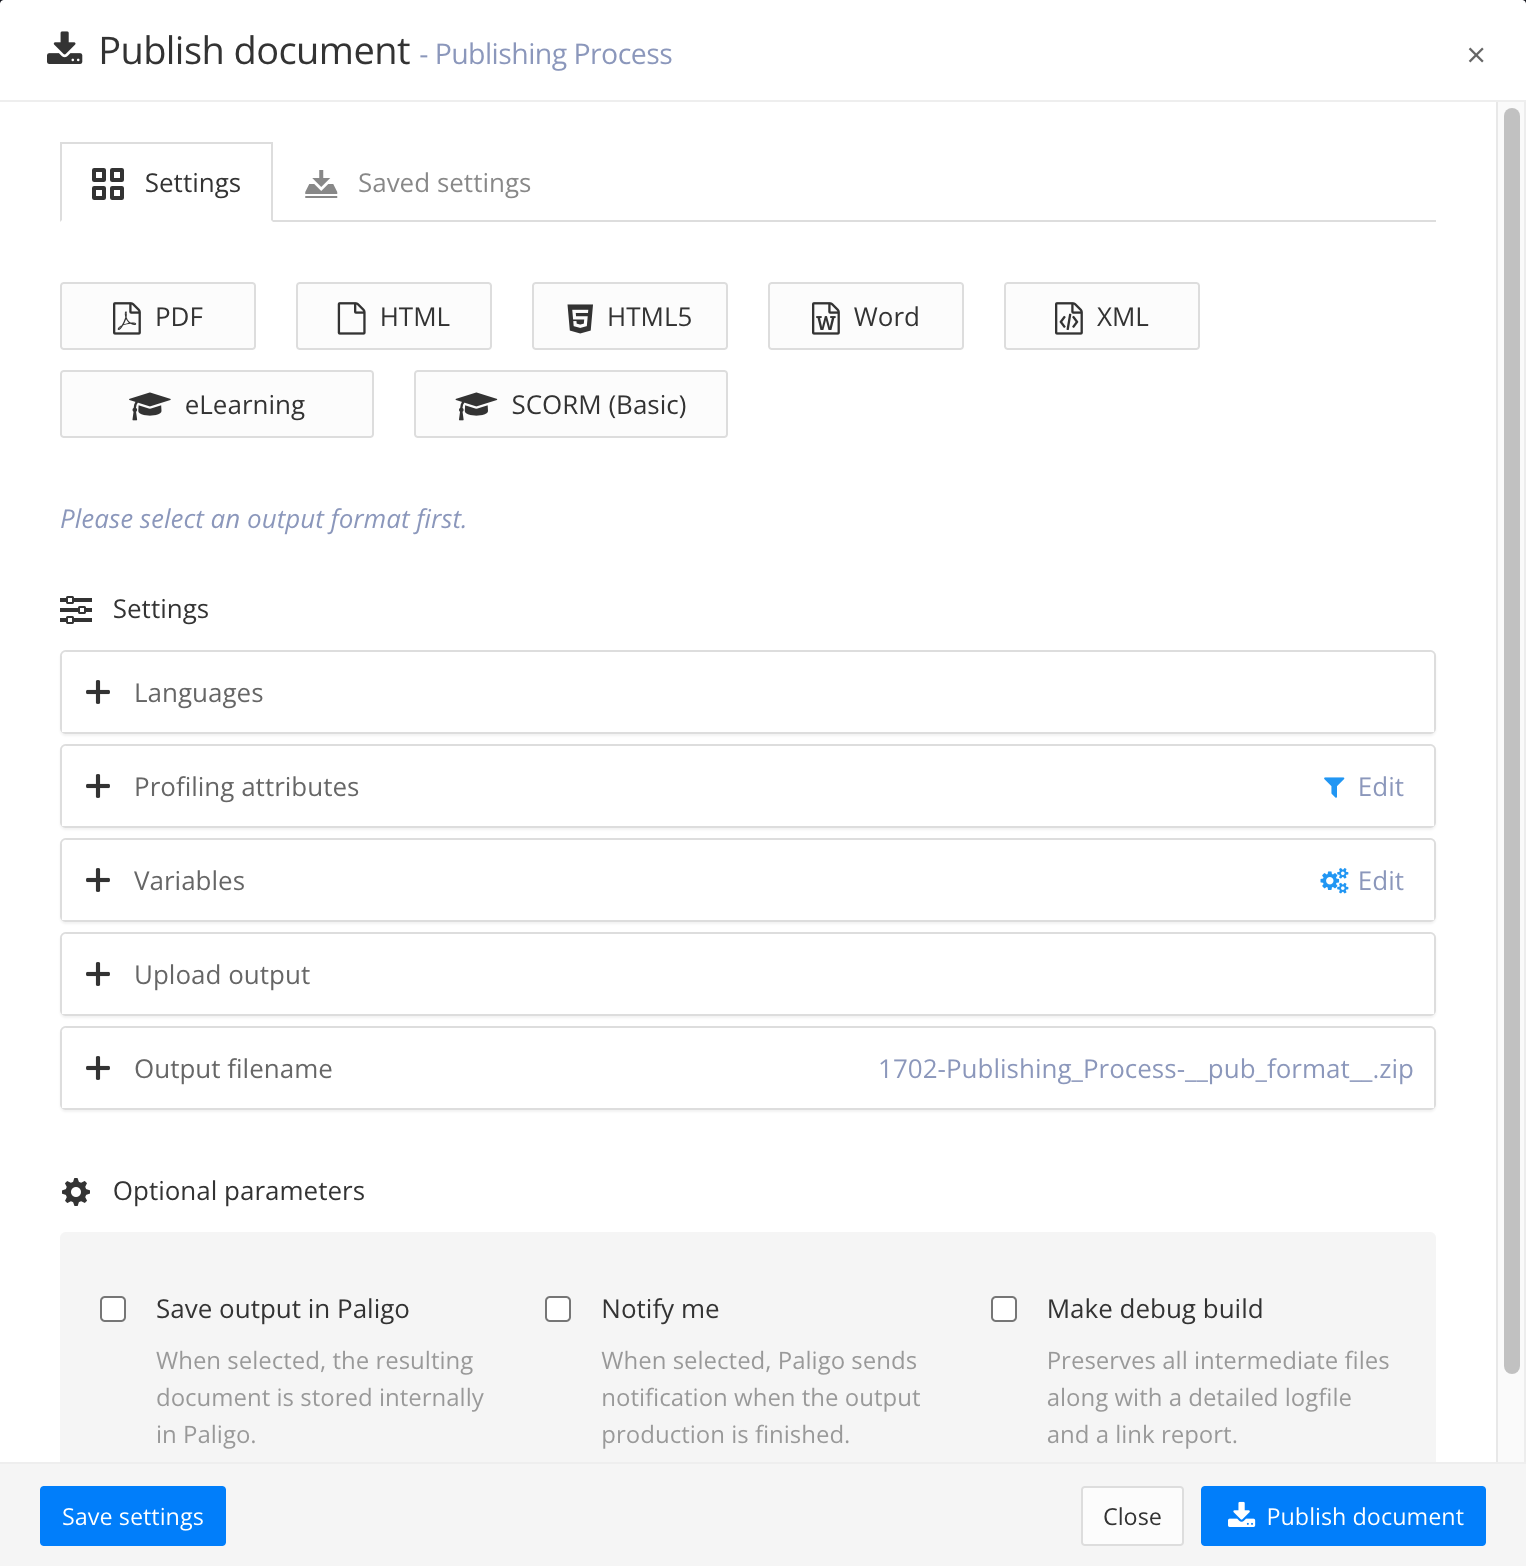 |
Paligo displays the Publish document dialog.
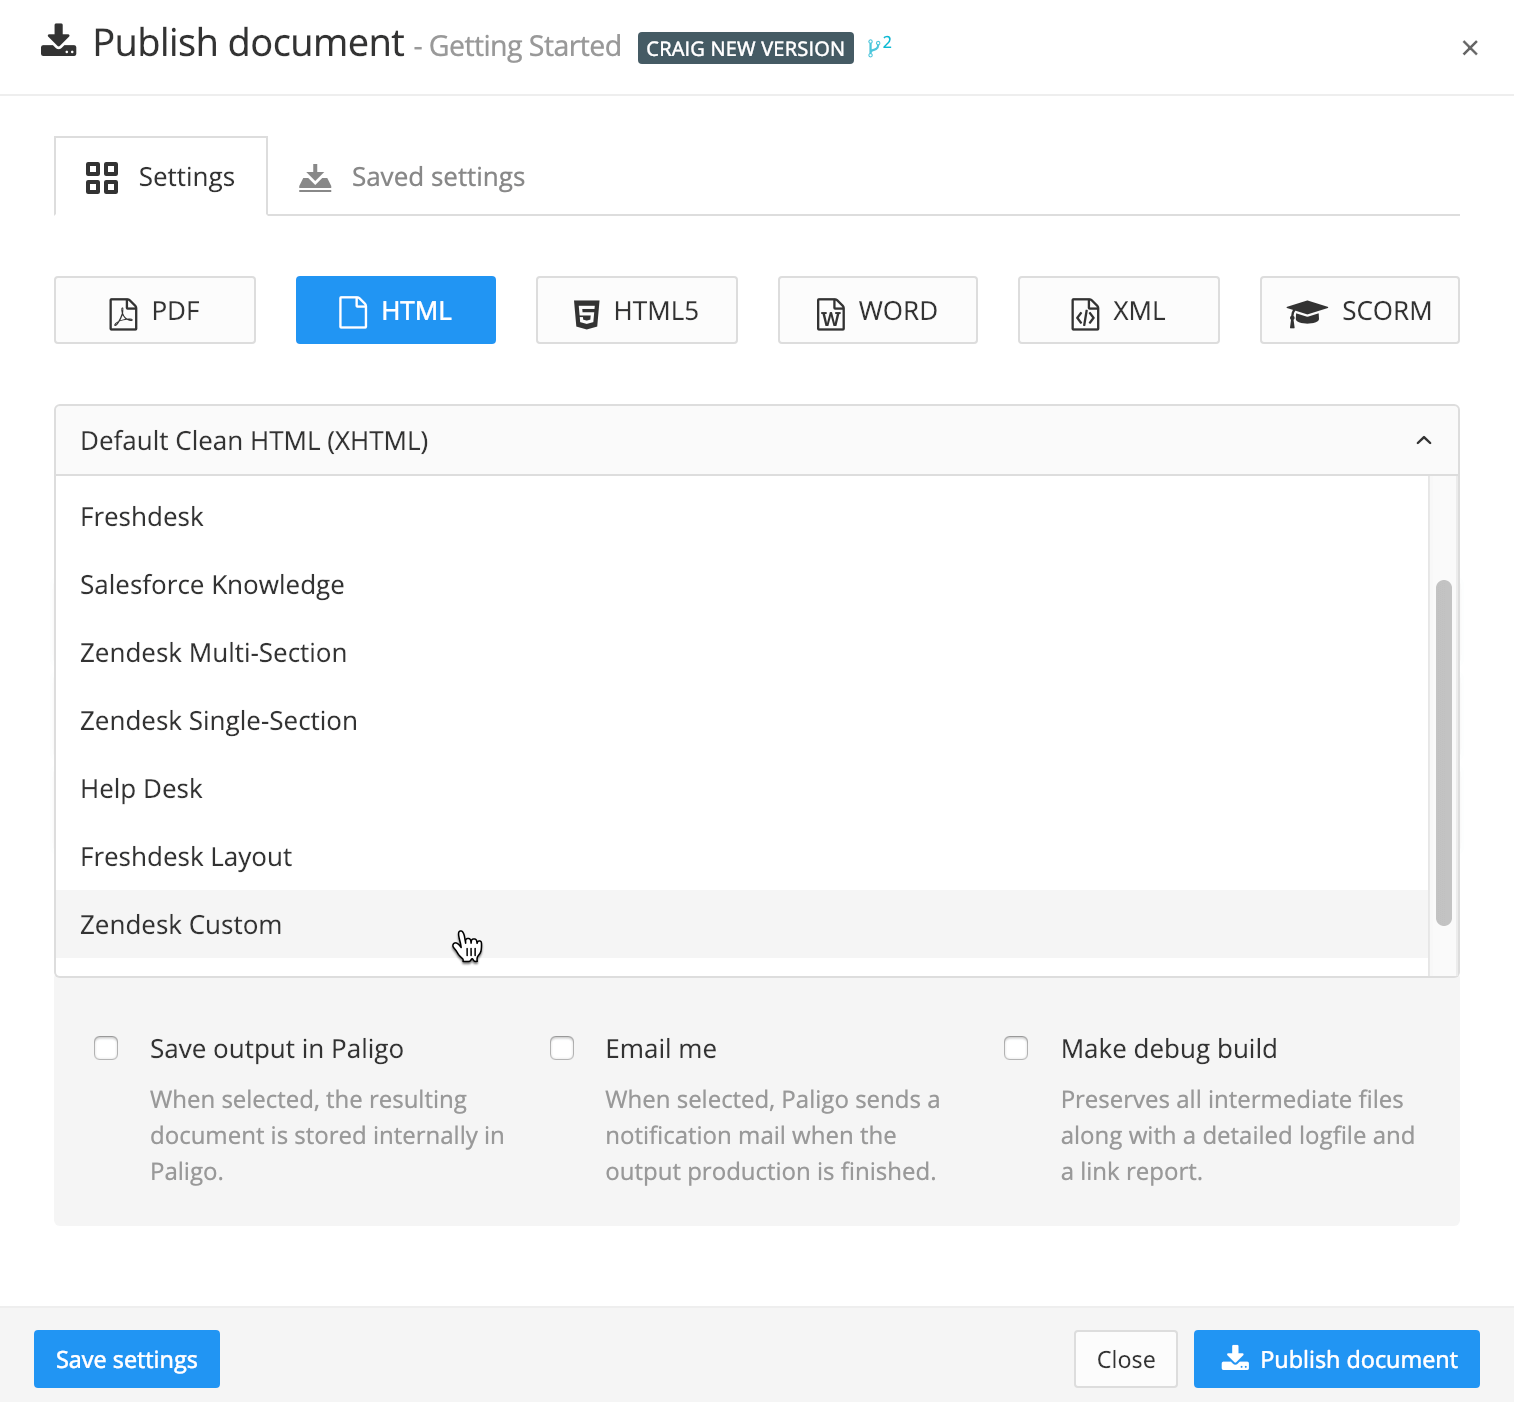
On the Settings tab, select HTML.
Choose the Zendesk layout that you want your publication to use.
The different types of Zendesk layout map content to Zendesk differently, so it is important that you choose a layout that meets your requirements. To find out how each layout maps content to Zendesk, see Zendesk Layouts.
 |
Choose the Zendesk category that will receive your selected Paligo content.
 |
Use the Managed by setting to choose which types of user can edit and publish the articles that Paligo creates or updates in Zendesk. The Managed by setting is sometimes called Permission Group in Zendesk.
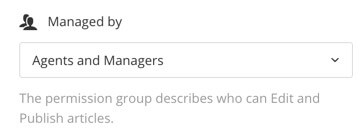 |
This setting is applied as the default for all articles that Paligo publishes to Zendesk, but you can have different settings for individual articles as well. The individual settings take priority over the default settings. You set Managed By for individual articles on the Zendesk Preflight tab.
Use the Visible to setting to choose who can see the articles that Paligo creates or updates in Zendesk. The Visible to group is sometimes called the User Segment Group in Zendesk. Click on the Visible to field to select from the groups configured in the selected account. Multiple groups can be selected. Use the x button to remove any unwanted groups.
 |
Note
Paligo uses the Visible to settings configured in the integration as the default for all articles when you publish to Zendesk, unless you configure specific groups in the Publish window.
The Zendesk Preflight feature has Visible To settings for each article. The article settings take priority over the default settings, as well as those configured in the Publish settings.
Select the languages to be published.
 |
Note
If no translations are available, only the Source Language will show. If you have multiple languages translated and approved, you can select which ones to include. Paligo will publish each language as a separate output.
For PDF output you can publish them as one multilingual publication, check the Combine selected languages box.
If your content is set up to use Filtering / Profiling, use the Profiling attributes section to apply them. [Optional]. If you do not use filtering, ignore this setting.
Select Edit and then choose the value for each filter that you want Paligo to use. For example, for Audience, choose Expert to include content that is marked as for expert users.
If you do not want to apply a filter, leave the field blank.
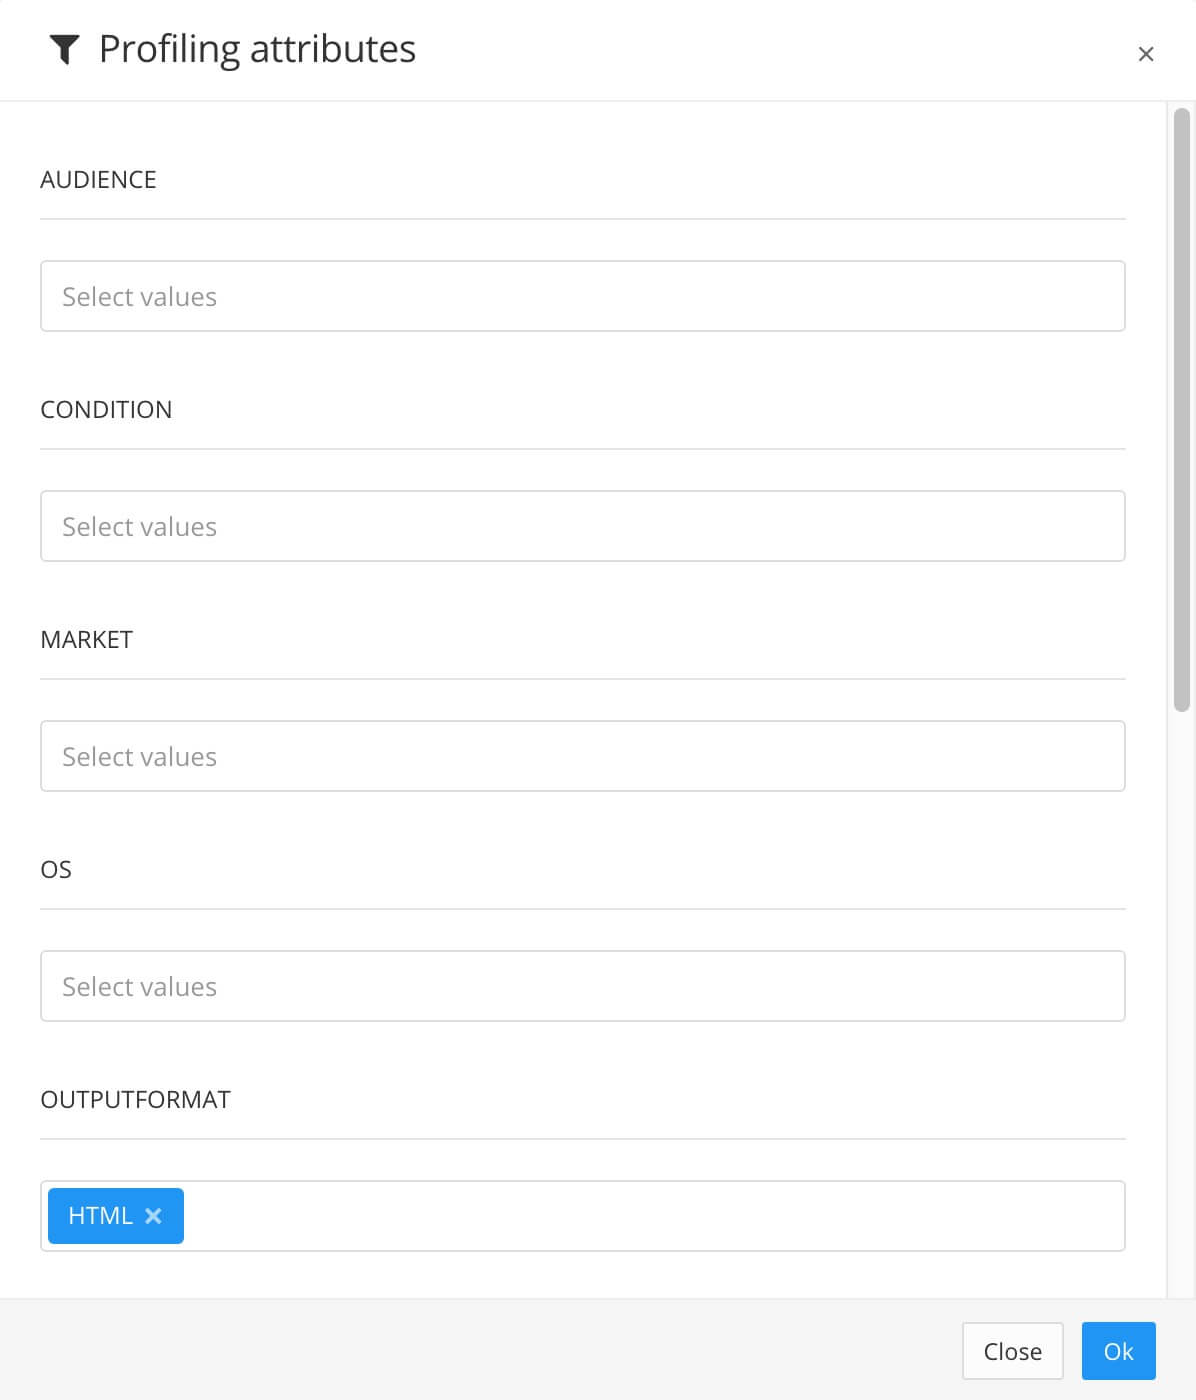 |
Select OK to add your chosen profiling attribute(s).
 |
Use the Output filename section to control the filename.
By default, Paligo will use the filename syntax that is defined in the System Settings.
 |
To change the information included in the filename, enter your preferred format in the publishing settings. Default is: ID-Title-Format.
You can use:
ID - The ID of the document.
Title - The title of the publication or topic that you are publishing.
Format - The name of the output format, for example, PDF or HTML5.
Edit date - The date that the publication or topic was last edited.
Branch label - The text from the branch label for the publication or topic. This only applies if your content has been branched and it has a branch label. For details, see Add or Edit Branch Labels.
Unique value - A random string of characters, generated by Paligo, that is added to the filename to make it unique. This can stop the file from being overwritten by later publishes of the same document.
Tip
If you type @ into the field, Paligo displays a list of the available values and you can select from the list. To remove a value, click in it and use the delete key or backspace key to remove all of its characters.
Note
The filename shown in the top-right corner is a preview of the filename that Paligo will use when you publish.
Set the Optional Parameters (leave unchecked if you do not want these features):
Save the output in Paligo - Check the box to save the zip file that Paligo creates when you publish. The zip file will be available from the Resource View and you can download it from the Saved Outputs tab. Clear the box if you don't want Paligo to store the zip file.
Notify me - Check this box if you want Paligo to send you an email when the publication is ready. This is useful if you have very large publications that can take a longer time to process and publish.
Make debug build - Check this box if you want Paligo to include a log file and link report. If there is an issue with your content, Paligo support may ask you to enable this feature so that they can use the log files to investigate.
Select the Zendesk Preflight tab to View the Paligo-to-Zendesk Mapping.
If you are happy with the existing mapping, you can proceed to the next step.
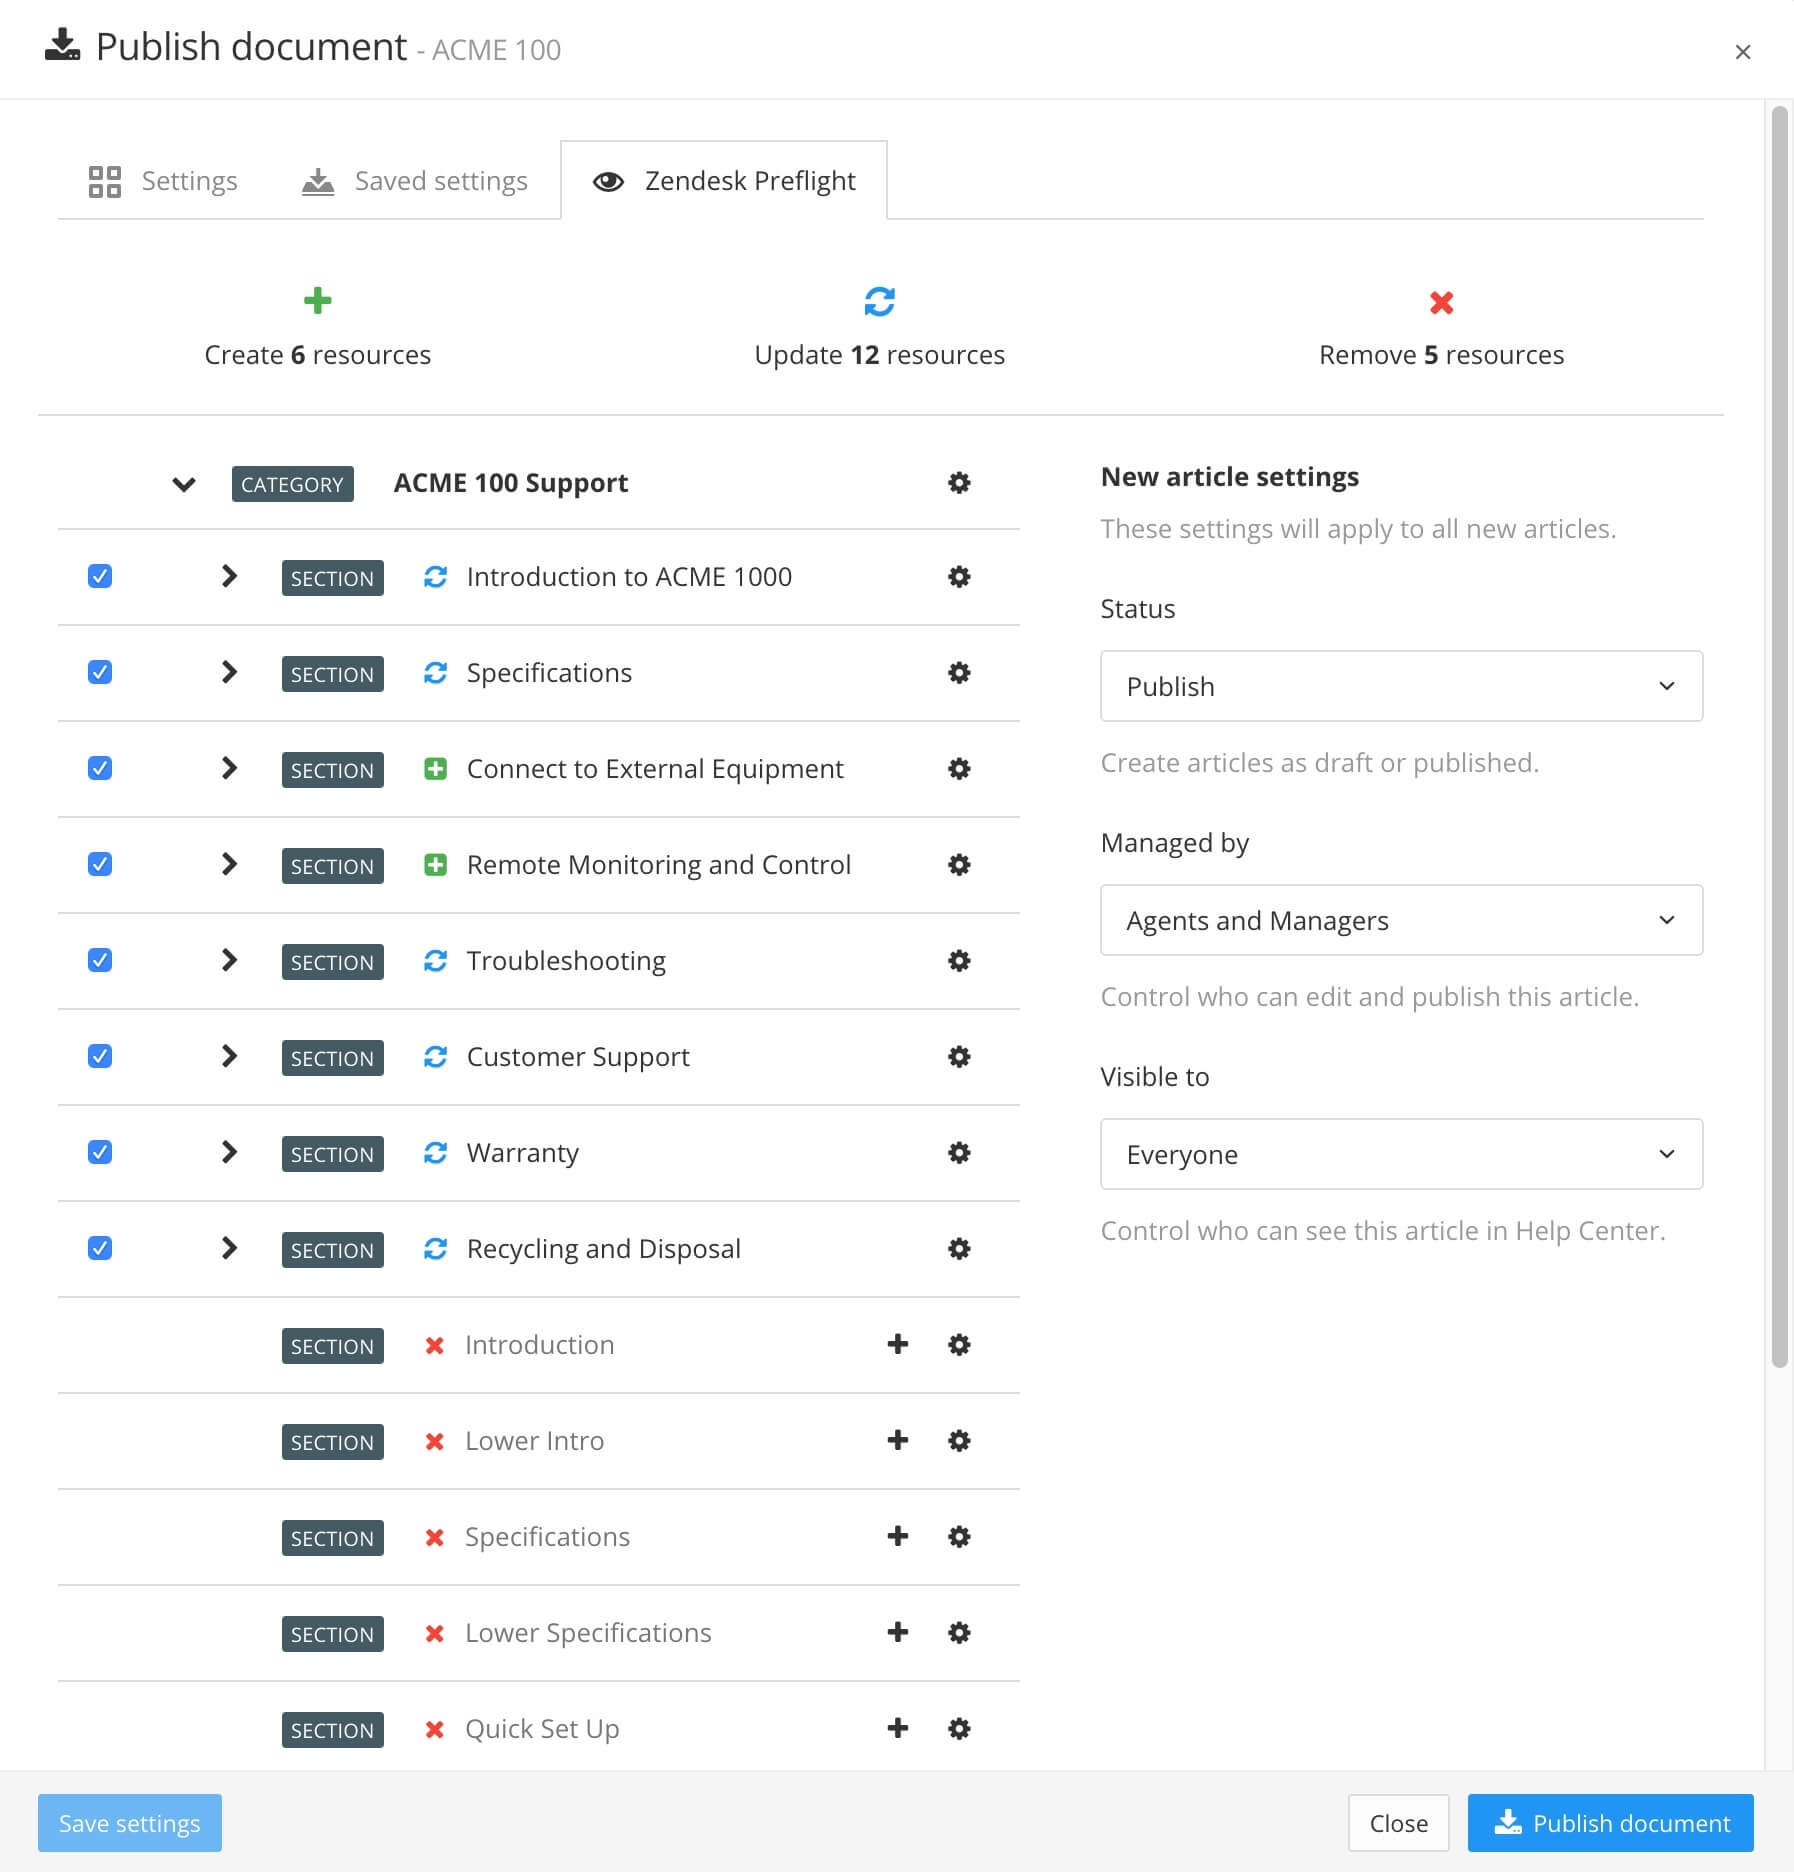 |
To change the mapping, use the various settings on the Zendesk Preflight tab. You can map the Paligo topics to different sections and articles, change the Managed By and Visible To status, set the topics to be draft or publish, and promote them as needed. To find out more, see Customize Paligo-to-Zendesk Mapping.
Select Publish Document.
Paligo starts processing your content and applies your layout and publishing settings. The time that this takes varies depending on how much content you are publishing (the more content, the longer it takes).
 |
A progress bar appears. Select the arrow to hide the progress bar and reopen it by selecting the progress clock in the top menu. To abort the publish, select the X.
The published output appears as:
A ZIP file with the published output appears in the downloads folder on your computer.
If you have altered your browser's settings to store downloaded files somewhere else, the zip file will be found there instead.
If you are using a publishing integration, the zip file will also be sent to the relevant service.
A link in the Activity Feed Panel to download the published content.
Note
To make the content available online, first unzip the file. You can then use the file locally or you can use an FTP client, such as Filezilla, to upload the unzipped content to a web server.
Tip
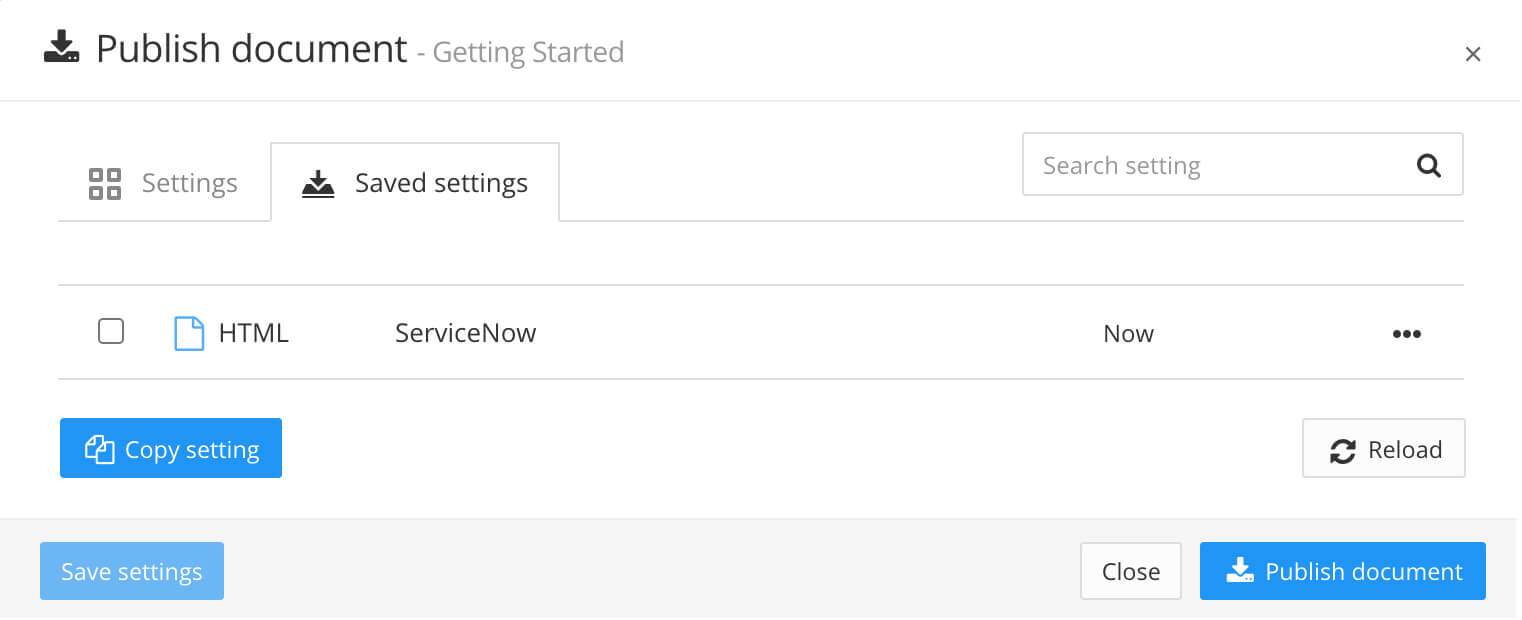
You can save your publishing settings and reuse them to achieve a smoother publishing process, see Publishing Settings. Any settings you save can also be used for Batch Publishing.
 |
When Paligo publishes to Zendesk, a compressed file downloads in your browser. The first time you publish to Zendesk, you will need to add some of the downloaded files to your Zendesk.
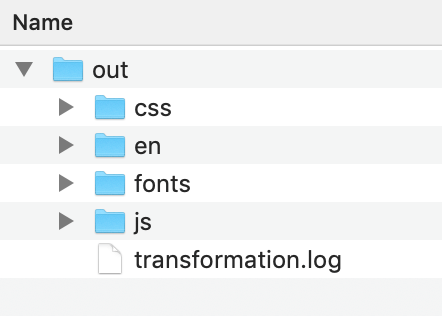
When you publish to Zendesk, Paligo downloads a package in your web browser. The package contains CSS and javascript files, which are used to provide certain functionality and styles in Zendesk. You can add some or all of these assets to your Zendesk, depending on what functionality you want to include.
The CSS and JS files are:
JS
paligo-zd.js
Provides a range of functionality, including "accordion" collapsible sections, syntax highlighting for code, and checklists.
paligo-zd-lightbox.js and lightbox-min.js
These provide the "lightbox" feature, where you can select an image to view a larger version of the image
paligo-zd-glossary.js
Provides a popup on the glossary terms in your content. The popup contains the glossary term definition.
paligo-swagger.js
Allows swagger/Open API content to be embedded in Zendesk articles.
paligo-stickymenu.js
Adds a sub-navigation menu in the sidebar. This contains links to the sections inside an article. It also makes the menu "sticky" - it stays in view on the page even when you scroll down, and will scroll separately for long articles.
paligo-anchorlinks.js
Adds a "Click to copy" option to each heading, so that you can quickly copy the URL for that heading.
bootstrap-min.js
Provides the bootstrap framework that is needed for some of the javascript features, such as the glossary popups.
CSS
paligo-zd.css
Includes some basic styling to improve the overall look and feel of your articles, and also supports the functionality in the javascript files.
You can use this as a starting point for your styling. But you should check that the paligo-zd.css styles do not clash with any base styles you already have in Zendesk. If the styles do clash, you will need to make some overrides in your CSS or choose which styles you want to include/exclude.
paligo-stickymenu.css
Contains the styling for the "sticky menu" feature that's provided by paligo-stickymenu.js
lightbox.min.css
Contains the styling for the "lightbox" feature that's provided by paligo-zd-lightbox.js and lightbox.min.js.
You can find these files in the css and js folders in the zip file that is downloaded in your browser when you publish to Zendesk.
 |
The first time that Paligo publishes to your Zendesk, you should add the CS and JS files to the Zendesk Assets :
Open the zip file that is downloaded when you publish.
Log in to your Zendesk help center.
Click the Knowledge Admin icon at the top right.
Select the Customize Design feature, and then choose the active theme and select Edit Code.
Select the Assets folder.
Find the JS > Zendesk folder and the CSS > Zendesk folder in the downloaded package. These contain the CSS and javascript files you need to add to your Zendesk assets. You can ignore the other files in the downloaded package.
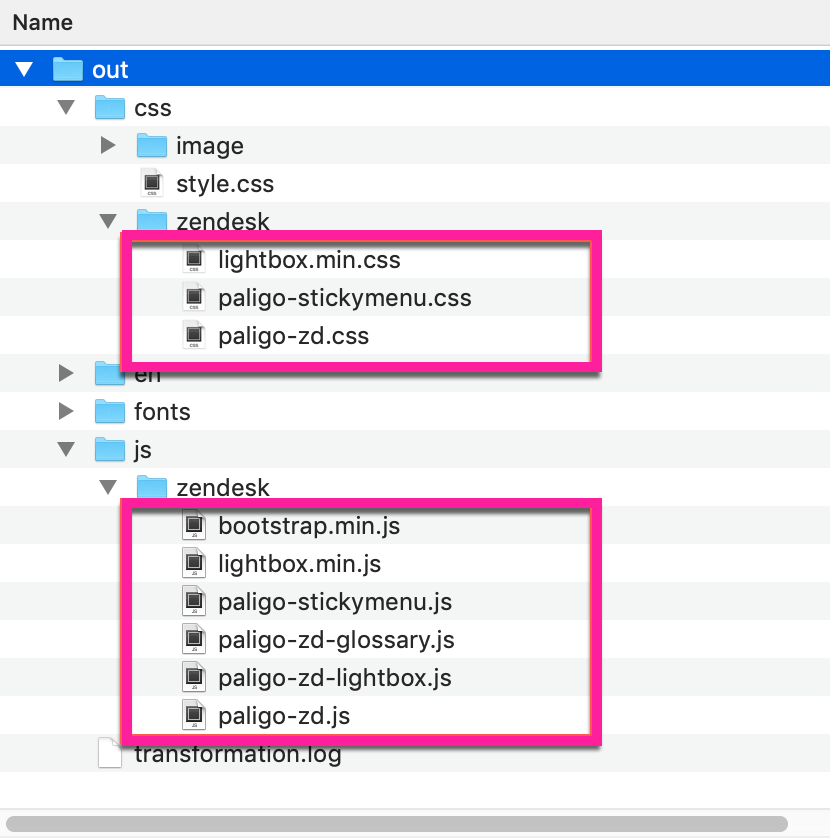
Decide on which JavaScript and CSS files you want to use and then add them to the Assets in Zendesk.
We recommend that you include references to: paligo-zd.js, paligo-zd.css, and bootstrap.min.js. You should also include a reference to the jquery.min.js script.
paligo-zd.js
paligo-zd.css
bootstrap.min.js
jquery.min.js (this is a script that is provided externally, and the details for this reference are included in step 9).
The other references are optional. But if you decide to use a feature, remember to include all of the files that are needed for it, for example, glossary popups require paligo.zd-glossary.js and bootstrap.min.js, and the lightbox feature needs paligo-zd-lightbox, lightbox.min.js and lightbox.min.css as well as the jquery reference.
In the Zendesk theme, open the Templates folder and then select document_head.hbs.
Add a reference to each file, and also to the "Font Awesome" stylesheet (it is hosted, so there is no need to upload it to the Zendesk assets).
The following example shows the syntax for the references (and assumes that you have not renamed the package files). We have separated the references with comments so that you can see which references you need to include for the features you want.
<! -- reference for jquery script -->
<script src="https://ajax.googleapis.com/ajax/libs/jquery/3.5.1/jquery.min.js"></script>

<! -- reference for bootstrap script -->
<script src="{{asset 'bootstrap.min.js'}}"></script>

<! -- reference for fontawesome -->
<link href="https://maxcdn.bootstrapcdn.com/font-awesome/4.7.0/css/font-awesome.min.css" rel="stylesheet"/>

<! -- reference for "copy to copy" anchorlinks -->
<script src="https://cdnjs.cloudflare.com/ajax/libs/clipboard.js/2.0.0/clipboard.min.js"></script>

<! -- reference for paligo-zd scripts and css.
Note that the first two references are for code syntax highlighting and they must come
before the reference to the paligo-zd.js file. You can leave those out if you do not want to use
syntax highlighting -->

<link rel="stylesheet" href="https://cdnjs.cloudflare.com/ajax/libs/highlight.js/9.5.0/styles/androidstudio.min.css"/>
<script src="https://cdnjs.cloudflare.com/ajax/libs/highlight.js/9.5.0/highlight.min.js"></script>
<script src="{{asset 'paligo-zd.js'}}"></script>
<link href="{{asset 'paligo-zd.css'}}" rel="stylesheet" type="text/css" />

<! -- references for lightbox scripts and css --><script src="{{asset 'lightbox.min.js'}}"></script>
<script src="{{asset 'paligo-zd-lightbox.js'}}"></script>
<link href="{{asset 'lightbox.min.css'}}" rel="stylesheet"/>

<! -- references for stickymenu scripts and css -->
<script src="{{asset 'paligo-stickymenu.js'}}"></script>
<link href="{{asset 'paligo-stickymenu.css'}}" rel="stylesheet" type="text/css" />

<! -- reference for glossary scripts and css -->
<script src="{{asset 'paligo-zd-glossary.js'}}"></script>
Note
The references use the Zendesk curly brackets syntax to refer to uploaded assets.
Note
If you have included the references for code syntax highlighting (in the paligo-zd references), you do not need to upload any files. The necessary files are loaded from a cdn.
Select Publish to save the settings in Zendesk.
You have now uploaded the relevant packaged files from Paligo into Zendesk, and set your Zendesk article pages to reference the files.
Zendesk enterprise plans have a multibrand feature where you can have a main Zendesk domain and also subdomains for different brands. For example, you could have acme.zendesk.com as your main domain, and then acme100.zendesk.com as a subdomain and acme200.zendesk.com as another subdomain. Paligo can publish to the top-level categories in the main Zendesk domain or those in a subdomain.
Note
Paligo can publish to top-level categories in a brand. You cannot publish Paligo content to lower-level categories.
Before you set up Paligo to publish to multiple subdomains (brands), make sure that:
Your Paligo plan includes multibrand support. It is included in the Paligo enterprise plan. On other Paligo plans, you can only publish to the main domain (or you could set up a Zendesk subdomain as the main domain in Paligo).
You have made the necessary preparation for connecting Paligo to Zendesk.
You have set up the various brands you want to use (in Zendesk). They all need to have a URL for their subdomain.
For details, see the official Zendesk documentation.
With these prerequisites in place, complete the following steps (1-4).
To connect to Zendesk, Paligo needs an API key. You can generate the API key in Zendesk and then copy it to Paligo.
Log in to your Zendesk account.
Note
You need to log in via a user account that has administrator permissions.
Display the Zendesk Admin Center. (Select the Zendesk Products icon and then select Admin Center).

In the Apps and Integrations section, select Zendesk API.

On the Settings tab, set Token Access to Enabled. This allows you to create API tokens.

Select Add API Token.

Enter a name for the API token in the API Token Description field.

Select Copy to copy the API token to your computer's clipboard.

Important
You must copy the API token as it is not shown again after you exit the page.
When you have an API token from your Zendesk account, you can set up an integration in Paligo. The integration allows Paligo to connect to your Zendesk and:
Import content when you first migrate from Zendesk to Paligo
Publish content from Paligo to Zendesk.
If your Paligo plan includes multibrand support and you have Zendesk multibrand, you can publish to a top-level category in any of your brands. You can choose which brand and category to use for publishing in Paligo's integration settings.
Tip
To upgrade to a multi-brand account, please contact Paligo.
To connect Paligo to Zendesk:
Log in to Paligo via a user account that has administrator permissions.
Sign in to Paligo using a user account that has administrator permissions.
Select the avatar in the top-right corner.

Select Settings from the menu.

In the Zendesk box, select Change.
If the Zendesk integration has not been set up in your Paligo instance previously, select Add instead of Change.
In the Account #1 section, enter the connection details for your main Zendesk brand:

Your Zendesk url: Enter the web address of your main Zendesk brand. This is the primary domain in your Zendesk.
E-mail: Enter the email address of a user with "Manager" permissions for the domain in Zendesk.
API key: Paste the API key into this field. Paligo and Zendesk use the API key to authorize the connection.
Select Save.
Select Change to re-open the Zendesk integration settings again. If Paligo was able to connect to your Zendesk instance, it will detect the categories and permissions automatically. You will be able to select them in the remaining steps of this procedure.
Select the Default category. This is the category that Paligo will publish to by default, unless you choose a different category when you publish.
Paligo automatically detects the categories that are available for the chosen account. Select the category you want from the list.
In the Permission Settings section, choose who can control and view the articles published to the selected account.
Use the Managed by setting to choose which group of Zendesk users can edit and publish articles that Paligo creates/updates in Zendesk.
Choose Admins or Editors and Publishers.
Use the Visible to setting to control who can see the articles that Paligo creates/updates in Zendesk.
Choose Everyone, Signed-in users, or Agents and admins.
Use Set as default to define whether Paligo should use the account as the default for publishing:
Select the Set as default radio button to use this account as the default account for publishing. When you publish, the publishing settings will automatically have this account in place, as the default setting. You can choose to publish to a different account if you wish.
Deselect (clear) the Set as default radio button if you don't want Paligo to use this account as the default account for publishing.

Select Save and then select Test settings.
Paligo attempts to connect to Zendesk. If the connection attempt fails, check the URL, email, API key, and default category ID carefully for errors and make sure the API key is valid.
Note
If you have a multi-brand account, the connection test checks all of the accounts provided. The test will fail if Paligo is unable to connect to any of the accounts.
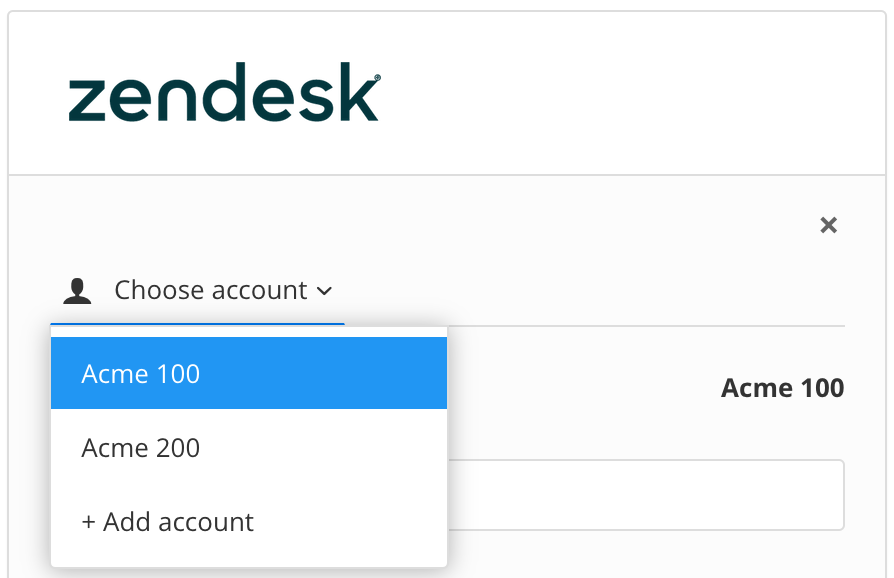
To change an existing account or add another account, select the Choose account drop-down and either:
Select another account that has already been created.
Select Add account to create a new account.
Note
If Paligo does not have the settings for multiple accounts, it is because your Paligo plan does not include multibrand. To upgrade, please contact support.
Edit the settings for the account you selected or added in the previous step.
Set the:
Your Zendesk url - The URL of your Zendesk brand. This is the address of the subdomain for the brand.
E-mail - The email address of a Zendesk user who has "manager" permissions for the brand.
Note
The API Key is the same as the API Key for the primary domain, by default. For multibrand, this is usually appropriate. However, if you wanted to publish to separate Zendesk instances, instead of brands on the same account, you could add an account for each Zendesk instance and then set the different API key for each instance.
Use the other settings to configure the subdomain. The settings work in the same way as on the main brand. The values you put in place are stored separately for each account, so you can have accounts with the same, similar, or completely different settings, depending on what you need.
Select Save and then select Test settings.
This works in the same way as the test on the main brand.
You have now set Paligo to connect to your Zendesk(s).
Tip
To delete an account, see Remove a Zendesk Multibrand Account.
Now let's publish your content to Zendesk.
Select the dotted menu (...) for the topic or publication in the Content Manager.
 |
Select Publish.
 |
Paligo displays the Publish document dialog.
On the Settings tab, select HTML.
Choose the Zendesk layout that you want your publication to use.
The different types of Zendesk layout map content to Zendesk differently, so it is important that you choose a layout that meets your requirements. To find out how each layout maps content to Zendesk, see Zendesk Layouts.
 |
Choose the Zendesk category that will receive your selected Paligo content.
 |
Use the Managed by setting to choose which types of user can edit and publish the articles that Paligo creates or updates in Zendesk. The Managed by setting is sometimes called Permission Group in Zendesk.
 |
This setting is applied as the default for all articles that Paligo publishes to Zendesk, but you can have different settings for individual articles as well. The individual settings take priority over the default settings. You set Managed By for individual articles on the Zendesk Preflight tab.
Use the Visible to setting to choose who can see the articles that Paligo creates or updates in Zendesk. The Visible to group is sometimes called the User Segment Group in Zendesk. Click on the Visible to field to select from the groups configured in the selected account. Multiple groups can be selected. Use the x button to remove any unwanted groups.
 |
Note
Paligo uses the Visible to settings configured in the integration as the default for all articles when you publish to Zendesk, unless you configure specific groups in the Publish window.
The Zendesk Preflight feature has Visible To settings for each article. The article settings take priority over the default settings, as well as those configured in the Publish settings.
Select the languages to be published.
 |
Note
If no translations are available, only the Source Language will show. If you have multiple languages translated and approved, you can select which ones to include. Paligo will publish each language as a separate output.
For PDF output you can publish them as one multilingual publication, check the Combine selected languages box.
If your content is set up to use Filtering / Profiling, use the Profiling attributes section to apply them. [Optional]. If you do not use filtering, ignore this setting.
Select Edit and then choose the value for each filter that you want Paligo to use. For example, for Audience, choose Expert to include content that is marked as for expert users.
If you do not want to apply a filter, leave the field blank.
 |
Select OK to add your chosen profiling attribute(s).
 |
Use the Output filename section to control the filename.
By default, Paligo will use the filename syntax that is defined in the System Settings.
 |
To change the information included in the filename, enter your preferred format in the publishing settings. Default is: ID-Title-Format.
You can use:
ID - The ID of the document.
Title - The title of the publication or topic that you are publishing.
Format - The name of the output format, for example, PDF or HTML5.
Edit date - The date that the publication or topic was last edited.
Branch label - The text from the branch label for the publication or topic. This only applies if your content has been branched and it has a branch label. For details, see Add or Edit Branch Labels.
Unique value - A random string of characters, generated by Paligo, that is added to the filename to make it unique. This can stop the file from being overwritten by later publishes of the same document.
Tip
If you type @ into the field, Paligo displays a list of the available values and you can select from the list. To remove a value, click in it and use the delete key or backspace key to remove all of its characters.
Note
The filename shown in the top-right corner is a preview of the filename that Paligo will use when you publish.
Set the Optional Parameters (leave unchecked if you do not want these features):
Save the output in Paligo - Check the box to save the zip file that Paligo creates when you publish. The zip file will be available from the Resource View and you can download it from the Saved Outputs tab. Clear the box if you don't want Paligo to store the zip file.
Notify me - Check this box if you want Paligo to send you an email when the publication is ready. This is useful if you have very large publications that can take a longer time to process and publish.
Make debug build - Check this box if you want Paligo to include a log file and link report. If there is an issue with your content, Paligo support may ask you to enable this feature so that they can use the log files to investigate.
Select the Zendesk Preflight tab to View the Paligo-to-Zendesk Mapping.
If you are happy with the existing mapping, you can proceed to the next step.
 |
To change the mapping, use the various settings on the Zendesk Preflight tab. You can map the Paligo topics to different sections and articles, change the Managed By and Visible To status, set the topics to be draft or publish, and promote them as needed. To find out more, see Customize Paligo-to-Zendesk Mapping.
Select Publish Document.
Paligo starts processing your content and applies your layout and publishing settings. The time that this takes varies depending on how much content you are publishing (the more content, the longer it takes).
 |
A progress bar appears. Select the arrow to hide the progress bar and reopen it by selecting the progress clock in the top menu. To abort the publish, select the X.
The published output appears as:
A ZIP file with the published output appears in the downloads folder on your computer.
If you have altered your browser's settings to store downloaded files somewhere else, the zip file will be found there instead.
If you are using a publishing integration, the zip file will also be sent to the relevant service.
A link in the Activity Feed Panel to download the published content.
Note
To make the content available online, first unzip the file. You can then use the file locally or you can use an FTP client, such as Filezilla, to upload the unzipped content to a web server.
Tip
You can save your publishing settings and reuse them to achieve a smoother publishing process, see Publishing Settings. Any settings you save can also be used for Batch Publishing.
 |
When Paligo publishes to Zendesk, a compressed file downloads in your browser. The first time you publish to Zendesk, you will need to add some of the downloaded files to your Zendesk.
When you publish to Zendesk, Paligo downloads a package in your web browser. The package contains CSS and javascript files, which are used to provide certain functionality and styles in Zendesk. You can add some or all of these assets to your Zendesk, depending on what functionality you want to include.
The CSS and JS files are:
JS
paligo-zd.js
Provides a range of functionality, including "accordion" collapsible sections, syntax highlighting for code, and checklists.
paligo-zd-lightbox.js and lightbox-min.js
These provide the "lightbox" feature, where you can select an image to view a larger version of the image
paligo-zd-glossary.js
Provides a popup on the glossary terms in your content. The popup contains the glossary term definition.
paligo-swagger.js
Allows swagger/Open API content to be embedded in Zendesk articles.
paligo-stickymenu.js
Adds a sub-navigation menu in the sidebar. This contains links to the sections inside an article. It also makes the menu "sticky" - it stays in view on the page even when you scroll down, and will scroll separately for long articles.
paligo-anchorlinks.js
Adds a "Click to copy" option to each heading, so that you can quickly copy the URL for that heading.
bootstrap-min.js
Provides the bootstrap framework that is needed for some of the javascript features, such as the glossary popups.
CSS
paligo-zd.css
Includes some basic styling to improve the overall look and feel of your articles, and also supports the functionality in the javascript files.
You can use this as a starting point for your styling. But you should check that the paligo-zd.css styles do not clash with any base styles you already have in Zendesk. If the styles do clash, you will need to make some overrides in your CSS or choose which styles you want to include/exclude.
paligo-stickymenu.css
Contains the styling for the "sticky menu" feature that's provided by paligo-stickymenu.js
lightbox.min.css
Contains the styling for the "lightbox" feature that's provided by paligo-zd-lightbox.js and lightbox.min.js.
You can find these files in the css and js folders in the zip file that is downloaded in your browser when you publish to Zendesk.
 |
The first time that Paligo publishes to your Zendesk, you should add the CS and JS files to the Zendesk Assets :
Open the zip file that is downloaded when you publish.
Log in to your Zendesk help center.
Click the Knowledge Admin icon at the top right.
Select the Customize Design feature, and then choose the active theme and select Edit Code.
Select the Assets folder.
Find the JS > Zendesk folder and the CSS > Zendesk folder in the downloaded package. These contain the CSS and javascript files you need to add to your Zendesk assets. You can ignore the other files in the downloaded package.

Decide on which JavaScript and CSS files you want to use and then add them to the Assets in Zendesk.
We recommend that you include references to: paligo-zd.js, paligo-zd.css, and bootstrap.min.js. You should also include a reference to the jquery.min.js script.
paligo-zd.js
paligo-zd.css
bootstrap.min.js
jquery.min.js (this is a script that is provided externally, and the details for this reference are included in step 9).
The other references are optional. But if you decide to use a feature, remember to include all of the files that are needed for it, for example, glossary popups require paligo.zd-glossary.js and bootstrap.min.js, and the lightbox feature needs paligo-zd-lightbox, lightbox.min.js and lightbox.min.css as well as the jquery reference.
In the Zendesk theme, open the Templates folder and then select document_head.hbs.
Add a reference to each file, and also to the "Font Awesome" stylesheet (it is hosted, so there is no need to upload it to the Zendesk assets).
The following example shows the syntax for the references (and assumes that you have not renamed the package files). We have separated the references with comments so that you can see which references you need to include for the features you want.
<! -- reference for jquery script -->
<script src="https://ajax.googleapis.com/ajax/libs/jquery/3.5.1/jquery.min.js"></script>

<! -- reference for bootstrap script -->
<script src="{{asset 'bootstrap.min.js'}}"></script>

<! -- reference for fontawesome -->
<link href="https://maxcdn.bootstrapcdn.com/font-awesome/4.7.0/css/font-awesome.min.css" rel="stylesheet"/>

<! -- reference for "copy to copy" anchorlinks -->
<script src="https://cdnjs.cloudflare.com/ajax/libs/clipboard.js/2.0.0/clipboard.min.js"></script>

<! -- reference for paligo-zd scripts and css.
Note that the first two references are for code syntax highlighting and they must come
before the reference to the paligo-zd.js file. You can leave those out if you do not want to use
syntax highlighting -->

<link rel="stylesheet" href="https://cdnjs.cloudflare.com/ajax/libs/highlight.js/9.5.0/styles/androidstudio.min.css"/>
<script src="https://cdnjs.cloudflare.com/ajax/libs/highlight.js/9.5.0/highlight.min.js"></script>
<script src="{{asset 'paligo-zd.js'}}"></script>
<link href="{{asset 'paligo-zd.css'}}" rel="stylesheet" type="text/css" />

<! -- references for lightbox scripts and css --><script src="{{asset 'lightbox.min.js'}}"></script>
<script src="{{asset 'paligo-zd-lightbox.js'}}"></script>
<link href="{{asset 'lightbox.min.css'}}" rel="stylesheet"/>

<! -- references for stickymenu scripts and css -->
<script src="{{asset 'paligo-stickymenu.js'}}"></script>
<link href="{{asset 'paligo-stickymenu.css'}}" rel="stylesheet" type="text/css" />

<! -- reference for glossary scripts and css -->
<script src="{{asset 'paligo-zd-glossary.js'}}"></script>
Note
The references use the Zendesk curly brackets syntax to refer to uploaded assets.
Note
If you have included the references for code syntax highlighting (in the paligo-zd references), you do not need to upload any files. The necessary files are loaded from a cdn.
Select Publish to save the settings in Zendesk.
You have now uploaded the relevant packaged files from Paligo into Zendesk, and set your Zendesk article pages to reference the files.
When you publish content to Zendesk, Paligo has to "push" the content from your topics into Zendesk. To do this, it "maps" topics to the Zendesk structure, which consists of categories, sections, and articles.
The mapping that takes place varies, depending on the type of Zendesk Layouts you use, the layout's settings, and whether you customize the mapping by using the Zendesk Preflight feature.
To set up the mapping for your content:
Choose the appropriate type of layout for the mapping you want to achieve, see Zendesk Layouts
Edit the layout settings to:
Control how many levels of sections can be used in Zendesk. This is only available on Zendesk Enterprise Layouts.
Use Customize Paligo-to-Zendesk Mapping to control how Paligo maps to sections and articles in Zendesk.
When you publish to Zendesk, Paligo maps the topics in your publication to Zendesk articles (see Map Content from Paligo to Zendesk. If there are links in your topics, Paligo can map those to your articles too:
Topics with internal links: These are mapped and resolved automatically when you publish to Zendesk.
Links to topics in the same publication: These are mapped and resolved automatically when you publish to Zendesk.
Links to topics in a different publication: These do not map to articles in Zendesk (by default). But Paligo can map these links if you enable the Fix cross-links outside of publication scope setting on the Zendesk Layout. You may also need to publish twice. For more information, see Resolve Cross-References between Zendesk Categories.
Note
In this section, we explain how branched content is mapped to Zendesk. We assume that you already understand and use the branching feature to create concurrent versions of your publications and topics. To learn about branching, see Branching.
When you publish to Zendesk, Paligo maps the content in your publication, including branched topics, to articles in Zendesk. For regular, unbranched topics, Paligo will map each topic to an existing article or will create a new article (see Map Content from Paligo to Zendesk). But if you have branched topics, they will map to articles differently, depending on how you create the branched topics:
If you create branches from inside the publication, the branched topics will map directly to corresponding articles in Zendesk. This is because branches made in the publication use the same fork ID as the original version of the topic (see Fork IDs and Mapping).
If you create branches of topics outside of the publication, and then add them to the publication, the branched topics will map to new articles in Zendesk. They will not update the existing articles.
Typically, you will want your branched versions of topics to map to Zendesk and update your existing articles. For this type of mapping, you need to make sure you branch your topics from inside the publication:
In the Content Manager, find the Publication you want to publish to Zendesk.
Open the publication so that you can see the links to the topics.
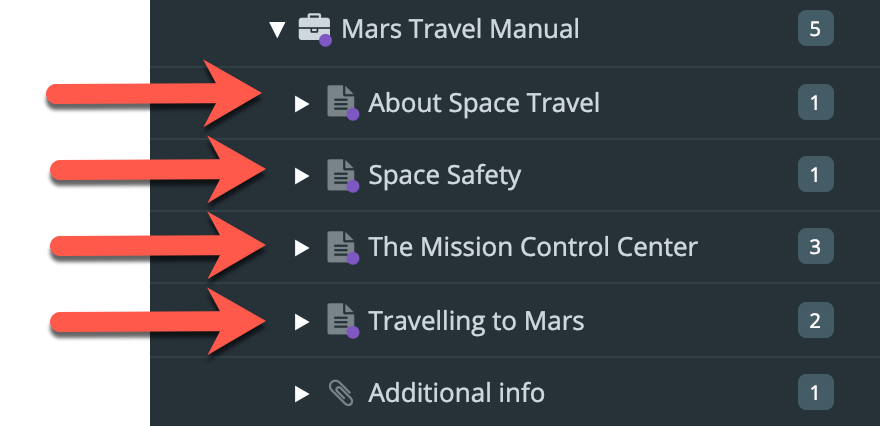
Display the options menu for the linked topic that you want to branch.
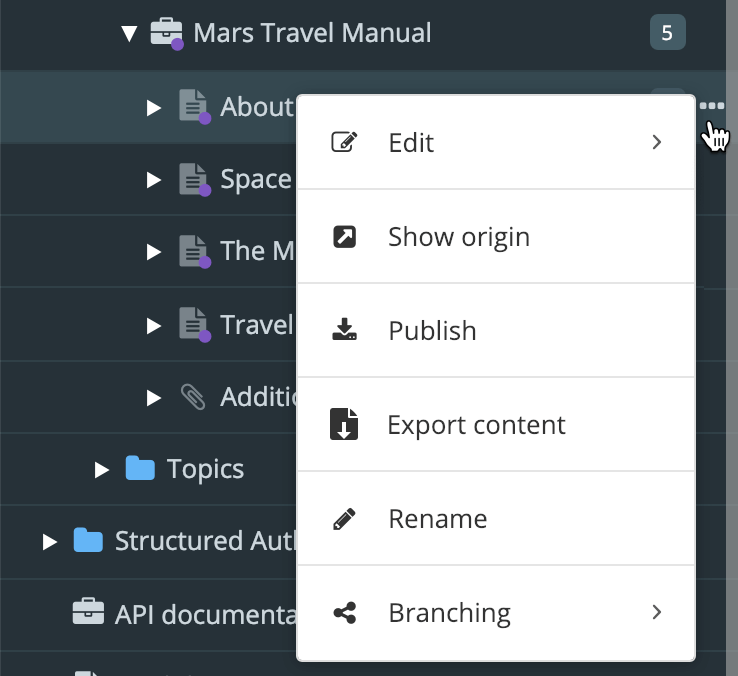
Select Branching.
Select New Branch.
Paligo creates a new branched version of the topic, and because you created it in the publication, the branched version will map to the same Zendesk article as the original version of the topic.
Tip
If your branched topics are mapping to new articles instead of updating existing articles, it is likely because they have been branched outside the publication. To resolve this situation:
Create new branches inside the publication. Then In Zendesk, delete the articles that were created for the "outside the publication" branches.
Copy the content from your "outside the publication" branches into your "inside the publication" branches.
Remove the "outside the publication" topics from the publication and delete them.
In Zendesk, delete the articles that were created for the "outside the publication" topics.
In this section, we explain how Paligo uses the "fork ID" to map topics to Zendesk articles. It will help you to understand why Paligo maps branched topics differently, depending on whether they are branched inside the publication or outside of the publication.
Let's say you have a Paligo publication and you want to publish to Zendesk for the first time. There are no articles in Zendesk at the moment.
unbranched topics
topics that are branched from inside a publication
topics that are branched outside a publication.
Note
If your branched topics are mapped to new articles instead of updating your existing articles, it is probably because the branches were created outside of the publication.
You can branch your content in two ways: in a publication or outside a publication. This example shows how Paligo maps content to Zendesk when you branch from inside a publication so that the branched versions and original topic all use the same fork ID.
Let's start with a publication and a topic. When you add a topic to a publication, Paligo creates a fork ID. It uses the fork ID as a record of the relationship between the publication and the topic.
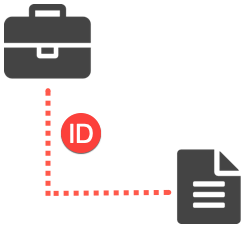 |
You decide to publish to Zendesk for the first time. Paligo checks its internal record to see if the topic's fork ID has been used to map to any articles in Zendesk. It has not, as there are no articles yet, and so Paligo maps the topic to a new article. It also keeps a record so that it knows the fork ID of your topic maps to that specific article in Zendesk.
You make some changes to the topic and publish to Zendesk again. Paligo checks its internal record and finds that the fork ID of your topic maps to the article in Zendesk. Paligo writes the content of the topic to the article in Zendesk.
 |
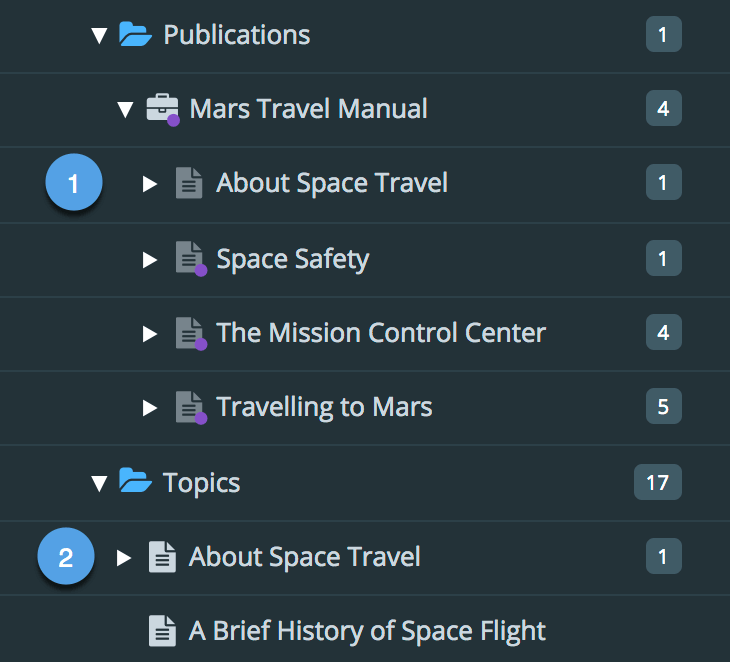
If Paligo has a record of the fork ID (1) mapping to an existing article (2), it will transfer the topic content to the article.
The product you work on is being updated, and you need to add new content to the topic. But you also need to have the original version available. To make this possible, you create a branch of the topic. You make the branch in the publication, so that the branched version of the topic uses the same fork ID as the original topic.
You write new content in the branched version of the topic. When the new product is ready, you publish your content to Zendesk. Paligo checks its internal record and finds the fork IDs of your original topic and branched version topic has been used to map to an article before. Paligo ignores the original topic and maps the latest version (the branched version) of the topic to the article. So the article in Zendesk is updated with content from your branched topic.
 |
The branched topic has the same fork ID (1) as the original topic and so is mapped to the same Zendesk article (2) as the original topic.
You could also merge the branched version of the topic with the original topic. This gives you the option to add all or some of the branched version to the original topic (you can choose which elements are copied to the original topic, see What is Merging?). When you publish to Zendesk, the original/merged topic is written to the article, as it is the most recent version and its fork ID maps to the article.
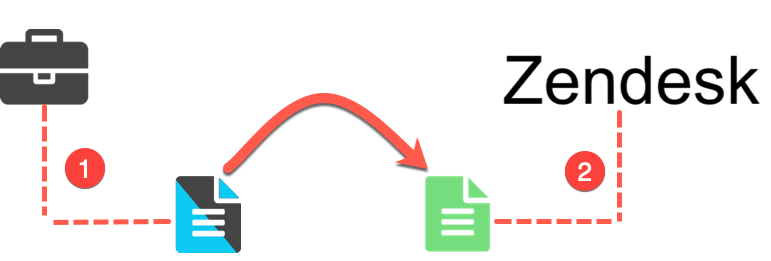 |
When you merge a topic, the topic that receives the merged content continues to use its own fork ID.
This example shows how Paligo maps content to Zendesk when you branch a topic outside a publication so that the branched version and original topic use different fork IDs.
Let's start with a publication and a topic. When you add a topic to a publication, Paligo creates a fork ID. It uses the fork ID as a record of the relationship between the publication and the topic.
 |
You decide to publish to Zendesk for the first time. Paligo checks its internal record to see if the topic's fork ID has been used to map to any articles in Zendesk. It has not, as there are no articles yet, and so Paligo maps the topic to a new article. It also keeps a record so that it knows the fork ID of your topic maps to that specific article in Zendesk.
You make some changes to the topic and publish to Zendesk again. Paligo checks its internal record and finds that the fork ID of your topic maps to the article in Zendesk. Paligo writes the content of the topic to the article in Zendesk.
 |
If Paligo has a record of the fork ID (1) mapping to an existing article (2), it will transfer the topic content to the article.
The product you work on is being updated, and you need to add new content to the topic. But you also need to have the original version available. To make this possible, you create a branch of the topic. You make the branch in the publication, so that the branched version of the topic uses the same fork ID as the original topic.
You write new content in the branched version of the topic. When the new product is ready, you publish your content to Zendesk. Paligo checks its internal record and finds the fork IDs of your original topic and branched version topic has been used to map to an article before. Paligo ignores the original topic and maps the latest version (the branched version) of the topic to the article. So the article in Zendesk is updated with content from your branched topic.
Paligo also checks its internal record for the fork ID of your branched version. The fork ID has not been used to map to an article before. So Paligo creates a new article in Zendesk and writes the content of the branched topic to the new article.
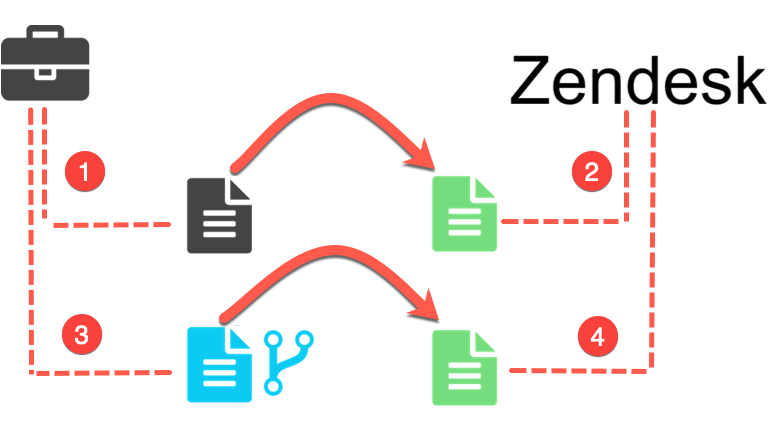 |
The branched topic has a different fork ID (3) to the original topic (1). So the original topic maps to one article in Zendesk (2) and the branched topic maps to a different Zendesk article (4).
When you publish from Paligo to Zendesk, you choose a Zendesk layout to use and a category to publish to. At that stage, Paligo is able to show you how your Paligo content will be published to Zendesk sections and articles. You can see a preview on the Zendesk Preflight tab.
 |
The Zendesk Preflight tab can show you how Paligo is going to:
Create new articles in Zendesk that map to topics in Paligo.
Update existing sections and articles in Zendesk.
Delete articles in Zendesk.
Note
"Mapping" is the term we use for how Paligo matches a Paligo topic to a Zendesk section or article.
To access the Zendesk Preflight tab:
In the Content Explorer, select the option menu ( ...) for your publication and then select Publish.
On the Publish document dialog, select HTML. Then select the Zendesk layout you want to use and choose the Zendesk Category you are going to publish to.
You will need a Zendesk Layouts for publishing. You can use one of the built-in Zendesk layouts or create one of your own. They are special types of HTML layout.
Select the Zendesk Preflight tab to see how Paligo is going to map the topics in your publication to your Zendesk when you publish.

Note
If you use saved publishing settings, there is a different way to access the Zendesk Preflight tab (see Saved Settings and Paligo-to-Zendesk Mapping).
The Zendesk Preflight tab provides you with a preview of how Paligo will map your content to Zendesk. You can also use the Zendesk Preflight to Customize Paligo-to-Zendesk Mapping.
At the top of the tab, Paligo provides you with information about the number of "resources" that are going to be created, updated, or deleted. "Resources" is the term we use for Zendesk content and it can include sections and articles.
 |
On the left, there is a hierarchical mapping list. This is where you can see how Paligo is going to publish your Paligo topics to Zendesk. It matches each topic to an existing section or article or will create a new section or article. The process of matching topics to sections and articles is called "mapping".
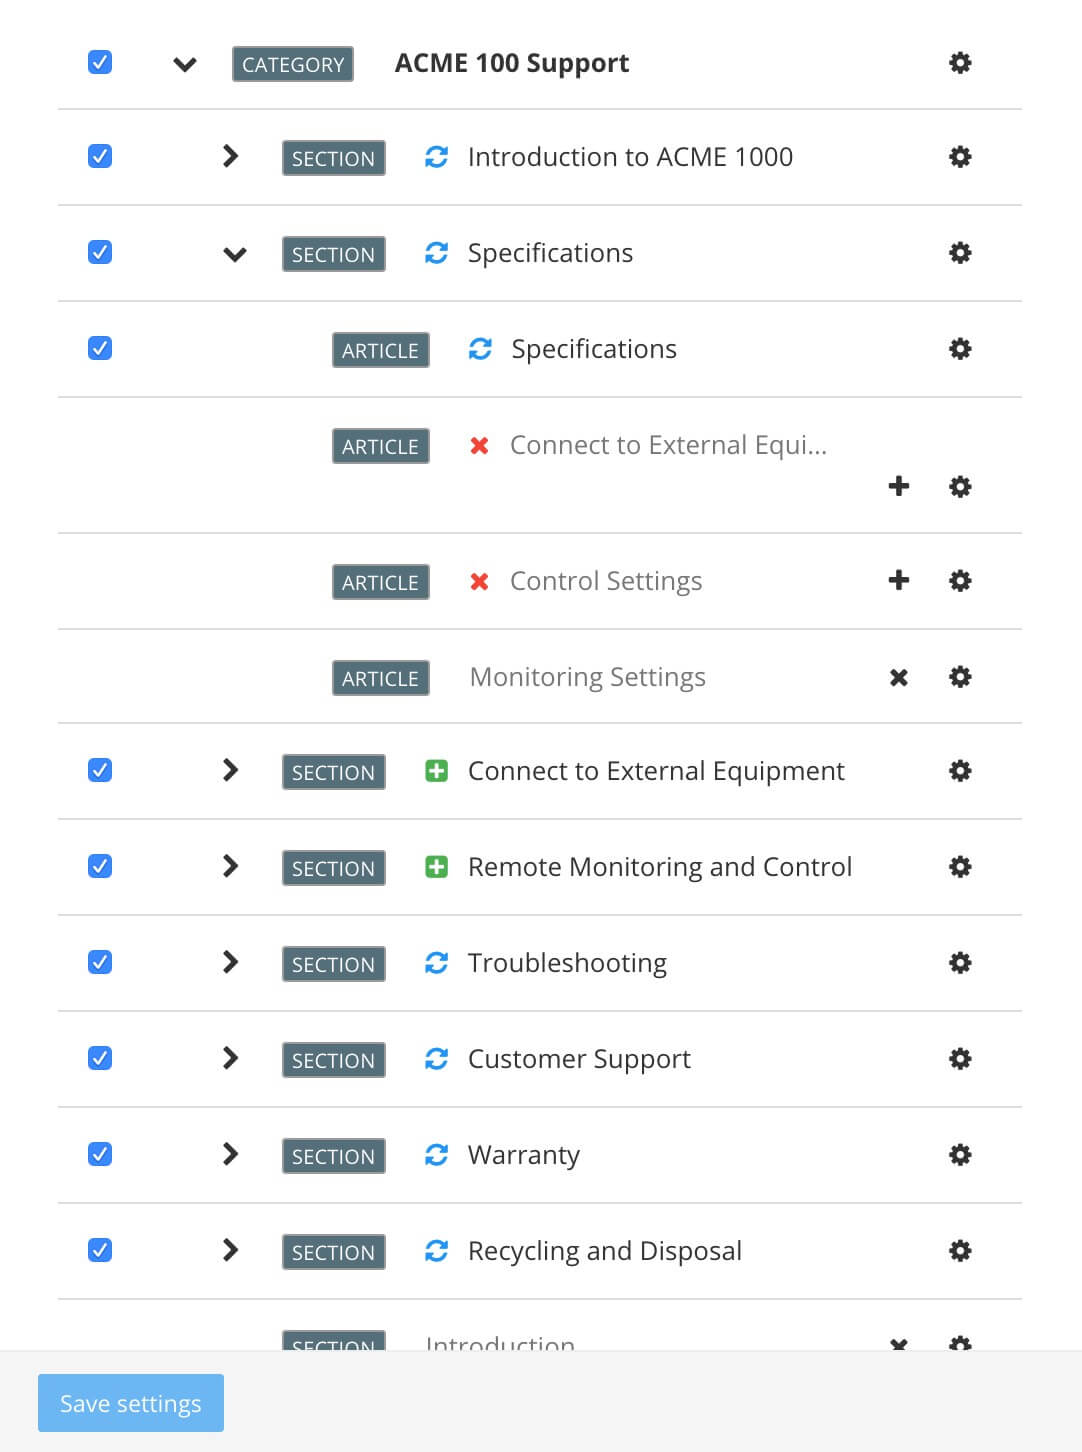 |
The list can show:
Topics that are going to be mapped to new sections or articles in Zendesk. These are shown with a plus icon.

Topics that are going to be used to update existing sections or articles in Zendesk. These are shown with an update icon.

Articles that Paligo is going to delete from your Zendesk. These are shown with a cross icon.

Articles that Paligo published to Zendesk previously, but they have since been moved in Zendesk. These are shown with a red copy icon.

By default, Paligo will create a new article at the location that Paligo expects the article to exist. You can control this behavior by using the Strict Mapping feature in the integration settings. For single brand Zendesk instances, see Connect Paligo to Zendesk. For multibrand Zendesk, see Connect Paligo to Multiple Zendesk Brands.
Articles that exist in Zendesk, but are not mapped to any topics in Paligo. These are shown as "grayed out" entries.

The "grayed out" articles could be articles that were created in Zendesk and have no matching topic in Paligo.
They could also be articles that were previously mapped to Paligo topics, but the mapping has since been broken, so now the articles are unmapped.
Tip
If you can see that Paligo is going to create a new article and there is a "grayed out" article of the same name, it is because the "grayed out" article is no longer mapped. So Paligo thinks the topic should become a new article.
The structure of the mapping comes from the type of Zendesk layout you are using (Multi-Section Zendesk Layouts or Single-Section Zendesk Layouts).
Each mapped "resource" in the list has a checkbox that you can use to control whether the resource is published to Zendesk.
 |
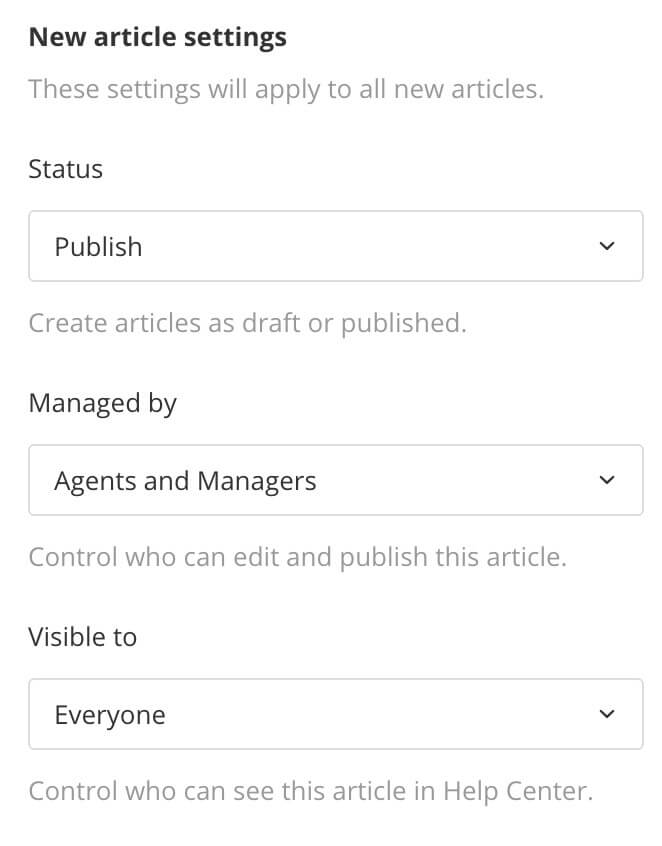
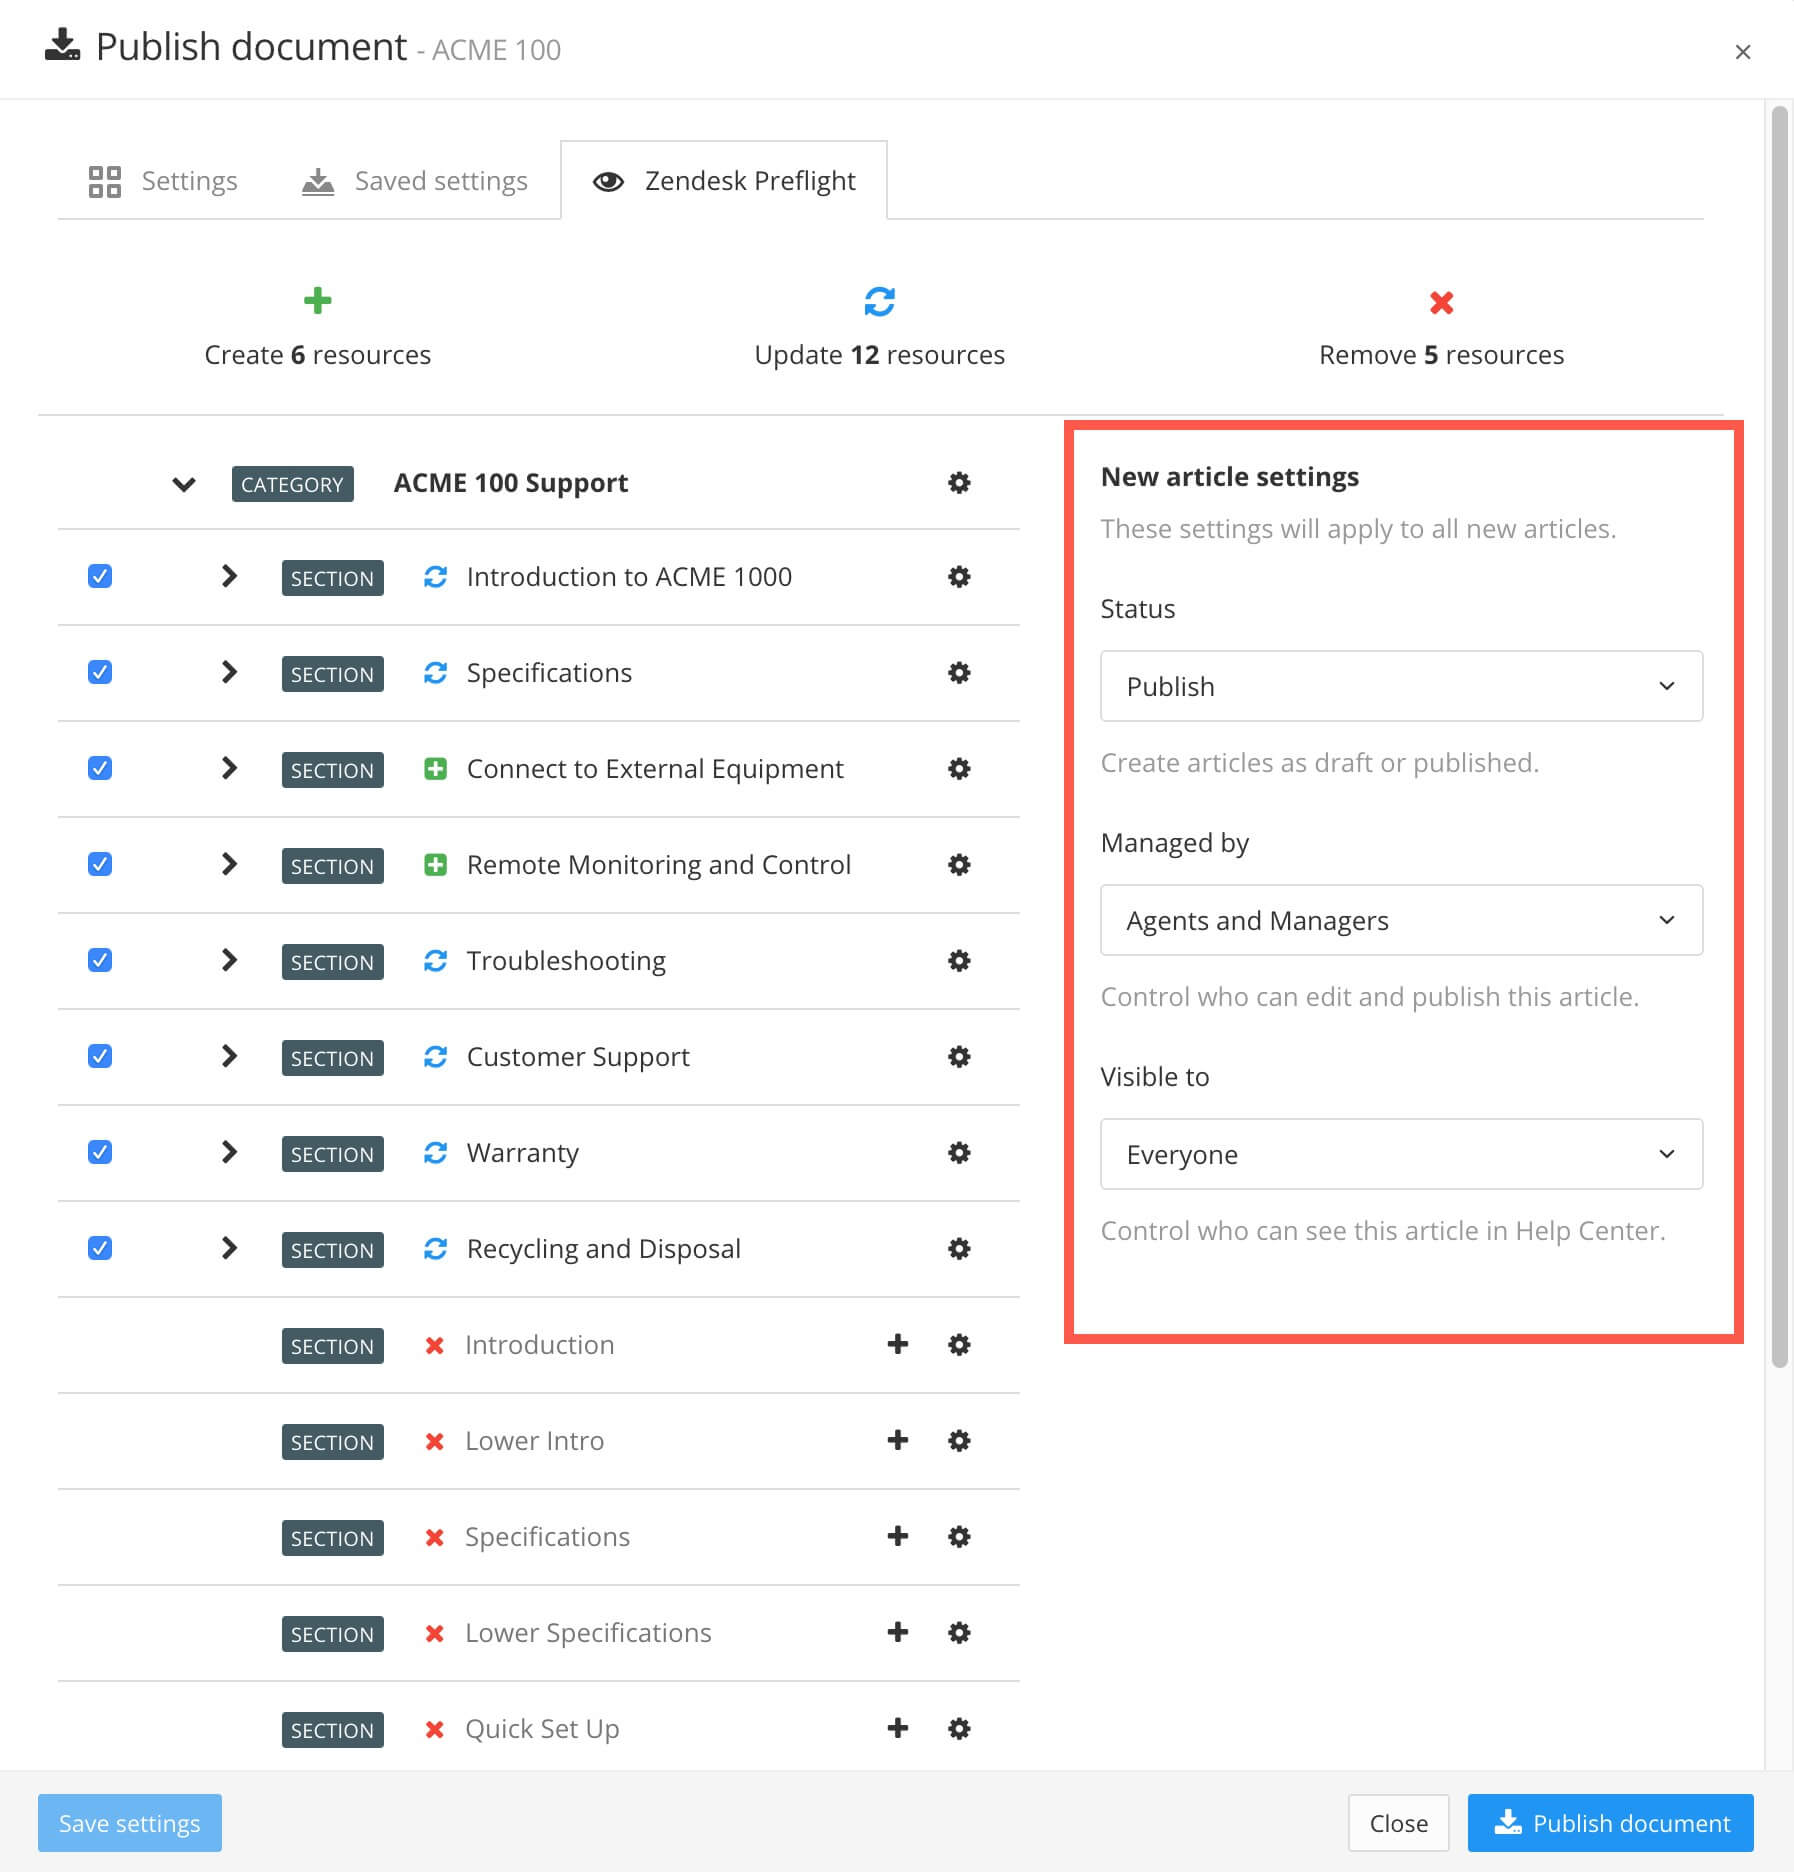
On the right, there are settings for controlling the status of new articles. These apply to all new articles, but it is also possible to change the status for individual topics. To find out more see Set the Status of Content that is Published to Zendesk.
 |
If you are happy with the existing mapping settings, you can Publish to Zendesk.
But you can also use the Zendesk Preflight tab to change the way content is mapped to Zendesk. To find out how to make changes, see Customize Paligo-to-Zendesk Mapping.
You can save your publishing settings so that you do not have to re-enter the same settings each time you publish (see Publishing Settings). When you publish to Zendesk, you can select the saved settings and then use the Zendesk Preflight tab to see how your content is going to be "mapped". Your topics will either be mapped to new sections or articles in Zendesk or used to update existing sections and articles.
To use the Zendesk Preflight tab with saved settings:
In the Content Manager, select the options menu ( ... ) for the publication you want to publish to Zendesk, and select Publish.
On the Publish Document dialog, select the Saved Settings tab.
Check the box next to the publishing settings you want to use. When you check the box, the Zendesk Preflight tab appears.
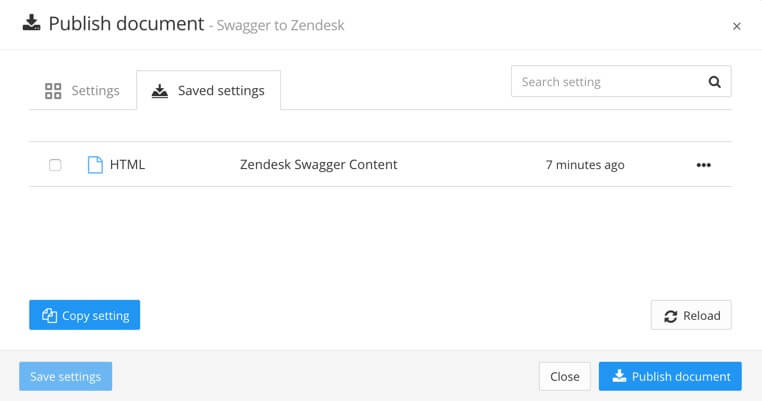
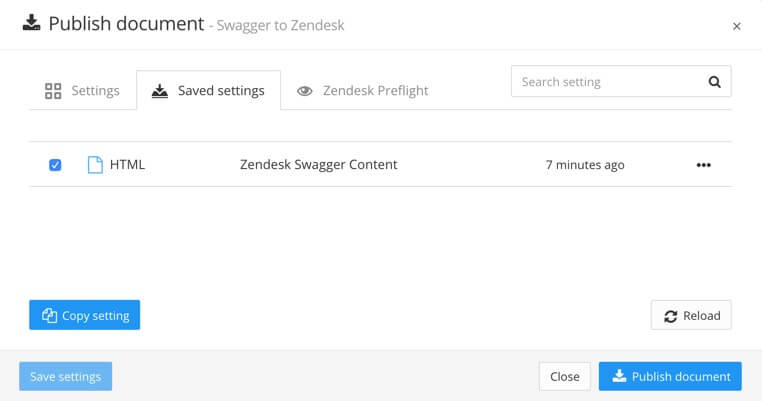
Select the Zendesk Preflight tab to see how your Paligo content will be mapped to Zendesk.
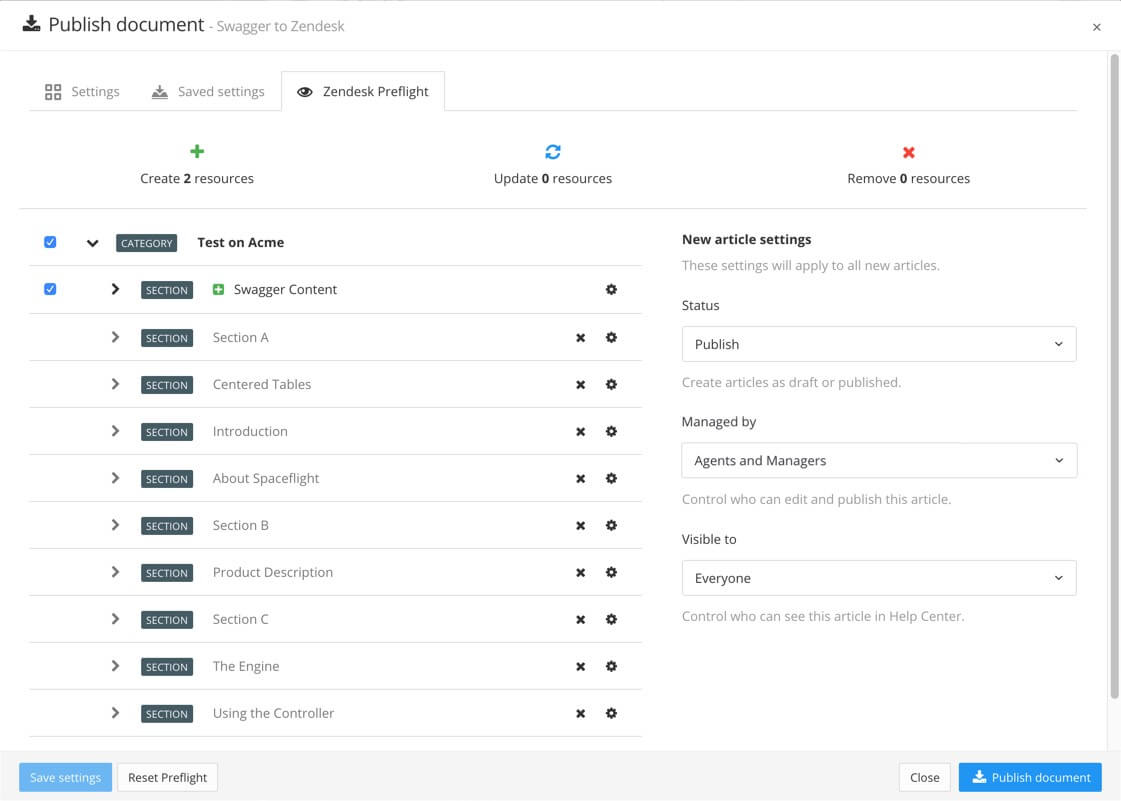
You can use the Zendesk Preflight tab to view or change the mapping as described in:
With Paligo's Zendesk Preflight feature, you can control how your Paligo content is mapped to Zendesk. It is available on Single-Section Zendesk Layouts and Multi-Section Zendesk Layouts Zendesk layouts. For details on how to display it, see View the Paligo-to-Zendesk Mapping.
Note
If you use saved publishing settings, there is a different way to access the Zendesk Preflight tab (see Saved Settings and Paligo-to-Zendesk Mapping).
 |
When you display the Zendesk Preflight tab, it shows the mapping that will take place if you publish to Zendesk. You can customize the mapping to meet your own requirements or you can leave the existing mapping in place.
Before you make changes to the mapping, we recommend that you familiarize yourself with the Zendesk structure. You will also need to know which type of Zendesk layout you are going to use for publishing. There are two different types, multi-section and single-section, and they map the top-level content differently.
Note
The Zendesk layout also has some settings that you can use to control certain parts of the mapping. For example, you can control how the titles of Paligo topics are mapped to heading levels in the Zendesk articles. To find out more, see Edit a Zendesk Layout.
The Zendesk Preflight feature gives you control over which topics are published to Zendesk. You can choose to publish an entire publication, just a selection of its topics, or even a single topic if you prefer.
Look at the list of categories, sections, and articles. Each of them has a checkbox.

If you want to publish the content to Zendesk, check its box.
If you want to exclude the content from publishing, so that it is not added to Zendesk or used to update Zendesk articles, clear the box.
If you have made all of the mapping changes you need and have set the languages, filters, etc. on the tab, select Publish document to start the publishing process.
When you publish your content, Paligo will only publish those topics that have their boxes checked.
You can use the Zendesk Preflight feature to change the mapping between a Paligo topic and a Zendesk section or article. The changes you can make vary, depending on the existing mapping in place.
If you are mapping a topic that is not currently mapped to an article or section, you can map it to:
A new article or section. This is the default setting for a new topic.
An existing unmapped article that is in the same section as the topic you are mapping
An existing unmapped section that is in the same category that you are publishing to
If you are mapping a topic that is currently mapped to an article or section, you can remap it to:
An existing unmapped article or unmapped section.
To map a topic to a different section or article:
Browse the list to find the Paligo topic that you want to map, and select its cog icon to display a dialog.

On the dialog, use the Mapping setting to choose the section or article that you want to map to.
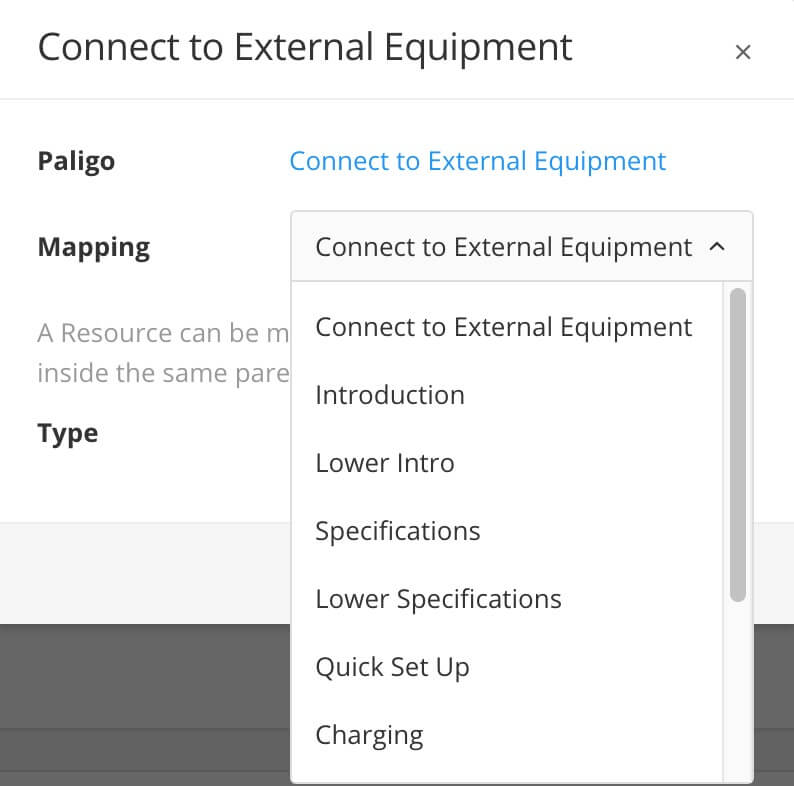
This step only applies if you are mapping a topic to an article.
Use the other settings on the dialog to define the publishing status and promoted status to control who can view and edit the article or section. To find out more about these settings, see Set the Status of Content that is Published to Zendesk.
Select Confirm.
If you have made all of the mapping changes you need and have set the languages, filters, etc. on the tab, select Publish document to start the publishing process.
When you publish your content to Zendesk, the Paligo topic will map to the section or article you selected.
Typically, when you map a topic in Paligo to an article in Zendesk, you will want the topic and article to keep their relationship. But it's possible that at some point, you may want to replace the topic with a different topic, but map to the same article and URL in Zendesk. To do this, complete the following steps:
In the Content Manager, find the publication that you publish to Zendesk and select it to display it in the structure view.
In the publication structure, remove the topic that you want to replace.
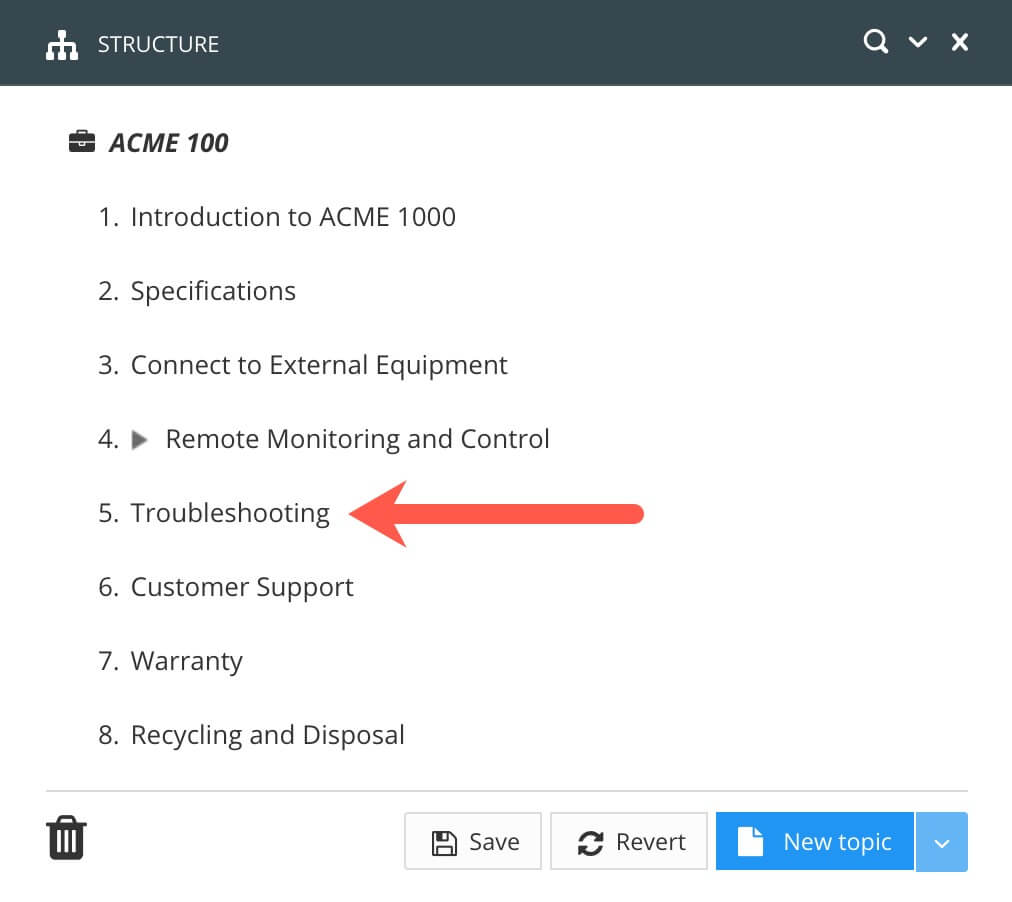
In the Publication structure, remove the topic that you want to replace. In this example, we are removing "Troubleshooting".
Add the replacement topic to the publication structure.
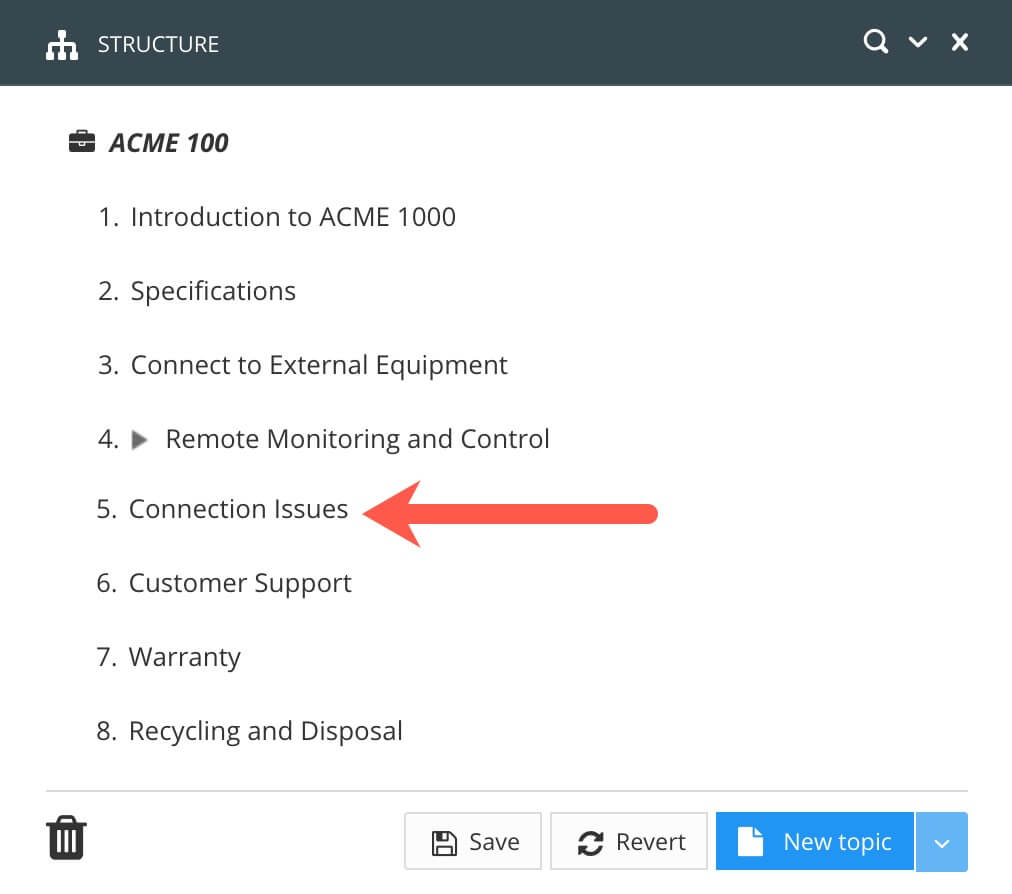
Add the replacement topic to the Publication structure.
Use the arrow buttons to arrange your topics and reused publications into the order you want. You can set them to display as a flat structure or you can "nest" topics and publications so they have a more complex structure, with multiple levels of content, see Organize a Publication.
In the Content Manager, find the publication and select its option menu ( ... ) and then select Publish.
Set the publication to produce an HTML output and choose a Zendesk layout.
Select the Zendesk Preflight tab.
For multi-section Zendesk layouts, the mapping shows:
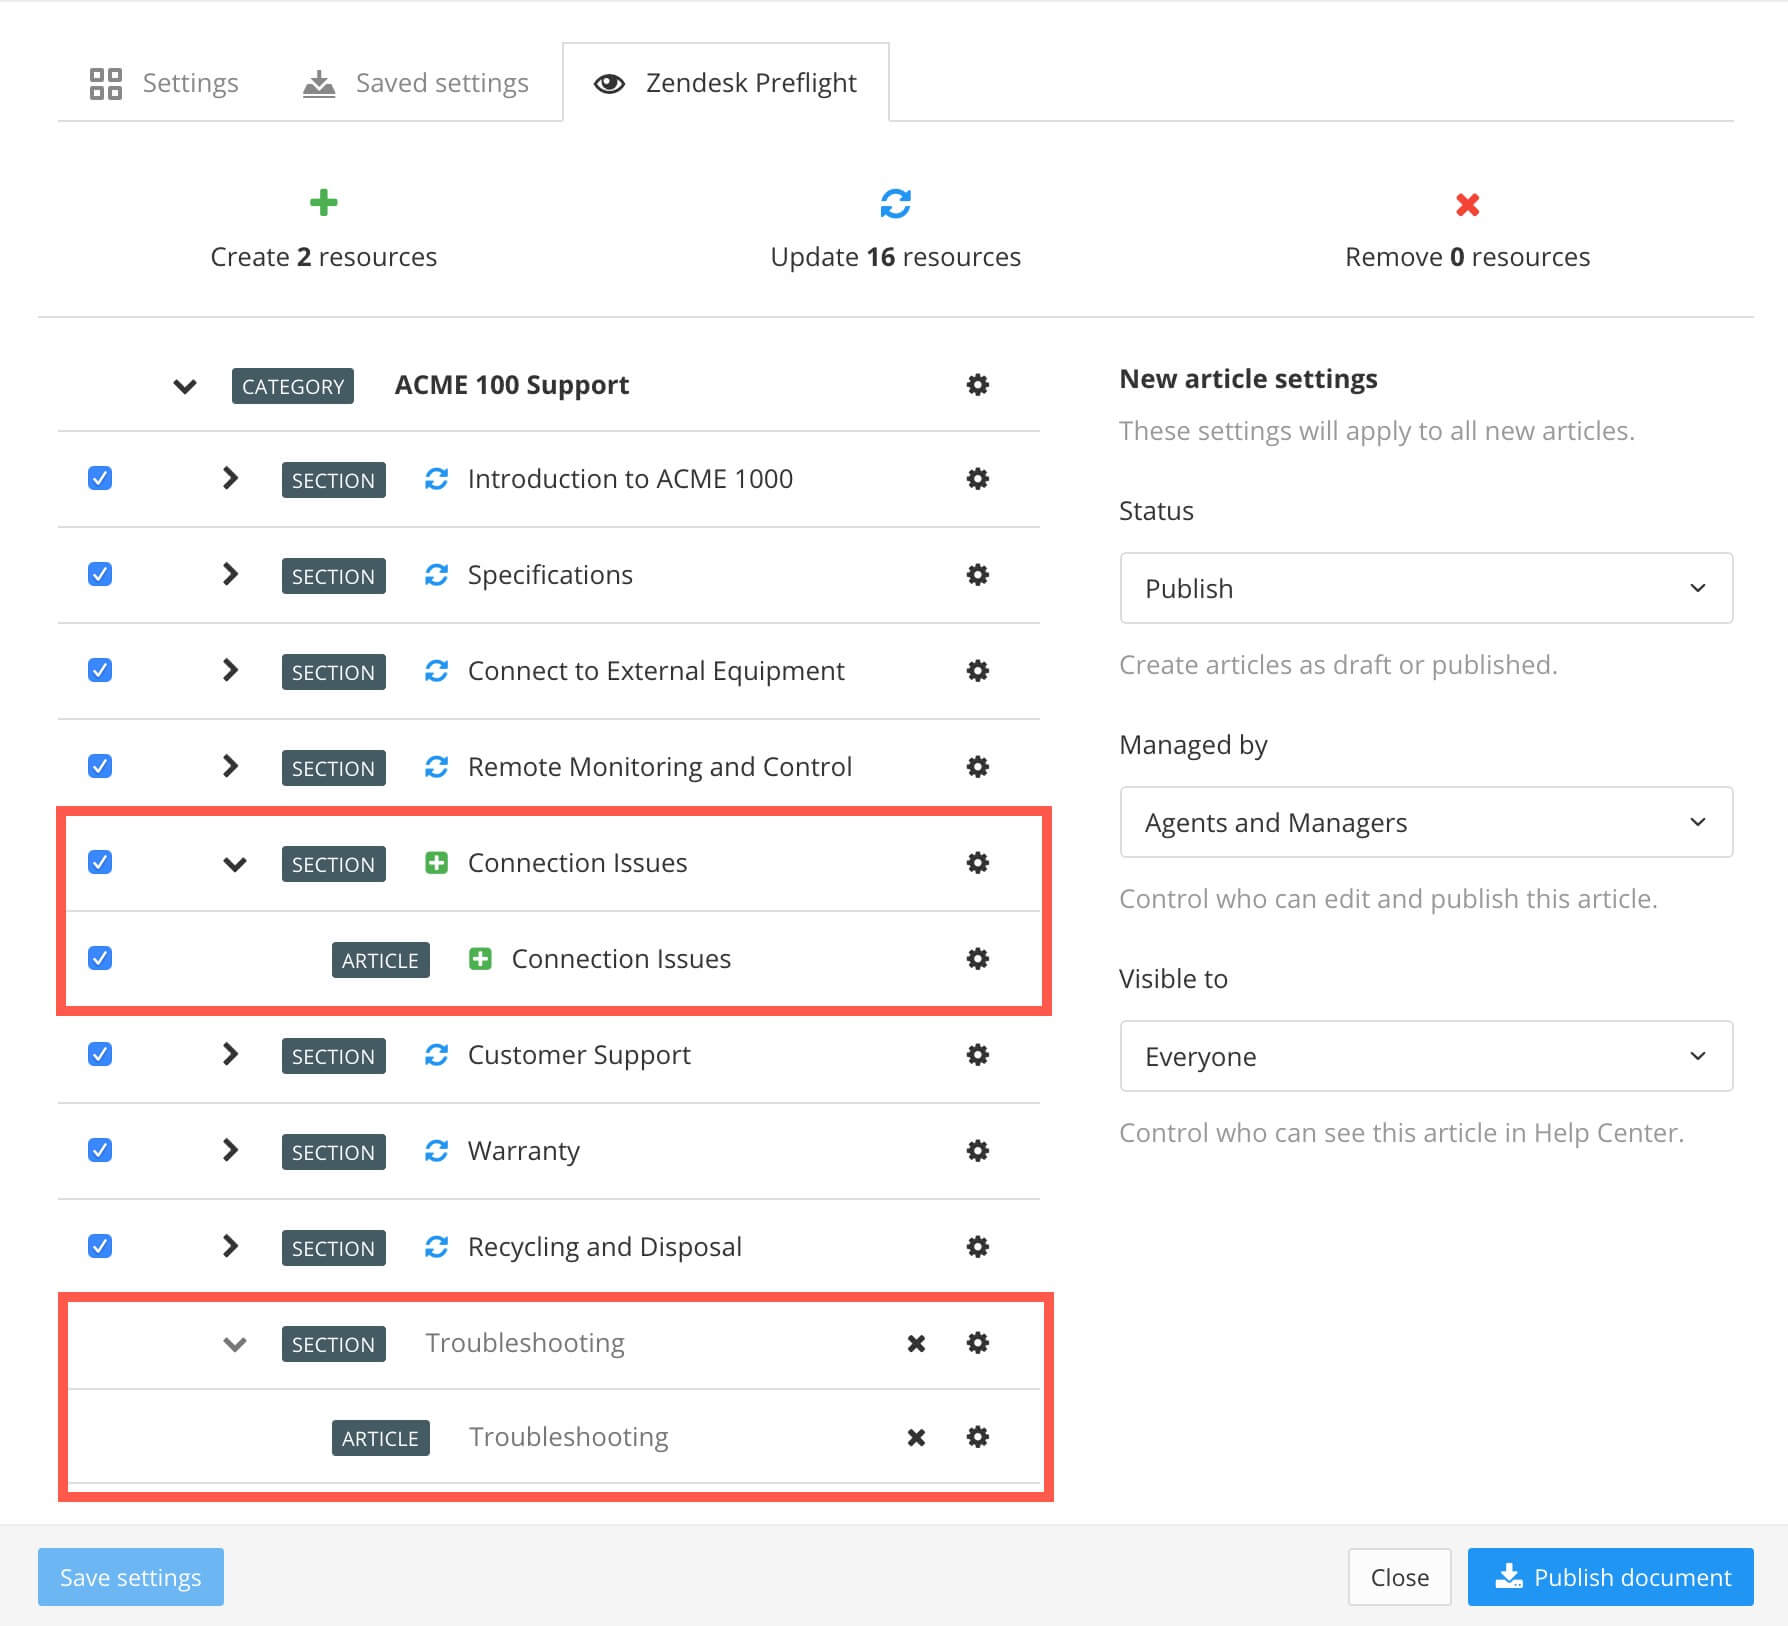
The new topic is mapped to a new section and a new article.
The article that was mapped to the topic you removed is now unmapped. Its section is also unmapped. These are both shown as gray listings.
For single-section Zendesk layouts, the mapping shows:
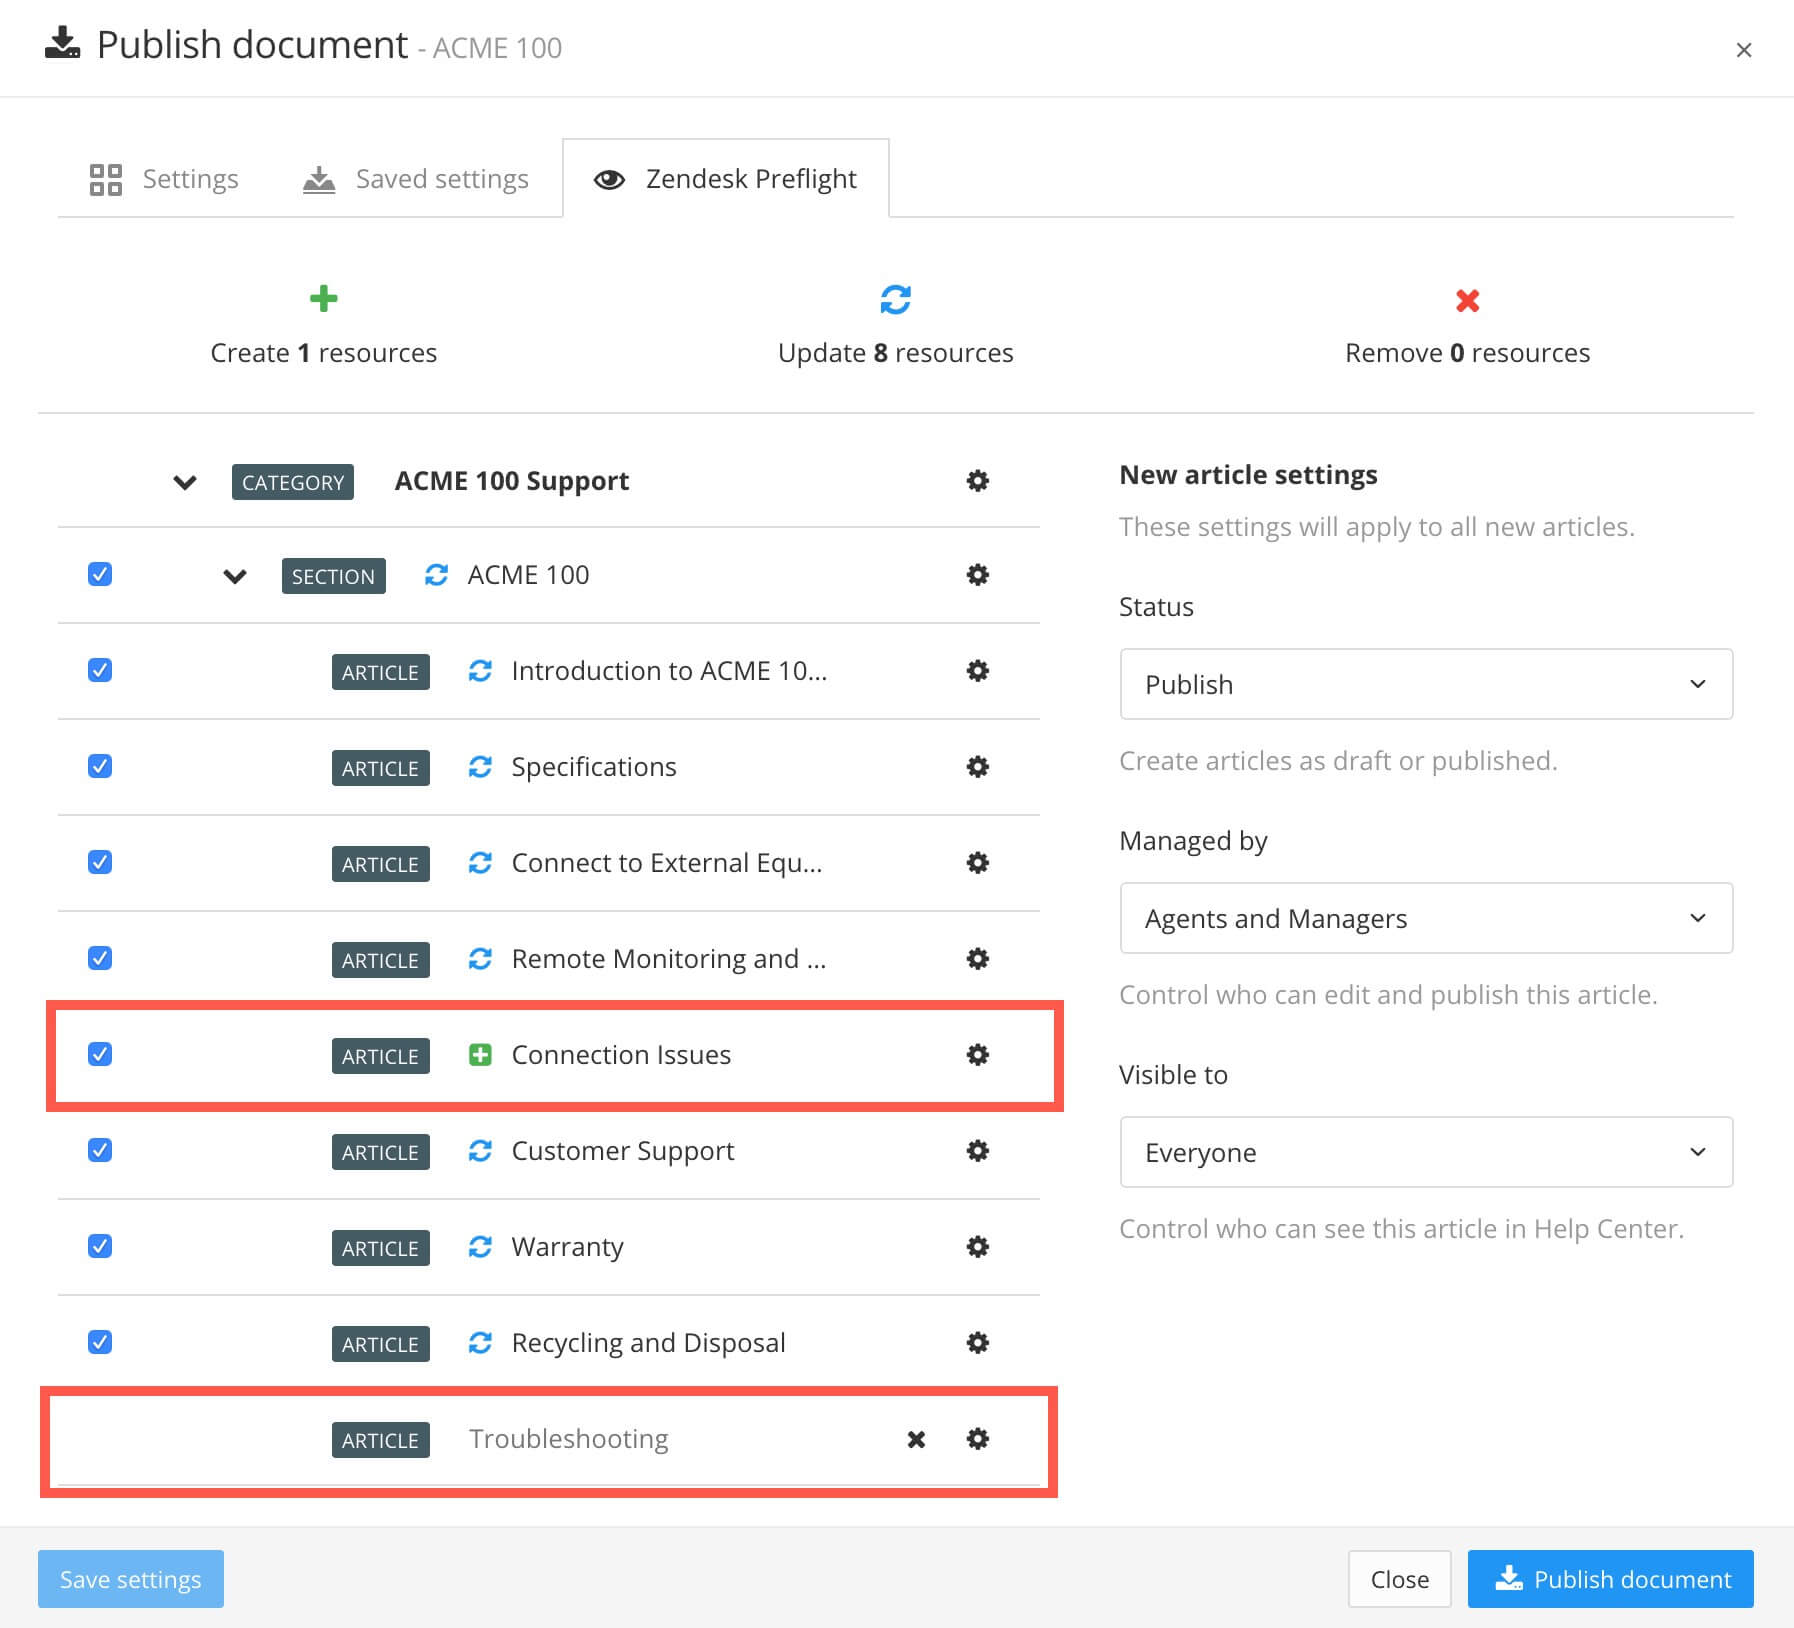
The new topic is mapped to a new article.
The article that was mapped to the removed topic is now unmapped. This is shown as a gray listing.
The new replacement topic has a green plus icon, which shows that it is a new article that will be created in Zendesk.
This step varies depending on whether you are using a multi-section or single-section Zendesk layout.
If you are using a multi-section Zendesk layout:
Select the cog icon for the new section. On the dialog, use Mapping to select an unmapped Zendesk section. Select Confirm.
Select the cog icon for the new article. On the dialog, use Mapping to select an unmapped Zendesk article. Select Confirm.
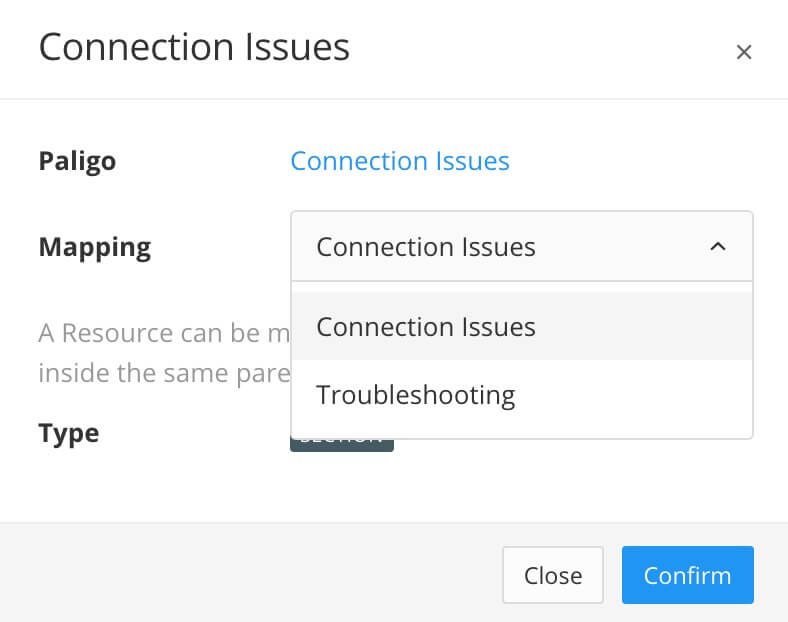
If you are using a single-section Zendesk layout:
Select the cog icon for the new article. On the dialog, use Mapping to select an unmapped Zendesk article. Select Confirm.
If you have made all of the mapping changes you need and have set the languages, filters, etc. on the tab, select Publish document to start the publishing process.
In Zendesk, there are several settings that control who can see the articles and where the articles appear:
Draft/Publish status
If an article is in the Draft state, it exists in Zendesk but is not shown in the help center. In the Publish state, it is "live" and appears in the help center.
Managed by
This lets you choose which types of user can edit and publish an article, for example, Agents and Managers. The Managed by setting is sometimes called Permission Group in Zendesk.
Visible to
This lets you choose who can see this article when it is published in the help center. The Visible to group is sometimes called the User Segment Group in Zendesk.
Promoted
In Zendesk, articles can be promoted so that they appear at the top of a section and have a star icon next to them. They can also appear on the home page, depending on what theme you are using. You can set the promoted status in Paligo instead of having to set it in Zendesk.
When you publish content from Paligo to Zendesk, you can set the statuses of the content.
Display the Publish document dialog for your publication and set it to use a Zendesk layout and choose a Zendesk category, as described in View the Paligo-to-Zendesk Mapping.
On the Settings tab, use Managed by to define what user group can edit and publish your articles.
Note
Each article has its own Managed by setting, and if that is set, it will be used instead of the Managed by on the Settings tab.
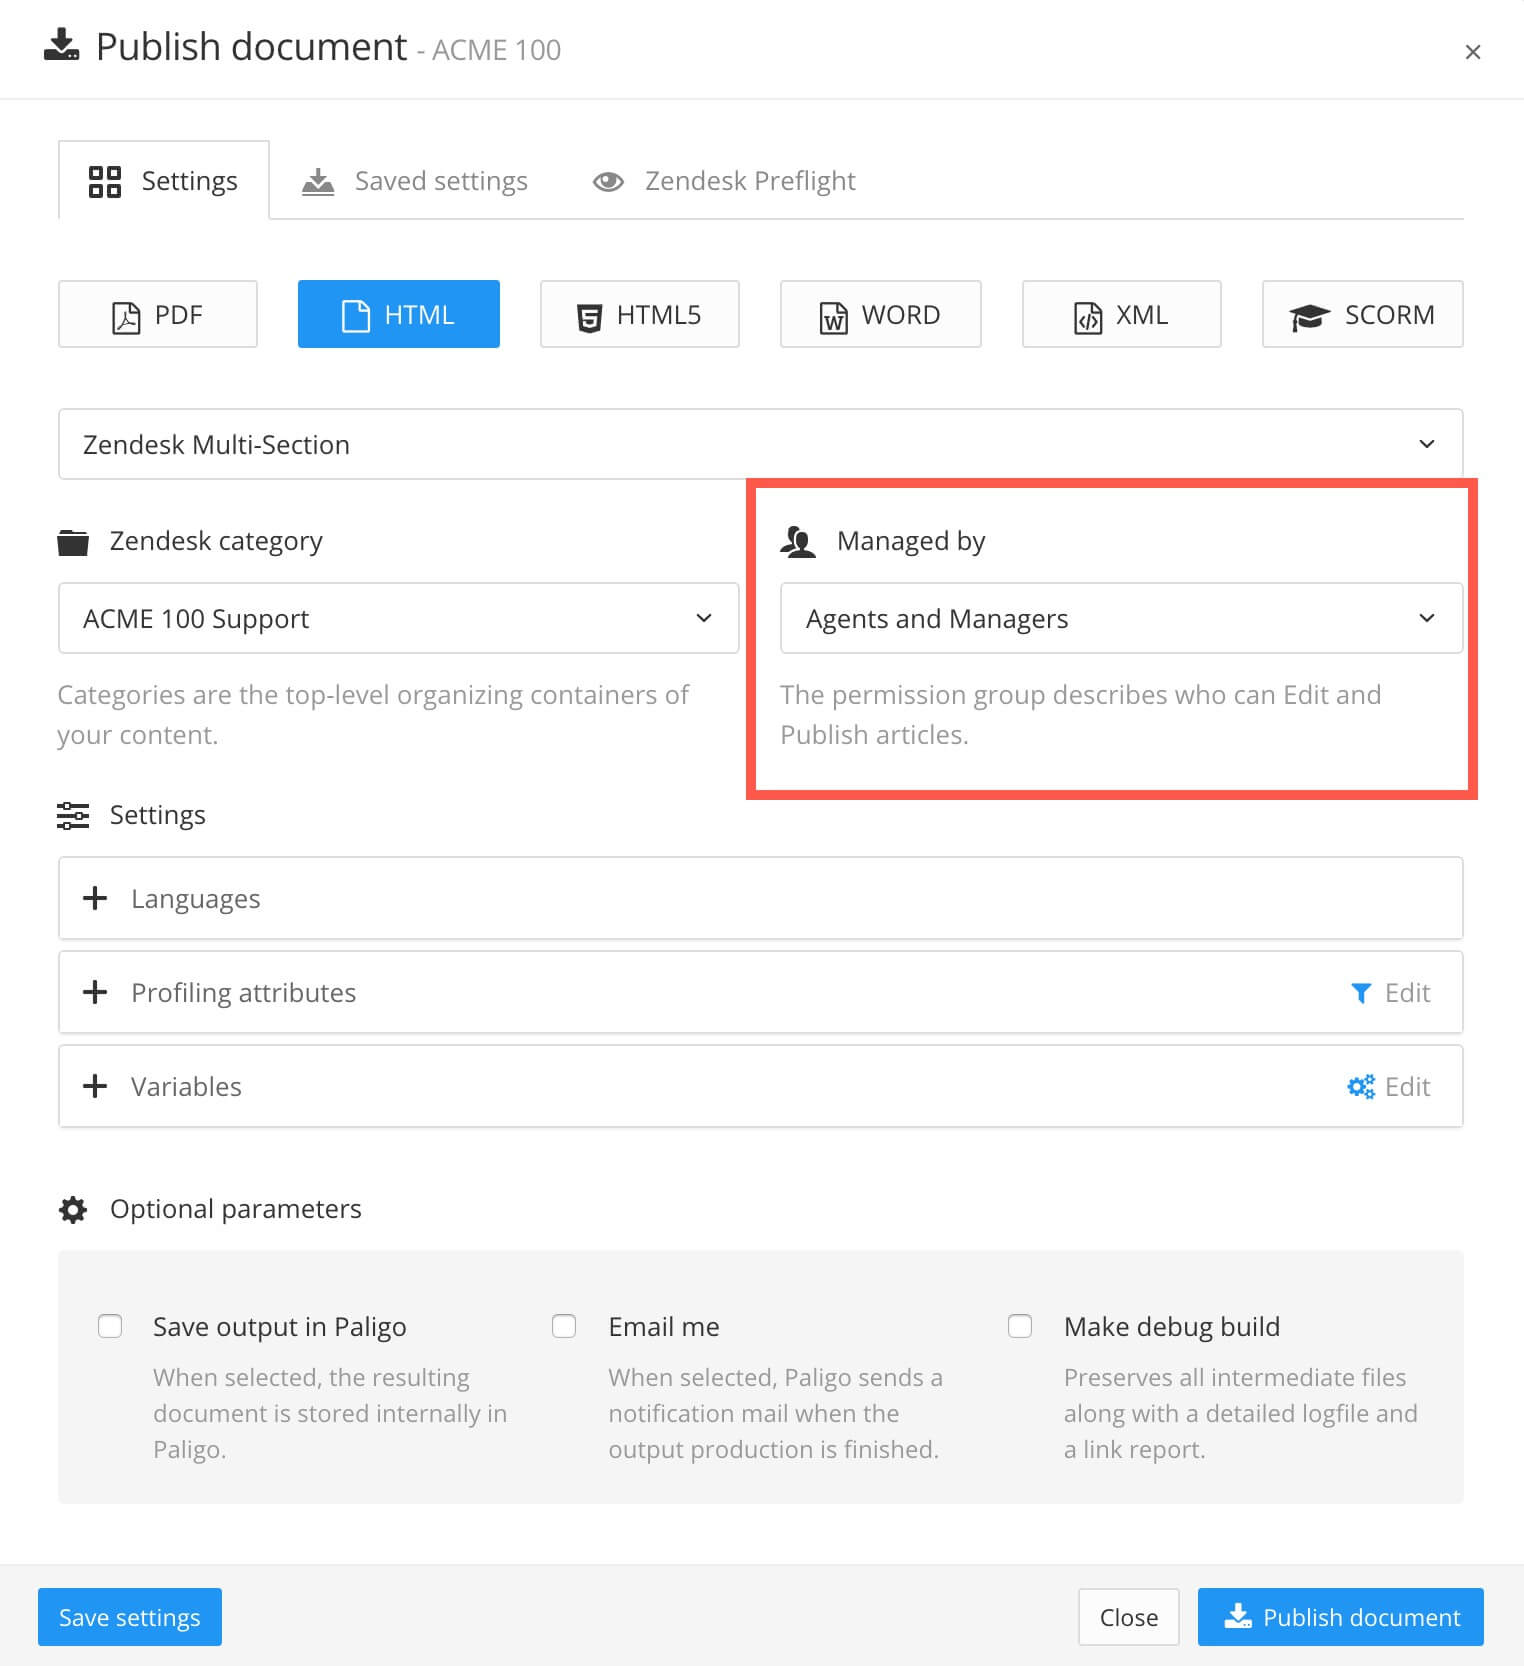
Select the Zendesk Preflight tab.
To set the status for all new articles, use the new article settings on the right.
Note
You cannot set the promoted state for all new articles. You can only set the promoted state for individual articles, see step Step 5.
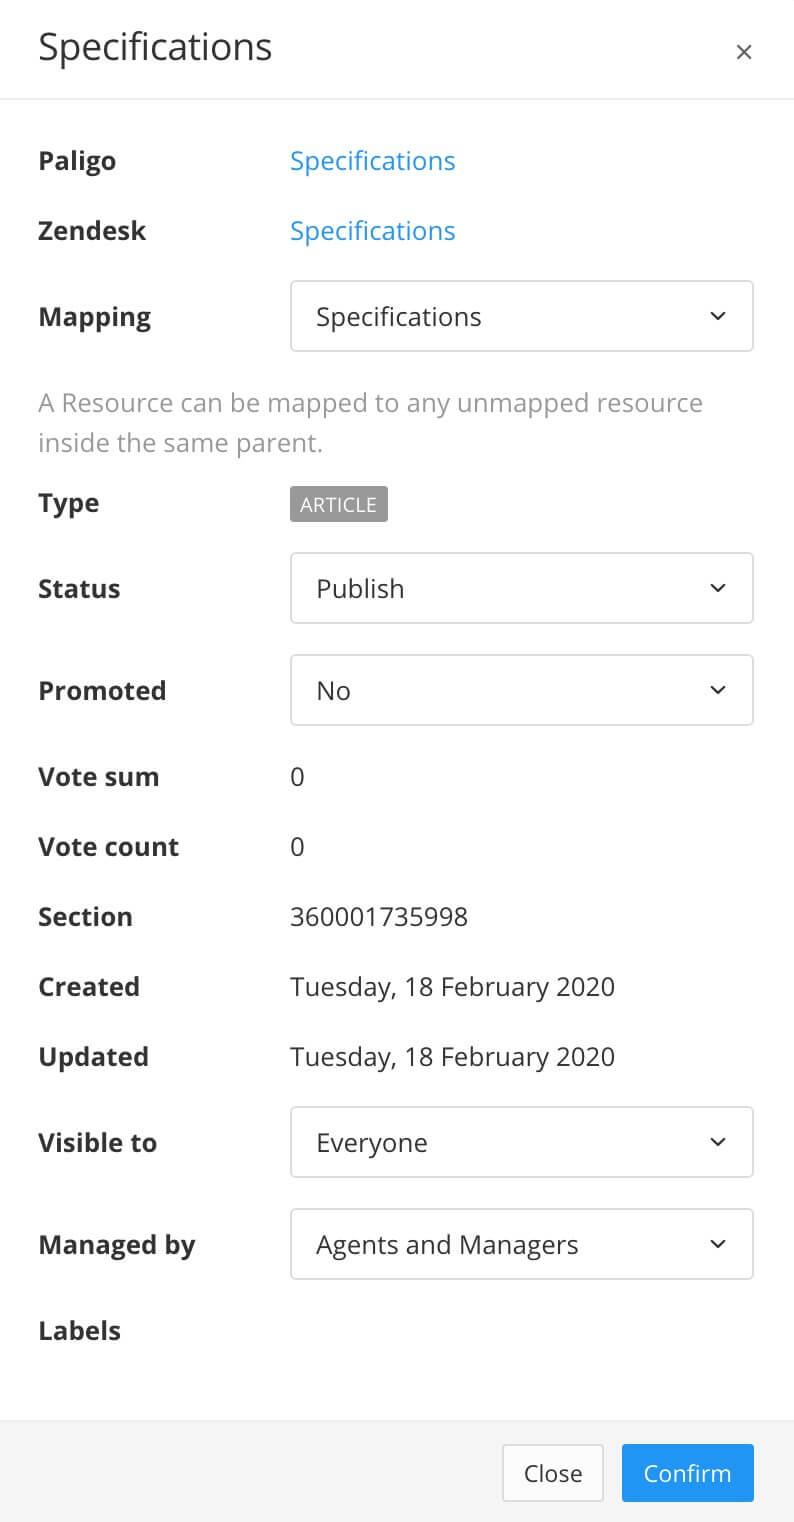
To set the status for an individual article, browse to the article in the list and select its cog icon to display a dialog.

On the dialog, you can set the draft/publish Status, Visible to, Managed by, and Promoted statuses. Select Confirm when you have made your choices.
Tip
You can also use this dialog to control the mapping.
If you have made all of the mapping changes you need and have set the languages, filters, etc. on the tab, select Publish document to start the publishing process.
When you publish your content to Zendesk, the content will use the statuses that you have set.
In Zendesk, each article can have labels that categorize the content, similar to how Taxonomies work in Paligo (Business and Enterprise plans only). For example, you could have some introductory training articles with labels for "Onboarding" and "Tutorial". When you map Paligo topics to Zendesk, you can set the Paligo articles to have labels too.
Display the Publish document dialog for your publication and set it to use a Zendesk layout and choose a Zendesk category, as described in View the Paligo-to-Zendesk Mapping.
Select the Zendesk Preflight tab.
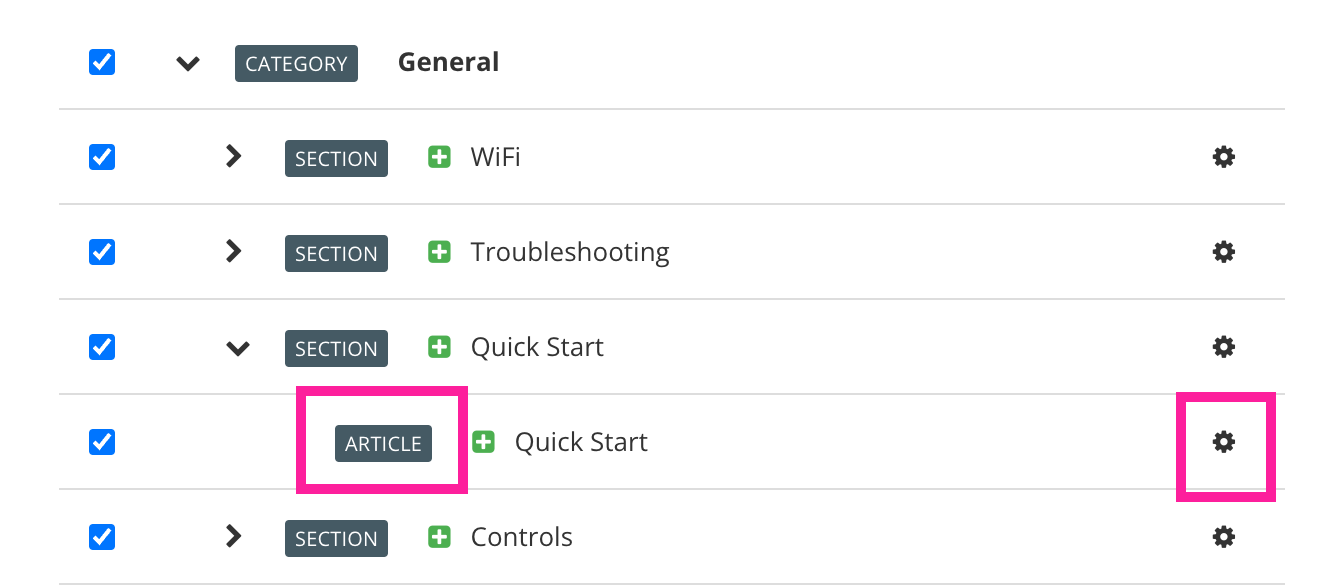
Expand the sections to reveal the topics that will become articles in Zendesk. Select the cog icon for the article you want to edit.
Use the Labels setting to define the labels for the article.
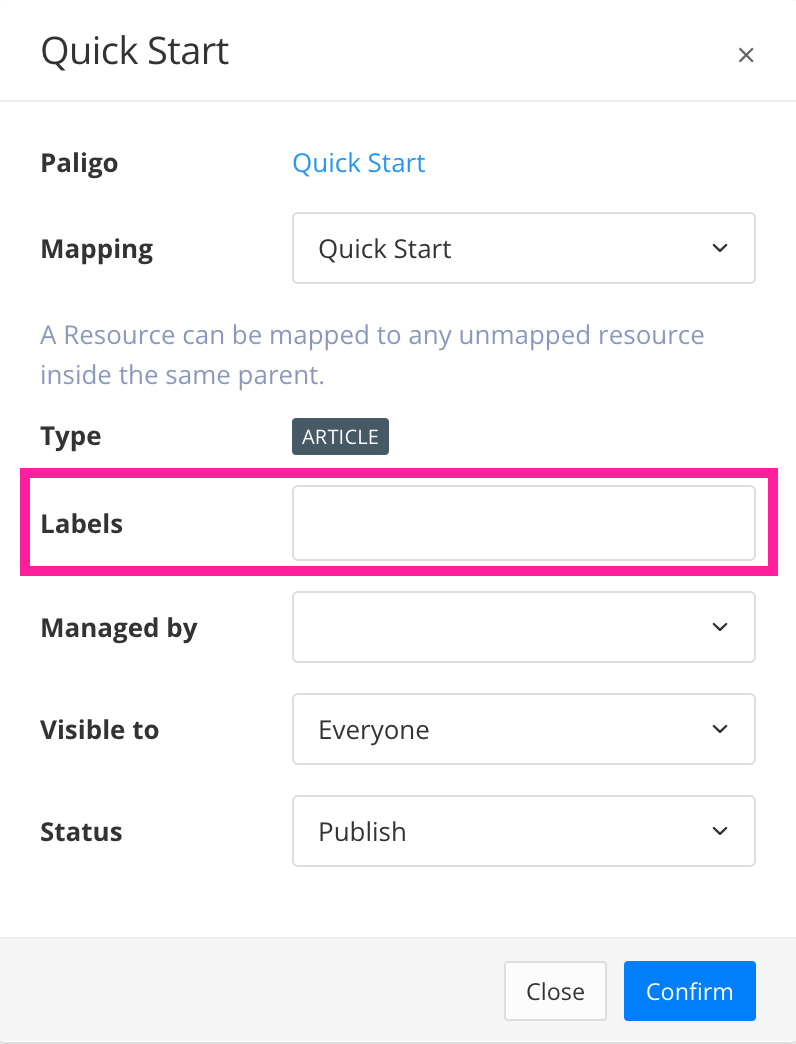
The Labels field shows the names of any labels and taxonomy tags that are already applied to the article. Taxonomy tags are converted into labels in Zendesk.
Note
Existing labels are only shown (and kept) if Preserve Zendesk Labels is enabled in the Zendesk integration settings.
Taxonomies are only shown as labels if Publish taxonomies as labels is enabled in the Zendesk integration settings.
You can:
Enter the name of a new label and press Enter. When you publish, Paligo will create that label in Zendesk and associate it with the article.
Enter the name of a label that already exists in your Zendesk and press Enter. Be careful when typing as the text you enter must match the existing label name exactly. If it is different, Paligo will create a new label with that name rather than associate the article with the existing Zendesk label.
Delete a label name to prevent the article from being associated with that label.
Select Confirm.
If you have made all of the mapping changes you need and have set the languages, filters, etc. on the tab, select Publish document to start the publishing process.
Paligo will publish the content to Zendesk and apply the labels you have set.
To remotely delete sections and articles from Zendesk, use the Zendesk Preflight tab on the Publish document dialog.
Find the article that you want to remove in the list. You can delete articles and sections that are not mapped to Paligo content.
You cannot delete new articles or sections from the list. If you do not want Paligo to create them, clear their checkboxes or remove the matching topics from the publication instead.
If you want to remove a mapped section or article, you first need to "unmap" it. To do this, remove the mapped topic from Paligo's publication and then publish. When the publish is complete, the article in Zendesk becomes unmapped. You can then delete it remotely as described in Step 3.
Select the delete icon next to the section or article that you want to remove.

You can cancel a deletion by selecting the restore icon (plus icon).

If you have made all of the mapping changes you need and have set the languages, filters, etc. on the tab, select Publish document to start the publishing process.
The deletion will take place when you publish to Zendesk.
You can set Paligo to include taxonomy tags when you publish to Zendesk. The taxonomy tags will then appear as labels in the Zendesk articles that Paligo creates or updates.
Note
For the following process, we assume that you have already set up Paligo to connect to your Zendesk instance. See Connect Paligo to Zendesk for details.
If you have not already set up your taxonomies in Paligo:
Associate your taxonomy tags with the appropriate publications, topics, and images
Sign in to Paligo using a user account that has administrator permissions.
Select the avatar in the top-right corner.

Select Settings from the menu.

Select the Integrations and webhooks tab.


Find Zendesk, and select Change.
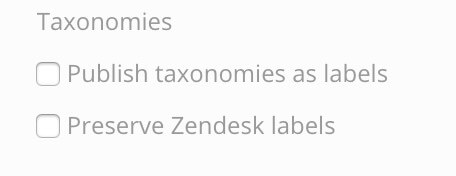
Use the Taxonomies settings to control how Paligo's taxonomy labels are used.
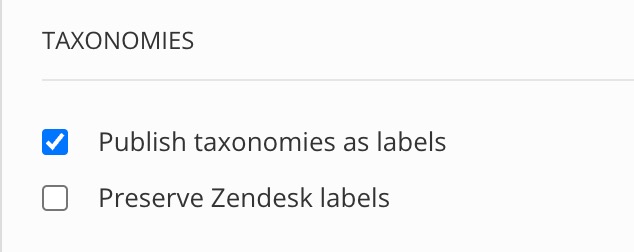
Use the Publish taxonomies as labels box to choose whether taxonomy tags are used as labels in Zendesk.
Use the Preserve Zendesk labels box to choose whether taxonomy tags are added as labels in Zendesk in addition to any existing labels.
If you check the box, Paligo will leave any existing Zendesk labels in place. It will then create new labels to match the taxonomy tags, but will not duplicate any existing tags. For example, if you have a "software" taxonomy tag and there is already a "software" label in Zendesk, Paligo will not create a second "software" label.
If you clear the box, Paligo will remove all existing Zendesk labels and will create new labels to match the taxonomy tags.
Select Save.
Publish your content to Zendesk.
For details, see Publish to Zendesk.
In Zendesk, check that the labels have been applied to your articles.
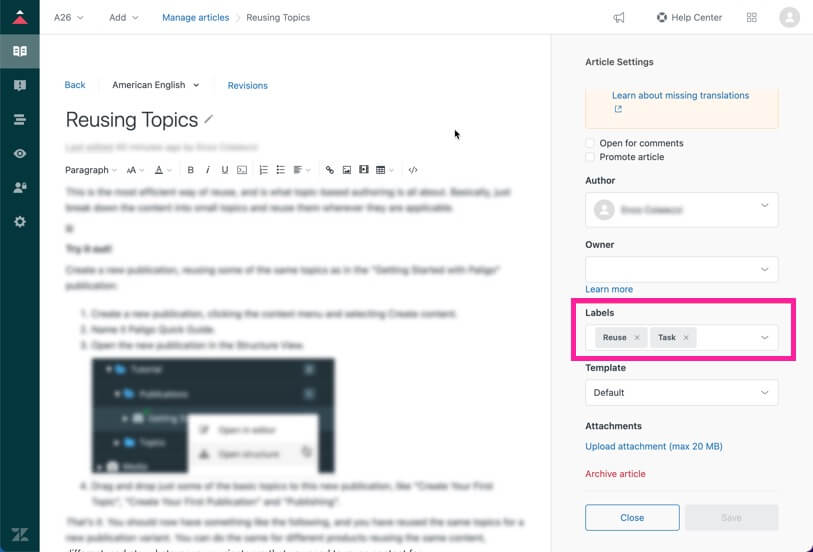
If the taxonomy tags have not been applied to the articles as labels, check that the Paligo-to-Zendesk connection is working. For this, you could update a topic in Paligo, publish to Zendesk and check that the changes appear in the article.
If the article updates, but the taxonomies do not appear as labels, double-check that you have applied the taxonomies settings in the Zendesk integration correctly. If they are in place, as described in step 4, contact support for assistance.
If the article does not update, check that the Zendesk integrations are correct. If they are, but you are unable to publish to Zendesk, contact support for assistance.
To publish content to Zendesk, Paligo uses Zendesk layouts. You can think of Zendesk layouts as templates that define how Paligo will map your topics to sections and articles in Zendesk.
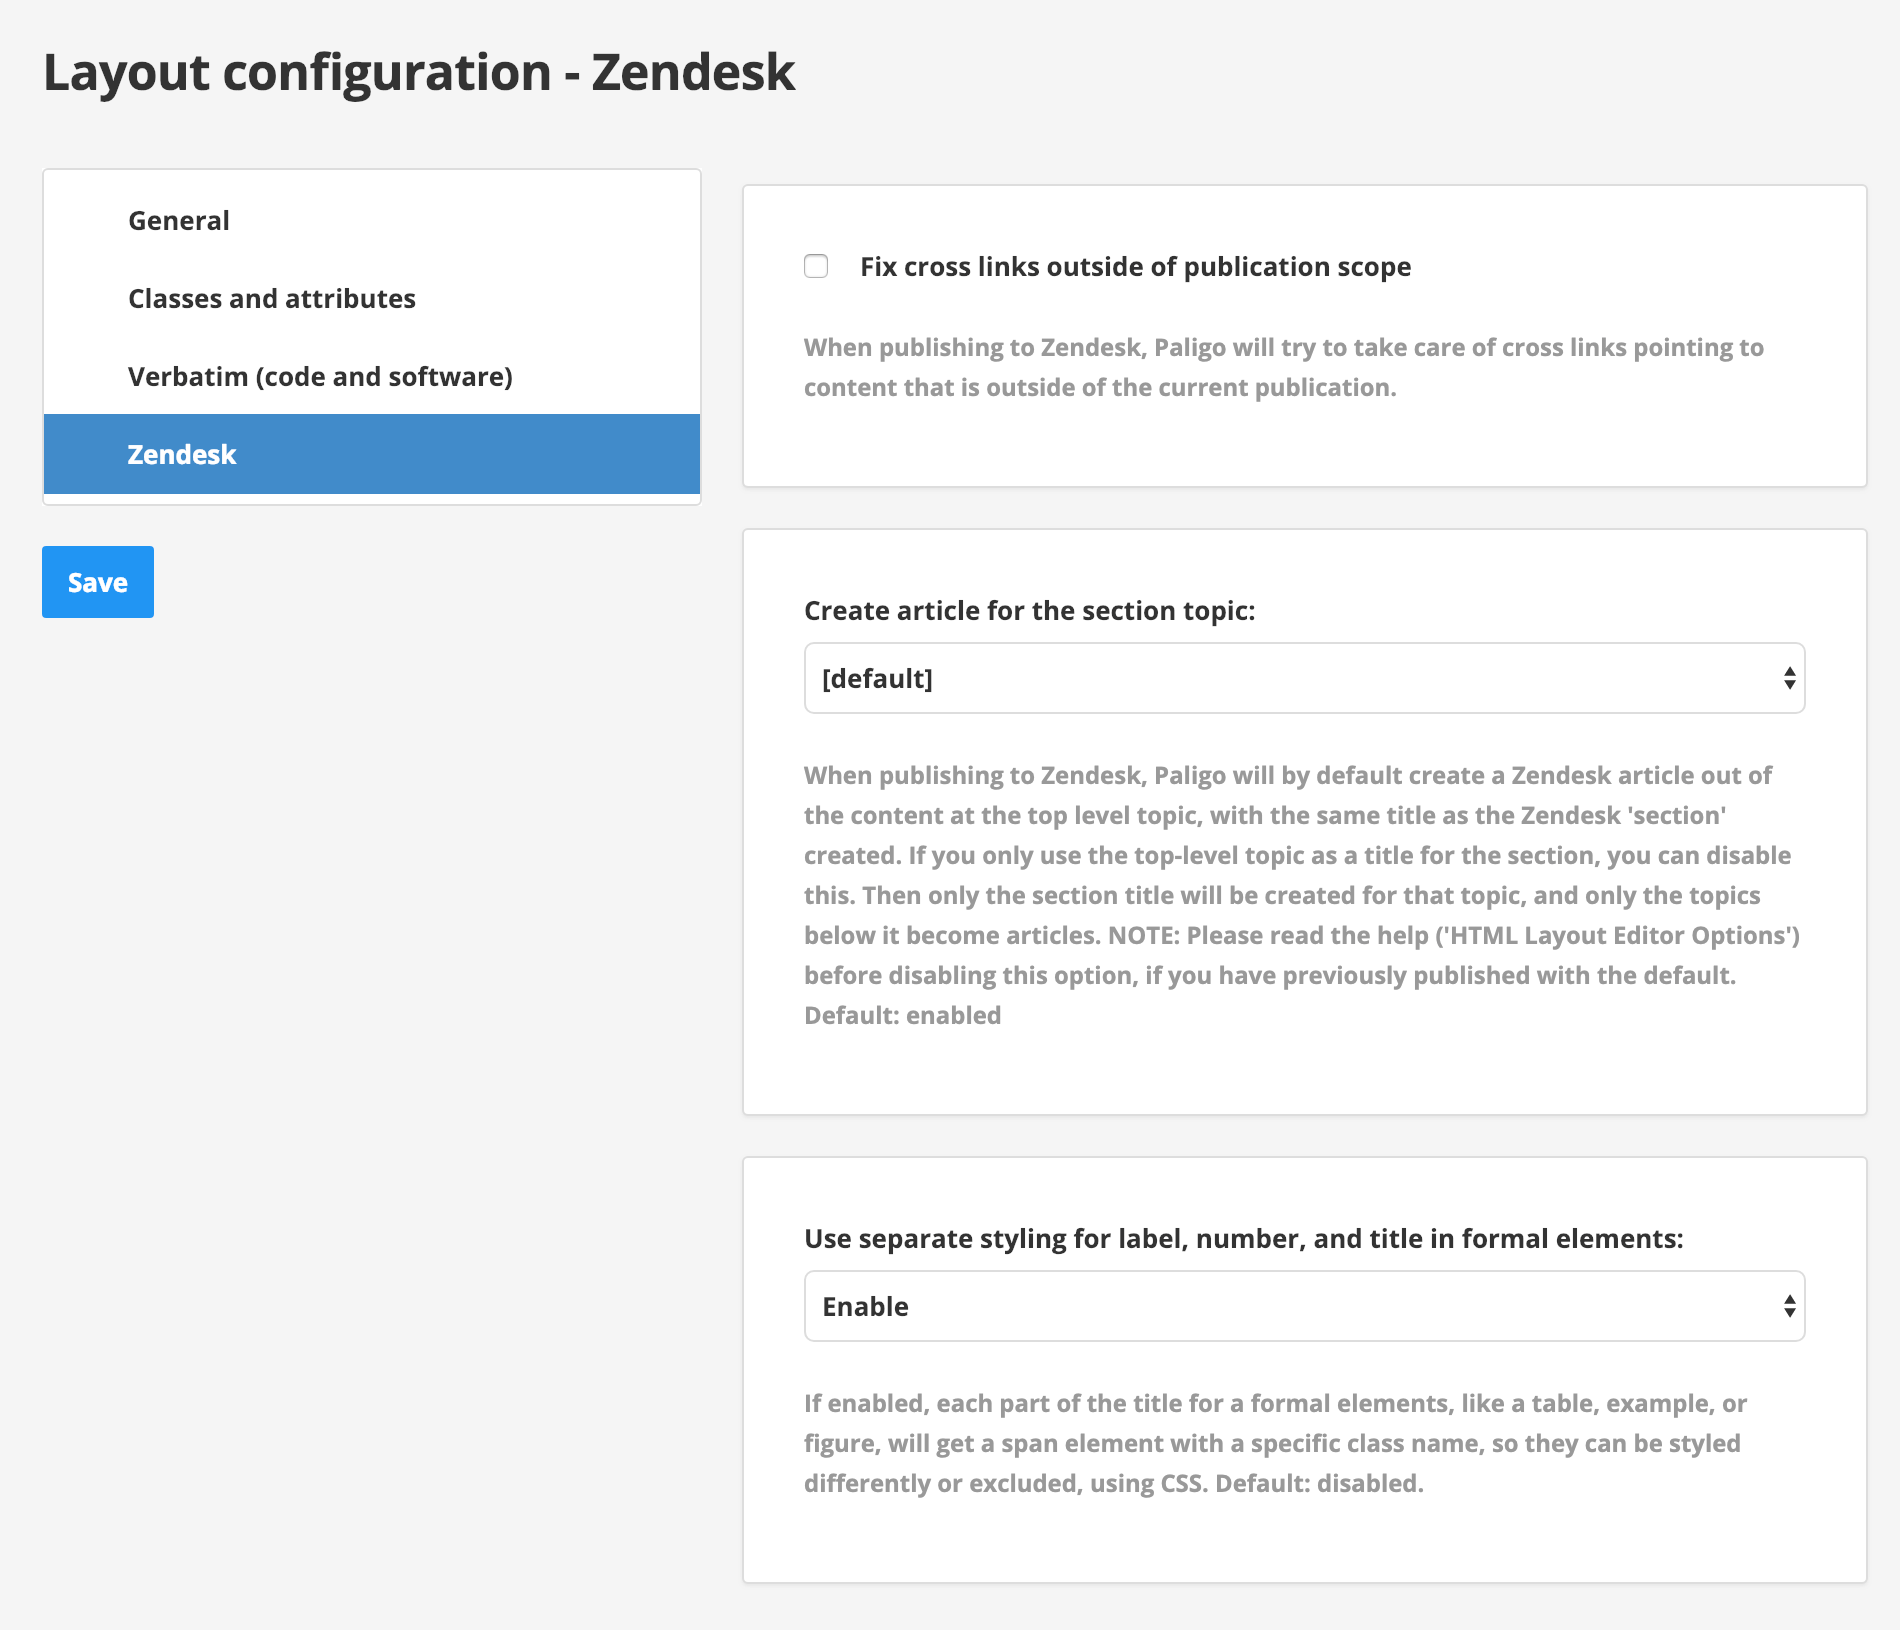 |
Paligo has a built-in layouts for each type, and you can publish with those. Alternatively, you can Create a Zendesk Layout. The layouts map Paligo content to Zendesk differently, and so it is a good idea to understand the differences before you use them.
The Zendesk layouts you can use are:
Single-Section Zendesk Layouts
Use this layout if you want to map a Paligo publication to a section in Zendesk, with top-level topics becoming articles. Lower-level topics become subsections in the articles. To find out more, see Single-Section Zendesk Layouts.
Use this layout if you want to map top-level Paligo topics to top-level sections in Zendesk, with articles inside those sections. To find out more, see Multi-Section Zendesk Layouts.
This layout is only available if you have the Paligo Enterprise plan and the Zendesk Enterprise plan. Use it to map several levels of Paligo content to multi-level sections in Zendesk, with articles inside the sections. To find out more, see Zendesk Enterprise Layouts.
In each Zendesk layout, there are settings that you can apply to all of the content that is published with that layout. To find out about the settings, see Edit a Zendesk Layout.
Note
A Zendesk Layout is for defining how Paligo features and content are published to Zendesk. They are not used for styling the content in Zendesk (see Customize Zendesk articles using CSS).
Tip
You can also use Customize Zendesk articles using CSS and Customize Zendesk Articles Using Javascript to change the appearance and functionality of the content in Zendesk.
If the built-in Zendesk layouts do not meet your requirements, you can create your own. Before you create a Zendesk layout, you should connect Paligo to Zendesk by following the instructions in Connect Paligo to Zendesk.
To create a Zendesk layout:
Select the Layout menu.
Select Create New Layout.
Give the layout a name in the Layout Title field.
Choose the Output Format.The Output Format is the base layout for your new layout.
The base layout defines:
The type of content you can create with your new layout. For Zendesk, you need to choose a Zendesk HTML base layout.
Where the default values for your new layout come from. In your new layout, if you set the value of a setting to Default, it means the value for that setting comes from the base layout. Your new layout "inherits" the value from the base layout. To find out more, see Layout Relationships - Base, New, Duplicate
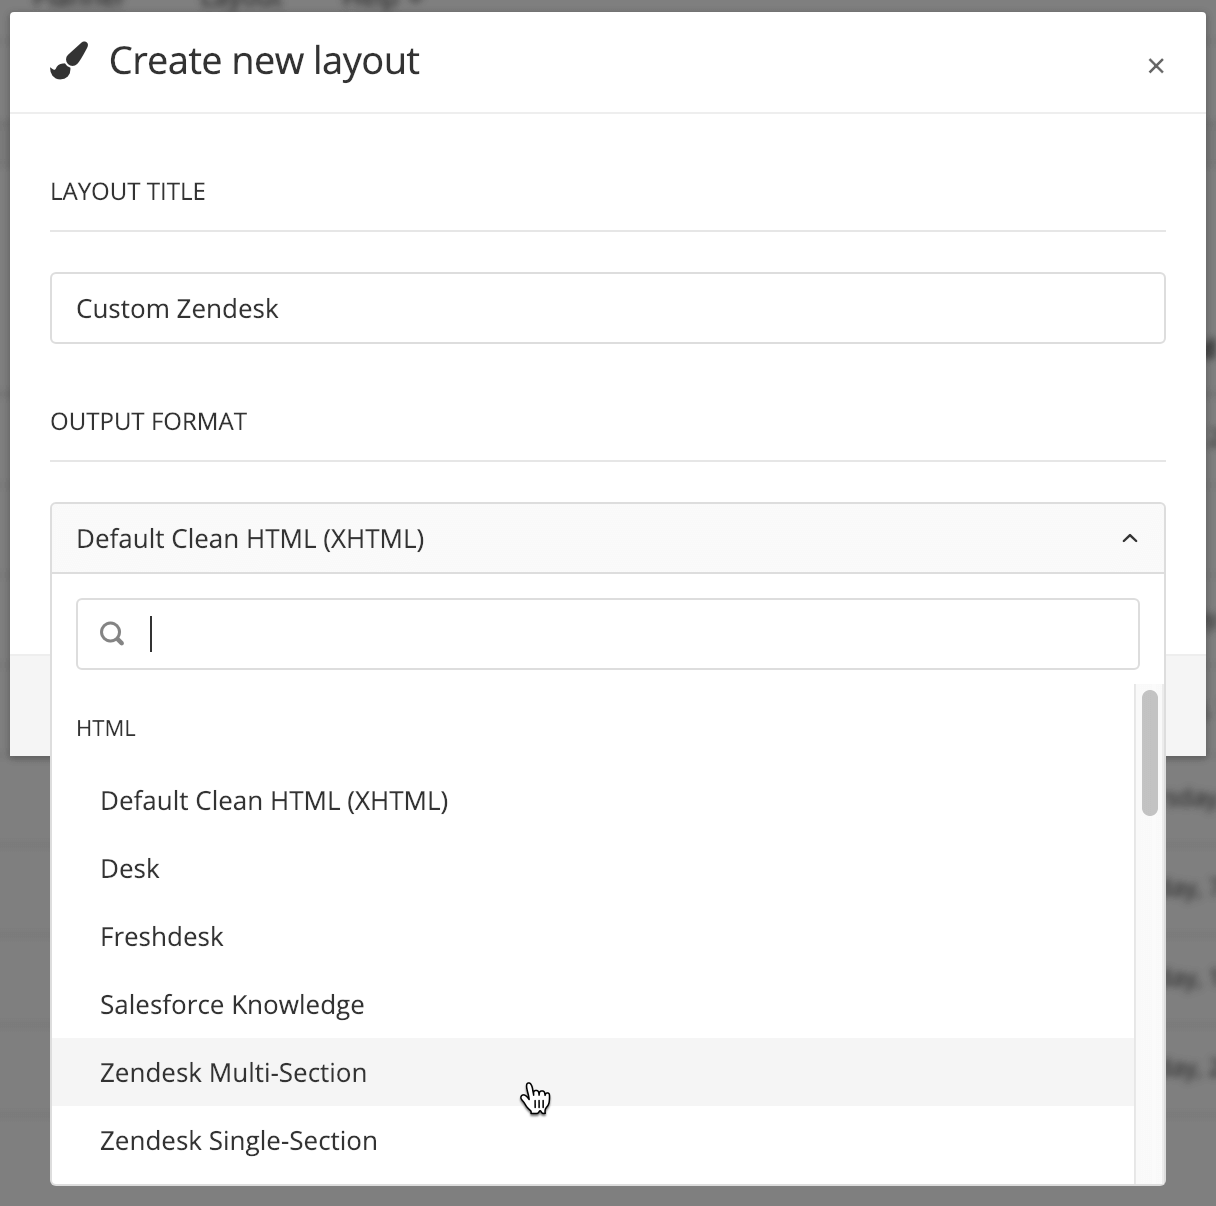
Paligo has three types of built-in Zendesk layout that you can use as the base layout. Alternatively, you can use one of your own Zendesk layouts, but those must have been based on one of the built-in layouts originally. The three built-in Zendesk layouts are:
Zendesk Multi-Section: We recommend this option for most projects. It sets Paligo to map the top-level topics in Paligo to sections in Zendesk. Paligo's second-level topics are then mapped to articles, and any third-level or lower topics are subsections within the articles.
To find out more, see Multi-Section Zendesk Layouts.
Zendesk Single-Section: Use this option if you want top-level topics in Paligo to be mapped to articles in Zendesk. All level-two and lower topics in Paligo will become sub-sections in the articles in Zendesk. This can result in long articles.
To find out more, see Single-Section Zendesk Layouts.
Zendesk Enterprise: Use this option if you want to map topics in Paligo to multiple levels of sections in Zendesk (sections inside other sections).
To find out more, see Zendesk Enterprise Layouts.
Note
Your choice of layout type affects how topics are mapped to Zendesk sections and articles. You can Customize Paligo-to-Zendesk Mapping to control which articles and sections are mapped to, but the structure comes from the layout.
Select OK to save the layout.
The default settings for the layout are designed to be suitable for most Paligo-to-Zendesk publications. You can make changes to the layout if required (see Zendesk Layouts).
When you have connected Paligo to Zendesk and set up a Zendesk layout, you can Publish to Zendesk.
Tip
We recommend that you set up a category in Zendesk that will not appear to your customers. You can then use your layout to publish to that location and test the Paligo-to-Zendesk publication process.
Each Zendesk layout contains settings that affect your content when you publish. By editing your Zendesk layout, you can change:
How cross-references between categories are handled
Whether Paligo creates sections and articles for topics, or only articles
Whether individual styling can be used for label, number, and title in formal elements
The number of section levels you can map content to (Zendesk Enterprise layouts only).
To edit a Zendesk layout:
Note
When you have connected Paligo to Zendesk and set up a Zendesk layout, you can Publish to Zendesk.
Select Layout.

Select the Zendesk layout that you want to edit. Paligo displays the Layout Editor.

Make your changes to the layout.
The General, Classes and Attributes, and Verbatim (code and software) settings are all common HTML Layout Editor Options.
Most of the Toc and chunking settings do not apply to Zendesk, however there is one exception. If you are using a Zendesk Enterprise layout, you can use the Chunk section depth to Set the Section Levels for Mapping to Zendesk.
The Zendesk settings are specific to Zendesk layouts and you can use them to:
Select Save.
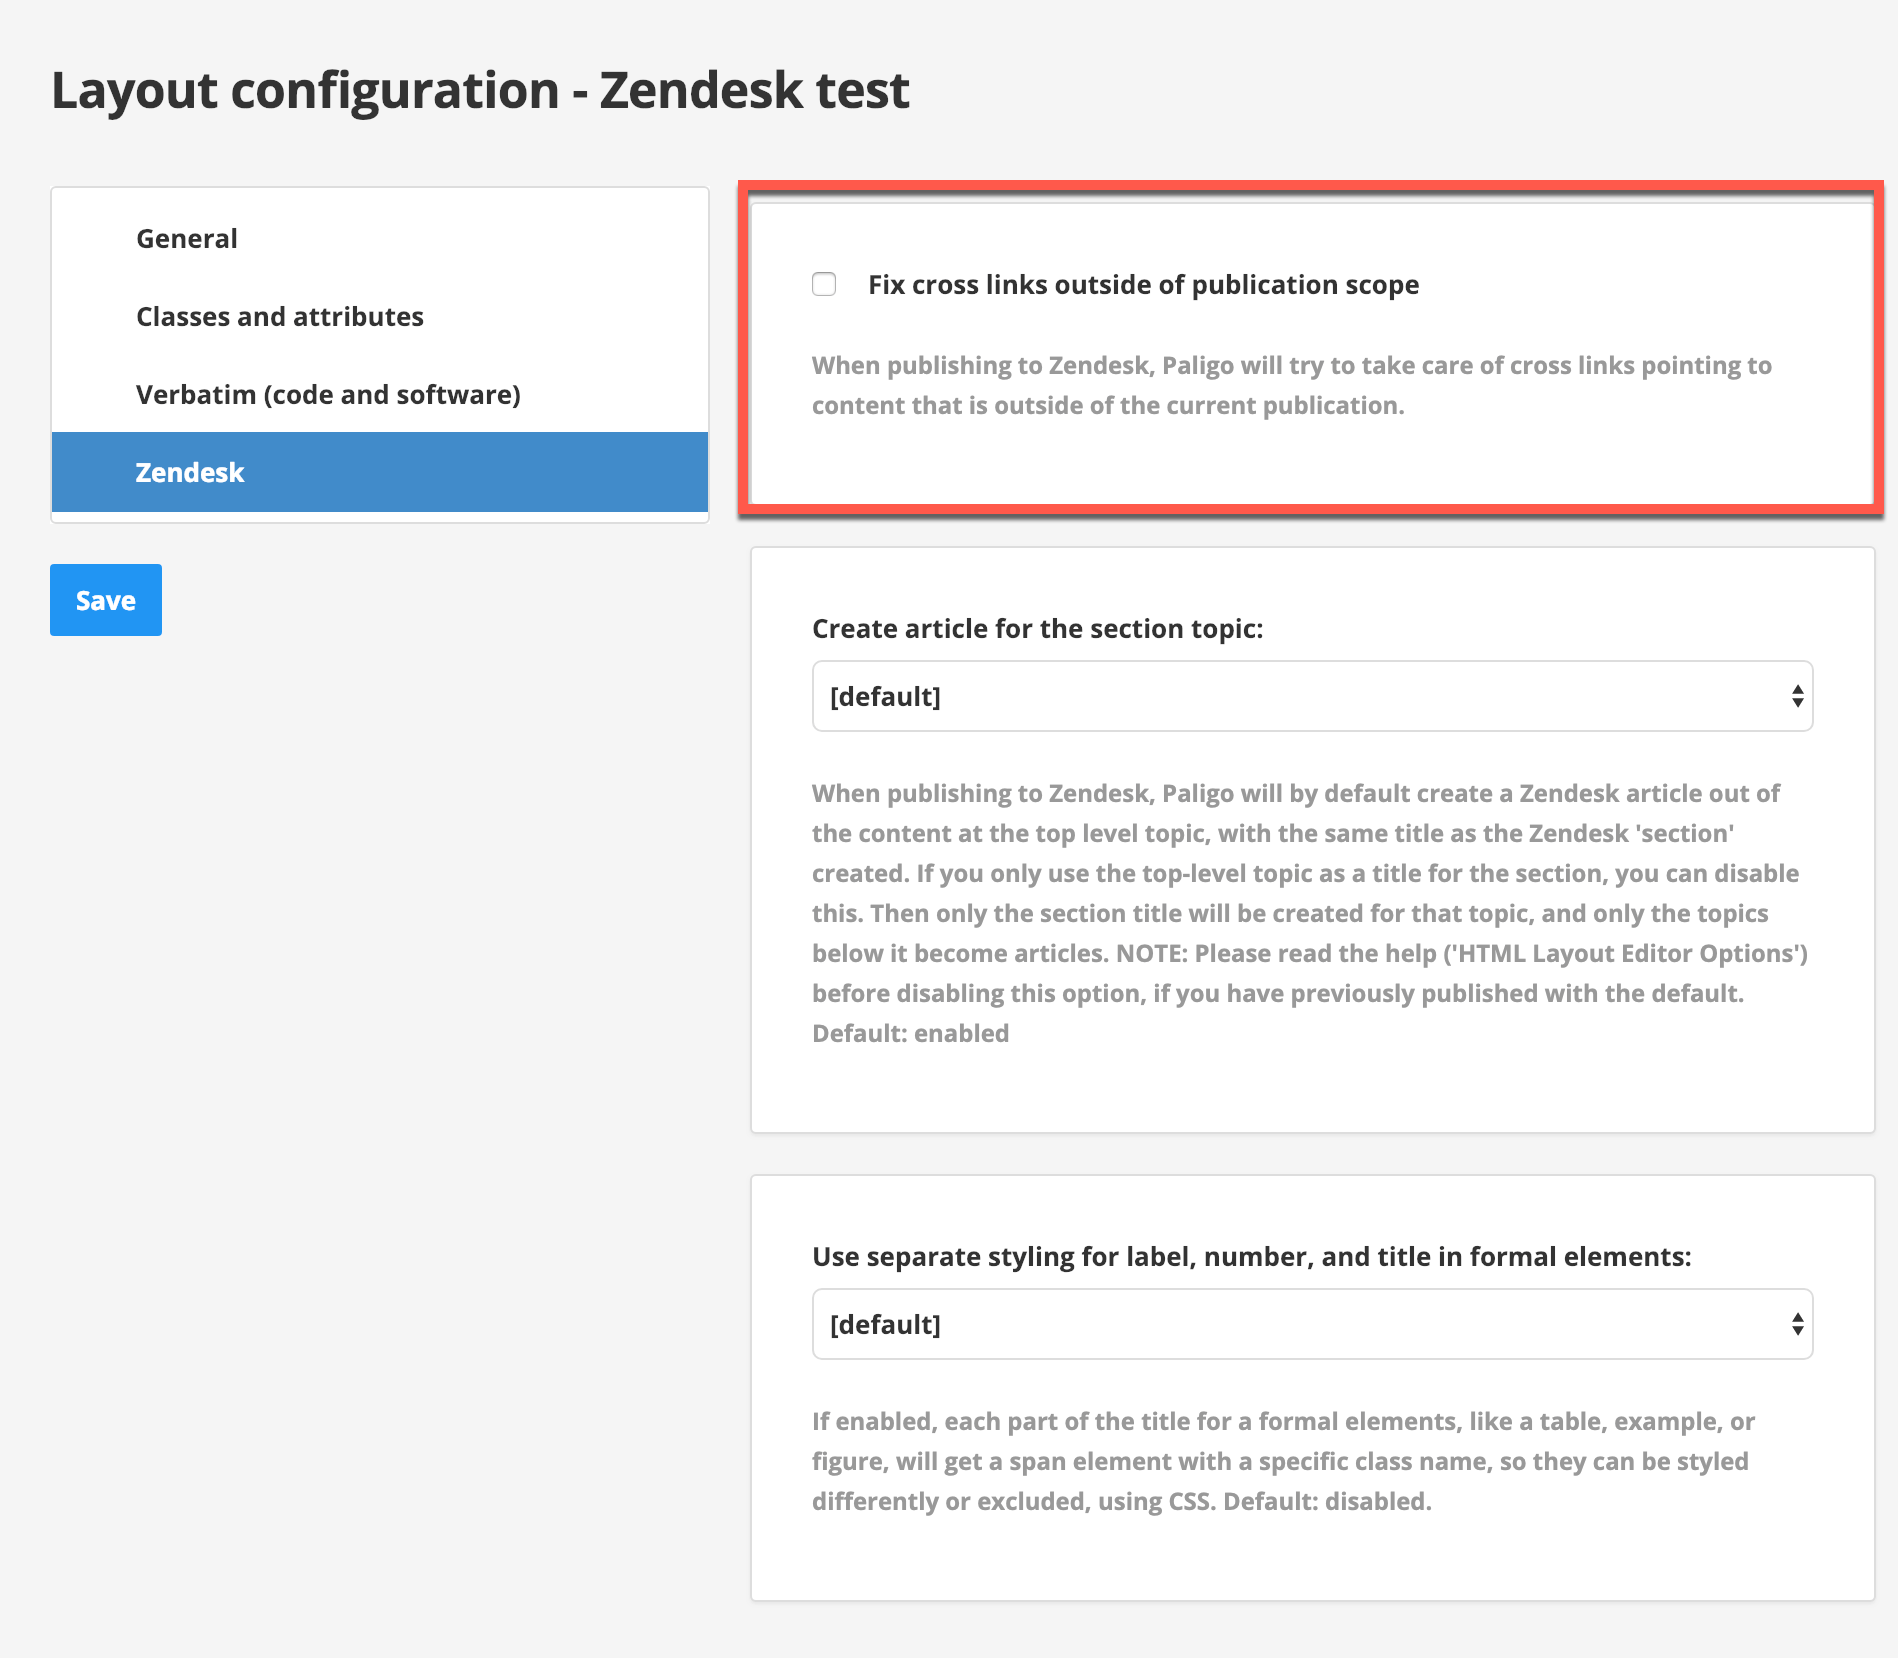
If your publication has topics that contain cross-references to other publications, you should enable the Fix cross-links outside of publication scope feature in the Layout Editor before you publish to Zendesk.
It allows Paligo to resolve links in Zendesk so that cross-references between publications will work in your Zendesk articles. However, it can only resolve links to:
Topics not reused in different contexts - If you have cross-publication links, and the target topic for the link is only used once in the publication, Paligo will resolve the link. This is because the target topic is only used in one context and only exists in one place in the publication.
Topic "forks" reused in different contexts - You may have cross-publication links where the target of the link is a topic that is used in several places in the publication. Obviously, Paligo cannot link to all instances of the topic at once. This is solved by adding a link to the topic "fork" in the publication, instead of linking directly to the topic. A "fork" is the reference from the publication to the topic and you can see them by expanding a publication in the Content Manager.
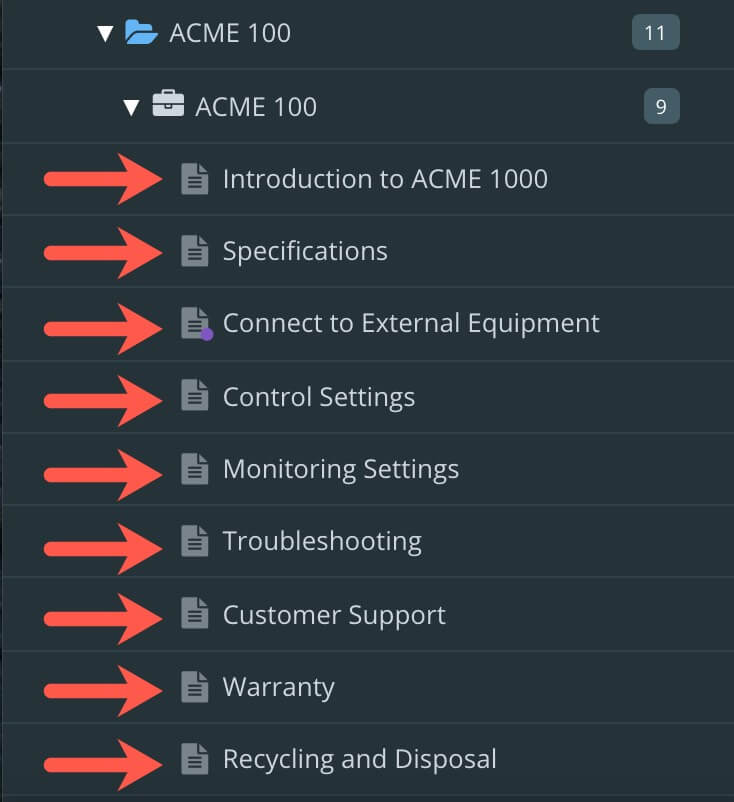
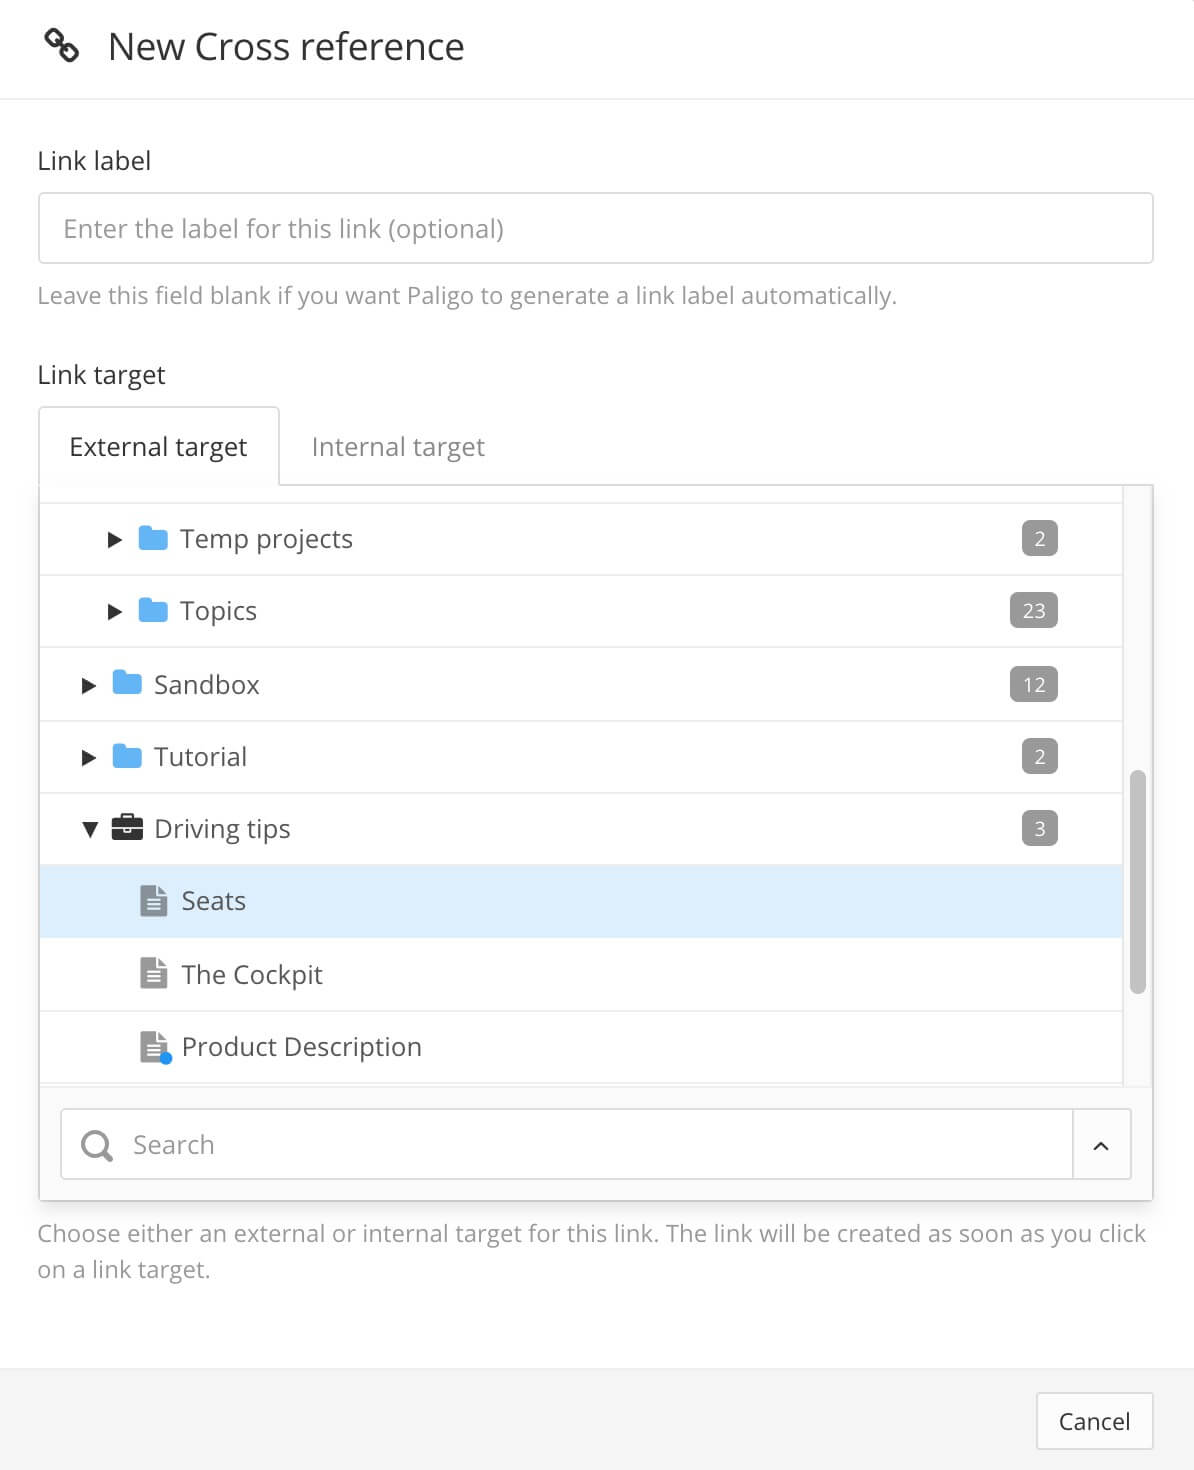
Expand the publication in the New cross-reference dialog, and select the topic fork (shown as a gray topic inside the publication's hierarchy).
Have been published to Zendesk before - If your publication has links to topics/articles that have not been published before, Paligo cannot resolve the links. The problem is that the content that contains the links (the source) is linking to content that does not exist in Zendesk.
The "source" cannot link to a "target" that does not exist. But there are two easy solutions:
Publish the "target" content before you publish the "source" content.
Publish the "source" content, then publish the "target" content, and then publish the "source" content again.
To enable the Fix cross links outside of publication scope setting for your Zendesk layout:
Select Layout in the top menu.

Paligo displays a list of Layouts. The list is empty if there are no custom Layouts in your Paligo instance.
Select the Layout you want to update or Create a Layout.
Tip
You can copy the URL of the Layout Editor and paste it into a new tab in your browser. This can be useful if you frequently switch between your Paligo content and the Layout settings.
Select Zendesk.
Check the Fix cross links outside of publication scope box to enable this feature.
Select Save.
Publish your content to Paligo using the Zendesk Layout you have edited (see Publish to Zendesk).
Note
You may need to publish to Zendesk twice for the publication-to-publication links to work.
Let's say you have two publications in Paligo: "Category A" and "Category B".
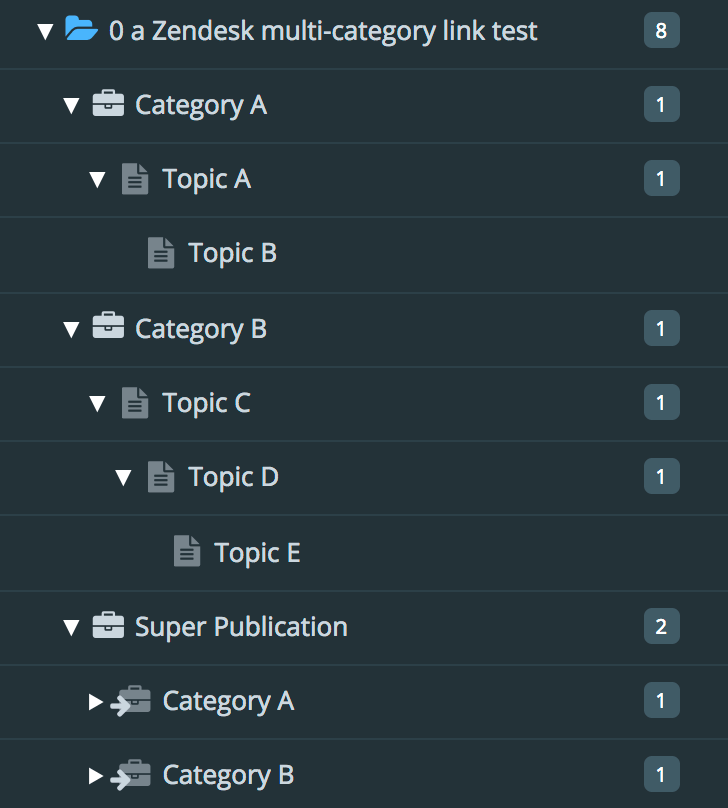 |
"Topic A" contains links to "Topic C" and "Topic E", which are topics in a different publication ("Category B").
You want to publish the "Category A" and "Category B" publications to Zendesk. In Zendesk, you create a category for each publication. You name the Zendesk categories to match the publication names, so the "Category A" publication will map to "Category A" in Zendesk.
You enable the fix cross links outside of publication range option in a custom Zendesk Layout:

(The reason it is not enabled by default is for backwards compatibility).
You publish the "Category A" publication to Zendesk. You use your custom Zendesk layout for the publication and set the destination Zendesk category to "Category A":

You publish "Category B" in the same way, but set the destination Zendesk category to "Category B".
You check the results in Zendesk. At this point, the links from "Topic A" to "Topic C" and "Topic E" are broken. This is because the target articles ("Topic C" and "Topic E") did not exist in Zendesk when you published "Category A". However, Paligo has stored the ids for the target articles.
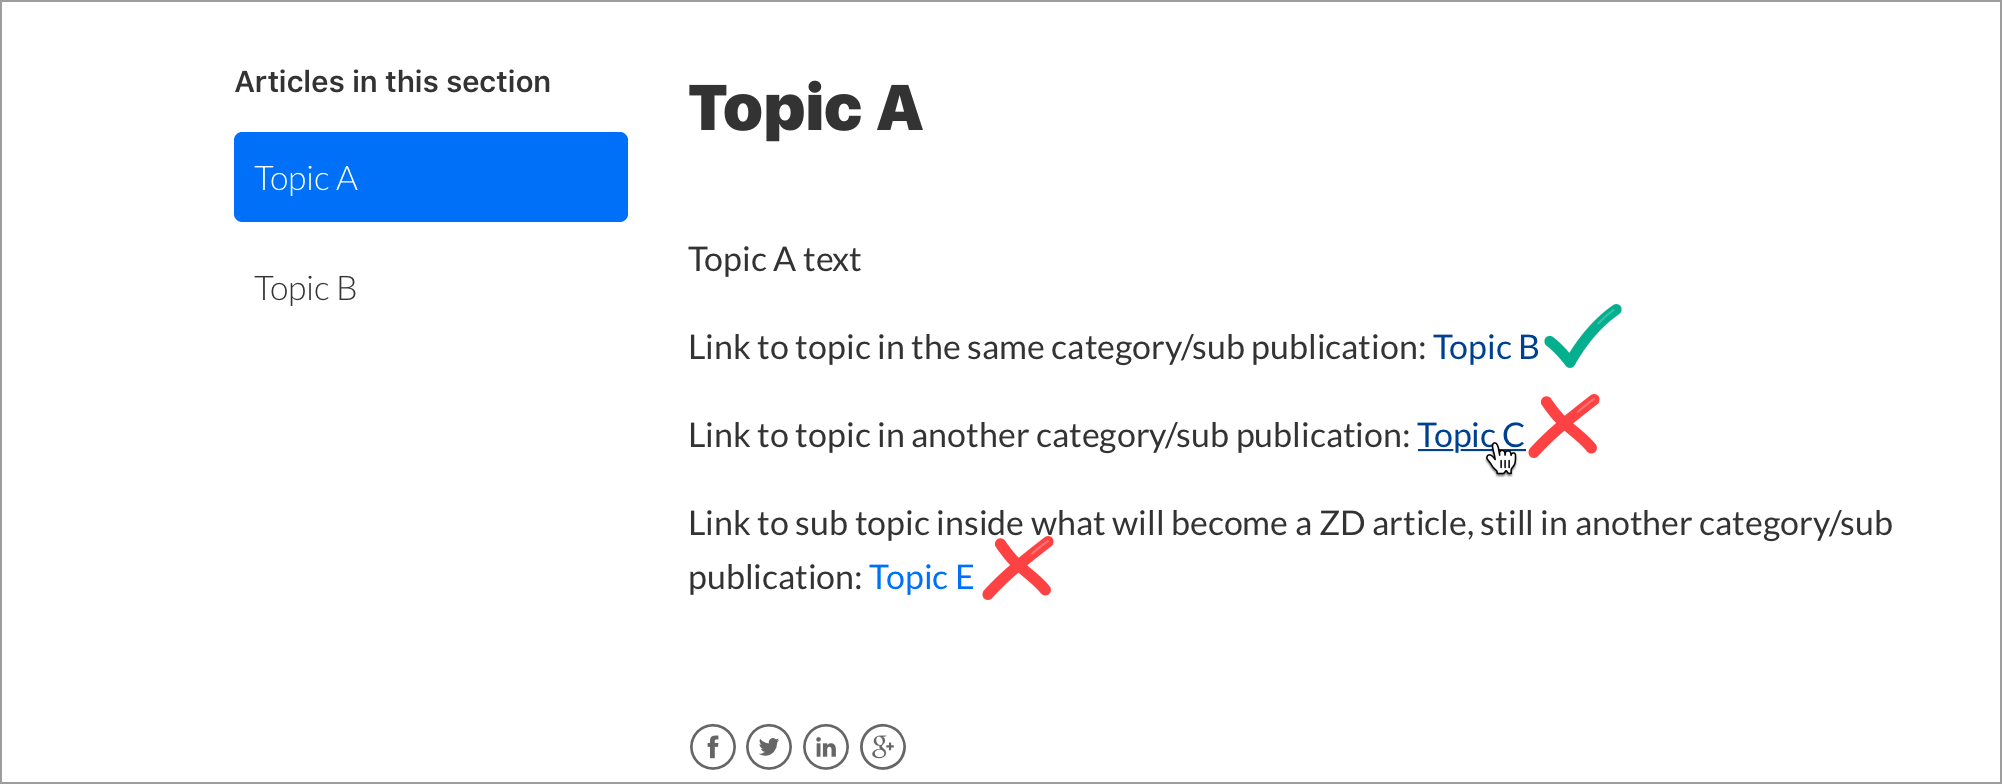
You publish both publications again, using the same custom Zendesk layout.
(In this example, it would have been enough to re-publish "Category A", as that's the only publication that contained links to another publication. But in a real-life scenario, you might have links back and forth between multiple publications, and so you would need to re-publish each one again.)
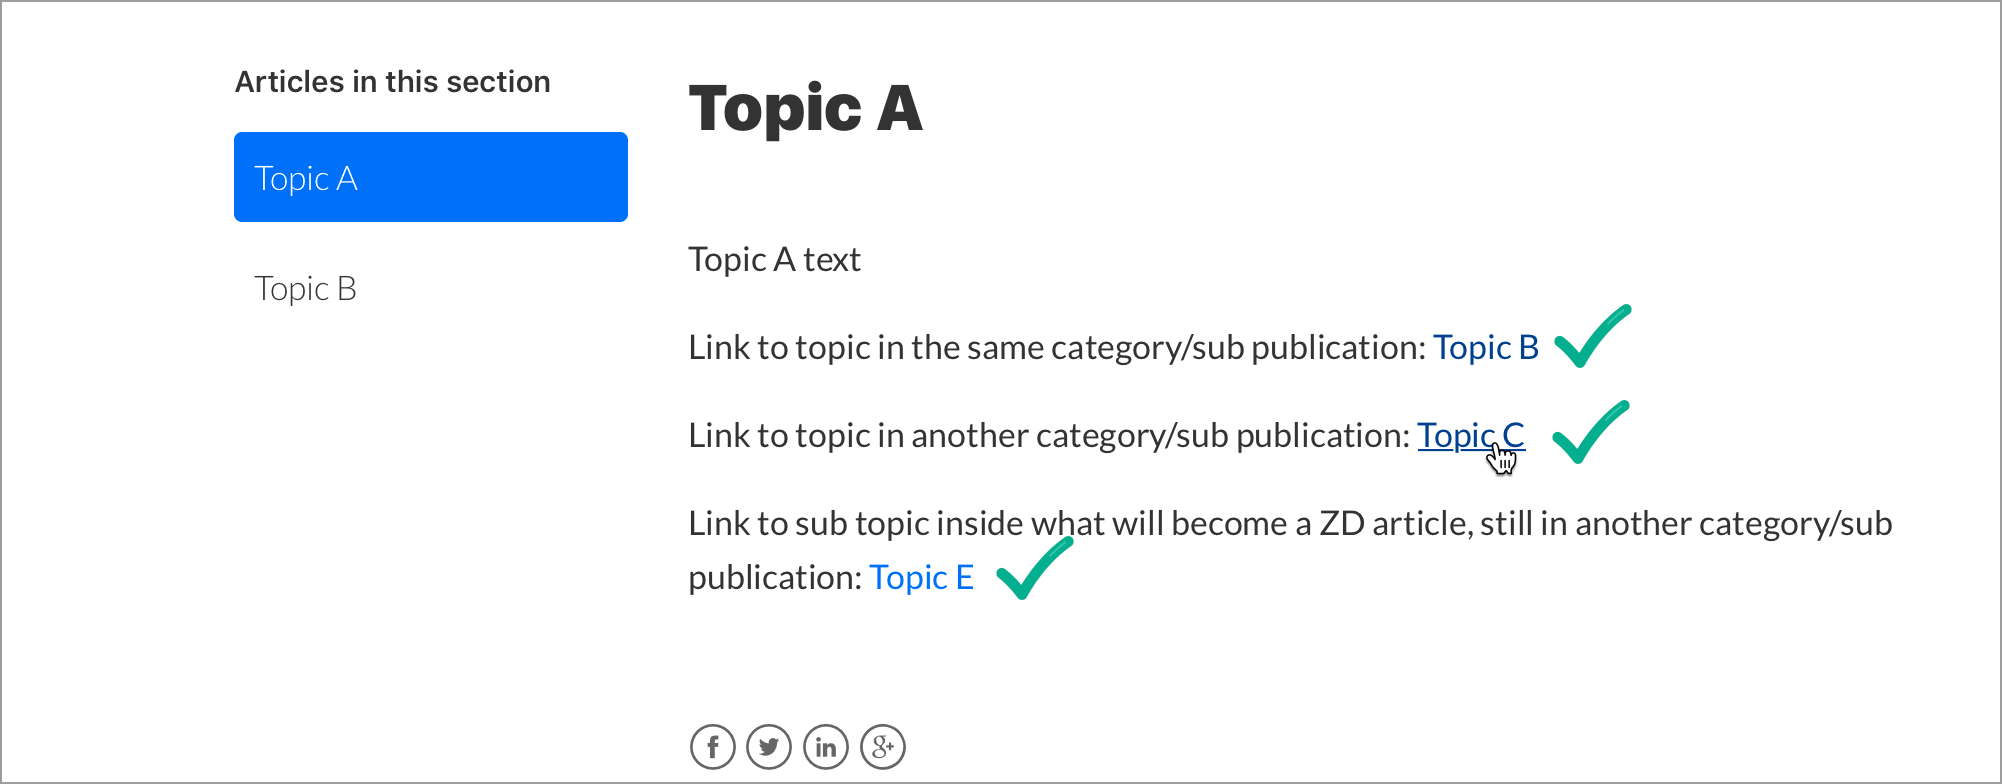
The links are now fixed and work as expected. This is because Paligo had stored the destination ids on the first publish. On the second publish, Zendesk contained the target articles, and the links could be resolved, even though they were in separate categories.
When publishing content to Zendesk, Paligo automatically creates extra topics for any top-level topics and sub-publications (reused publications). This helps to make sure any content in those top-level items is available in articles in Zendesk. But if you prefer, you can stop Paligo from creating this extra articles.
For a walk-through of how the extra article feature ("Create article for the section topic") works, see the example at the end of this article.
To control whether Paligo creates extra articles for the top-level content:
Select Layout and then select the Zendesk Layout that you are going to use for publishing. If you do not yet have a Layout, you can create one.
Paligo opens the layout in the Layout Editor.
Select Zendesk.
Apply the appropriate value for the Create article for the section topic:
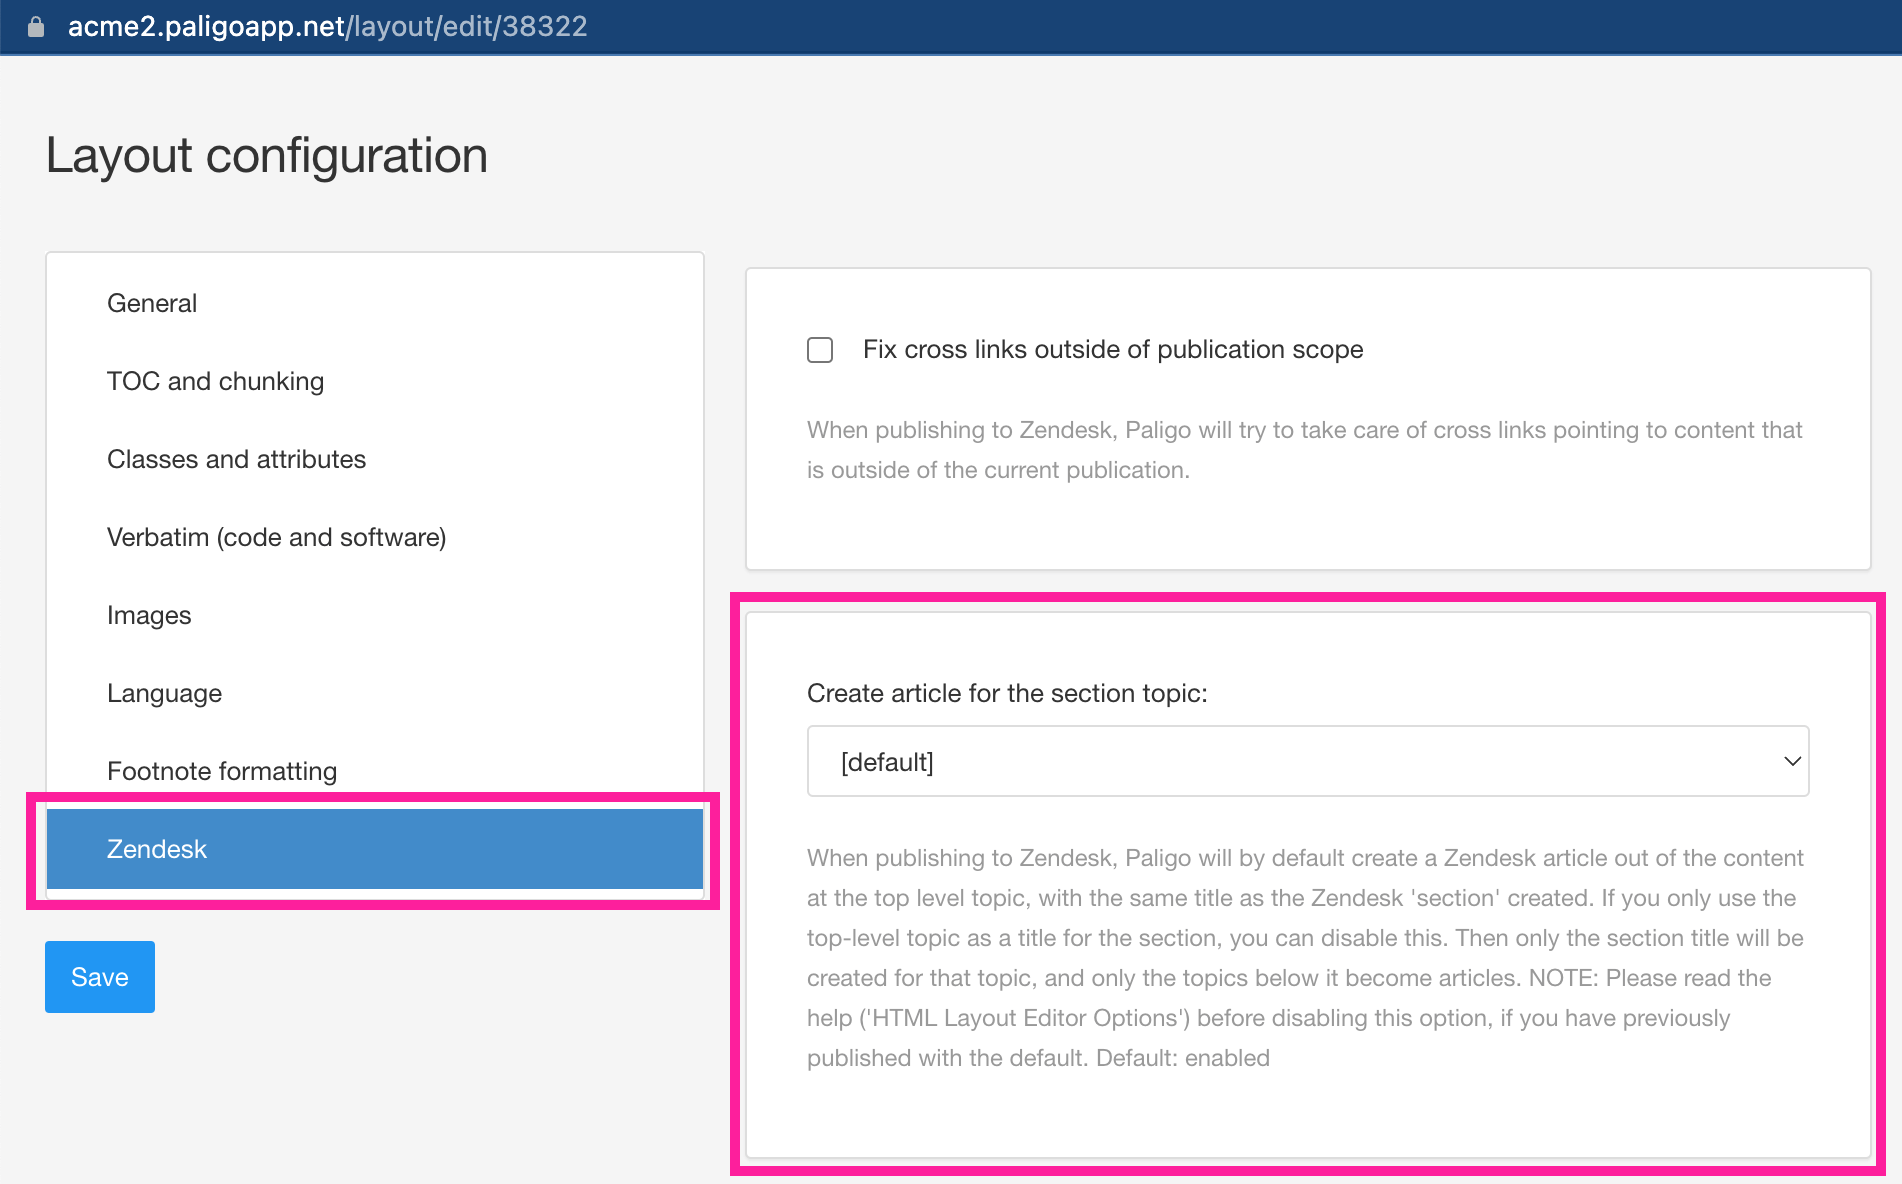
Enable
Paligo will generate an extra article for each top-level item (topic or sub-publication). The extra article has the same name and content as the top-level item in Paligo. So when you publish, there is a Zendesk section for each top-level item and inside that, an article for the top-level item as well as articles for the second-level items.
Disable
Paligo will not generate articles for top-level items that have child topics (second-level topics). If you have content in the top-level items, that content will be unavailable in Zendesk.
Note
If your Paligo publication has top-level topics with no children, Paligo will map them to a section and will also create an article. This is because you can't have a section with no articles inside it.
Default to inherit the value for this setting from the base Layout. The base Layout is either a built-in Layout provided by Paligo or another custom Layout, see Layout Relationships - Base, New, Duplicate.
Select Save.
You can now Publish to Zendesk. When publishing, make sure you choose the Zendesk Layout that you edited. Also, use the Zendesk Preflight feature to preview the mapping. To learn more about preflight, see Zendesk Preflight Overview and Access the Zendesk Preflight Tab.
Let's say you have a publication called "Acme Building Control". Inside it, you have reused an "Air Filtering" publication and a "Fire Response System" publication. These are sub-publications. You also have a topic called "Customer Support" at the same level as the sub-publications.
Both of the sub-publications contain two topics and have a flat structure.
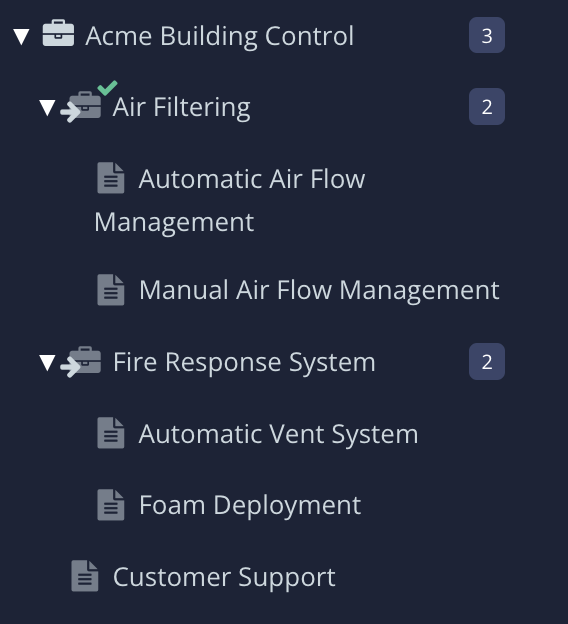 |
You set the layout option "Create Article for the Section Topic" to Disable.
When you publish, Preflight shows how the content will map to Zendesk:
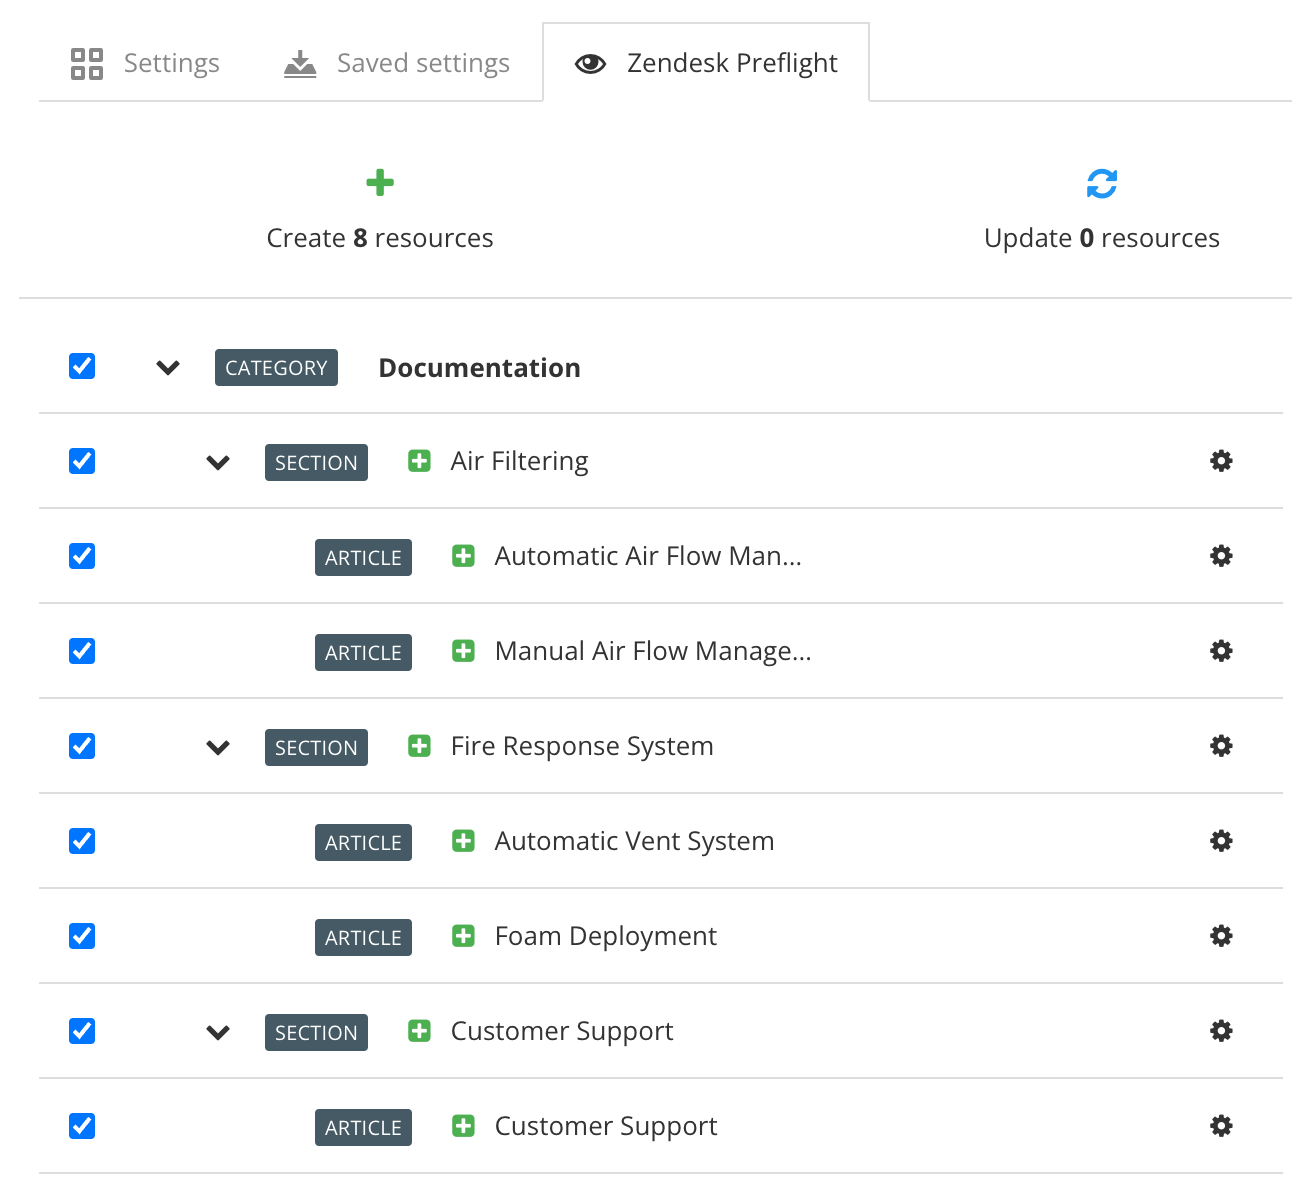 |
Each sub-publication is mapped to a section and the articles inside the sub-publications are mapped to articles. Paligo does not create any "extra" articles, so if there is content in the "publication topics" for "Air Filtering" or "Fire Response System", it will be unavailable in Zendesk.
Note
Paligo maps the "Customer Support" topic to both a section and an article. This is because the "Customer Support" topic is at the top-level and has no child topics (level two topics). Paligo creates an extra article here, as we cannot publish to a Zendesk section that has no articles in it. (The Create Article for the Section Topic setting only applies to top-level items that have children).
You decide to change the Create Article for the Section Topic setting to Enable. As a result, Paligo maps the content differently, as shown in Preflight.
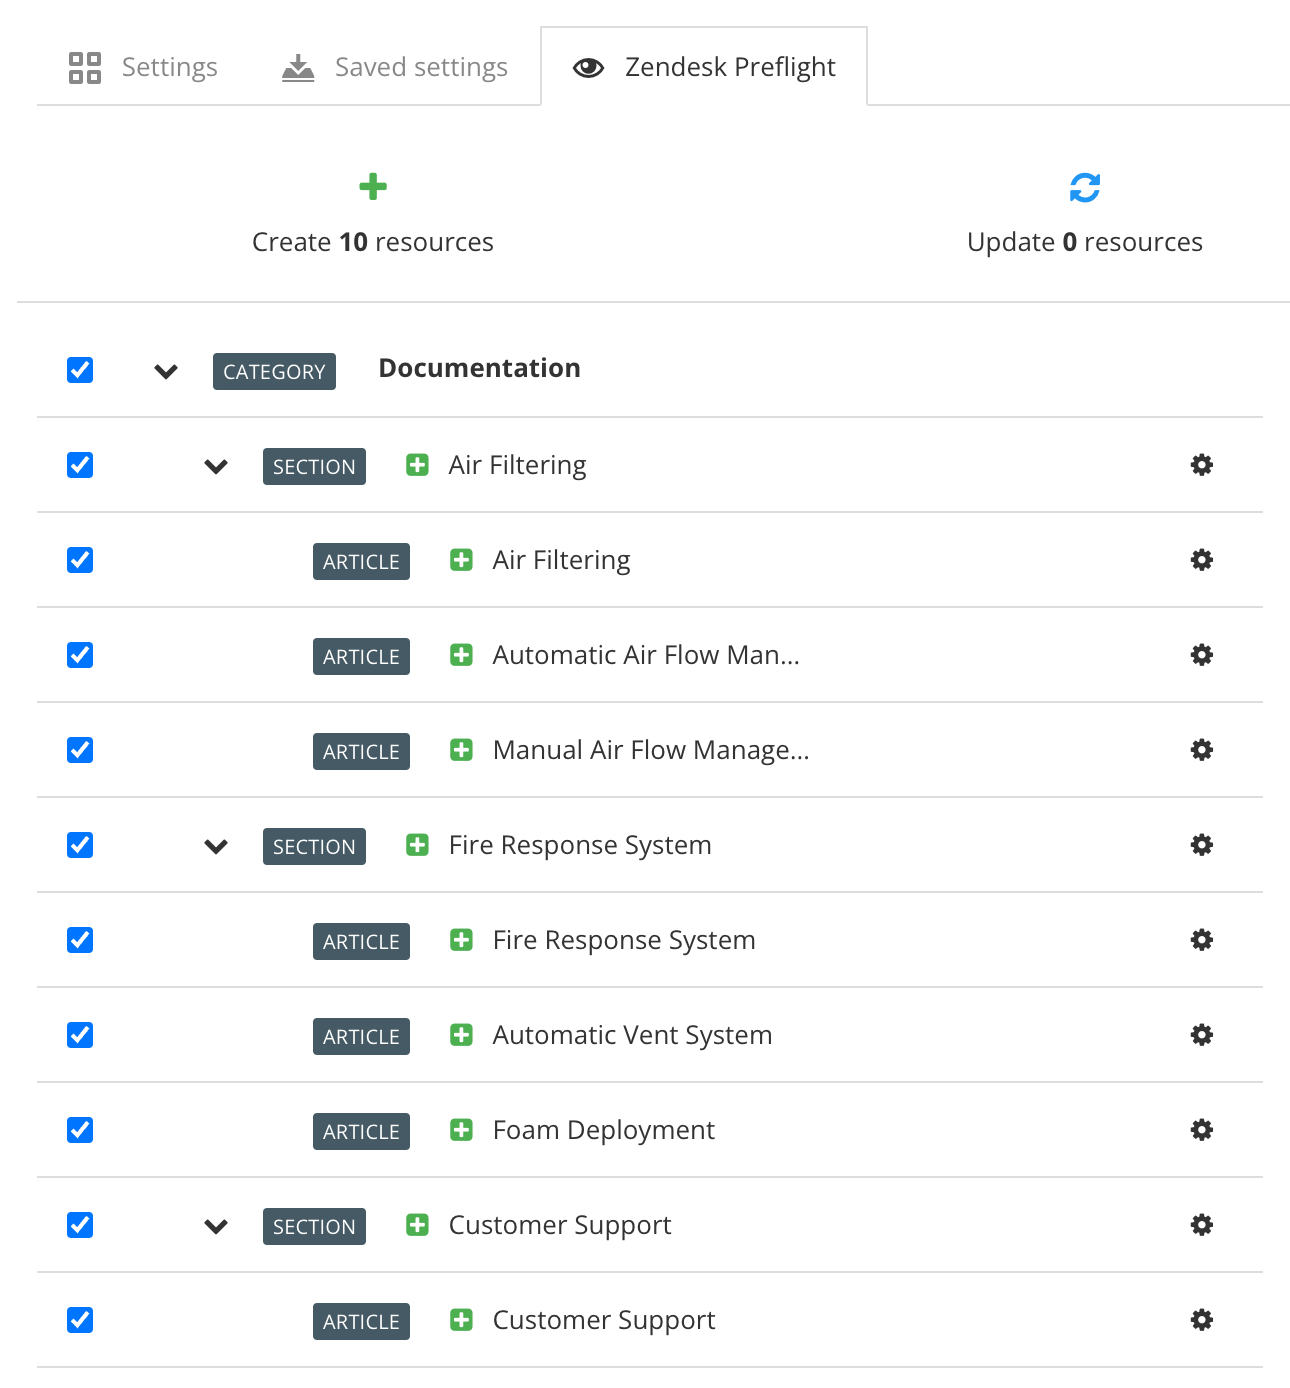 |
This time, Paligo creates an extra article for the "Air Filtering" sub-publication and the "Fire Response System" article. The content in these extra articles comes from the publication topics for those publications.
In Paligo, some "formal" elements contain other "nested" elements that are included automatically, such as a title or caption. For example, the example element has a title element nested within it (as well as a para element for the example text).
 |
If you publish to Zendesk, you may want to change the appearance of the "nested" elements in your articles.
To style the "nested" elements, you first need to get Paligo to generate <span> classes for them, and then you can style the <span> classes in a CSS stylesheet:
Select Layout in the top menu.

Paligo displays a list of Layouts. The list is empty if there are no custom Layouts in your Paligo instance.
Select the Layout you want to update or Create a Layout.
Tip
You can copy the URL of the Layout Editor and paste it into a new tab in your browser. This can be useful if you frequently switch between your Paligo content and the Layout settings.
Select Zendesk.
Set the Use separate styling for label, number, and title in formal elements to:
Enabled: To set Paligo to create a span element (in the HTML output) for each part of a label, number, or title. It will also create a class name for each span element.
Disabled: To set Paligo to output HTML that does not have span elements for each part of labels, numbers, or title elements.
Default to inherit the value for this setting from the base Layout. The base Layout is either a built-in Layout provided by Paligo or another custom Layout, see Layout Relationships - Base, New, Duplicate.
Select Save.
Re-publish your content to Zendesk, see Publish to Zendesk and then view a Zendesk article that contains an element that has labels, numbers, titles, or captions.
Use the web browser's Inspect feature (Chrome, other browsers may use different terminology) to view the code of the article.
You should see that there is a
spanclass for each part of the label, title, or caption. You can style this class by using CSS.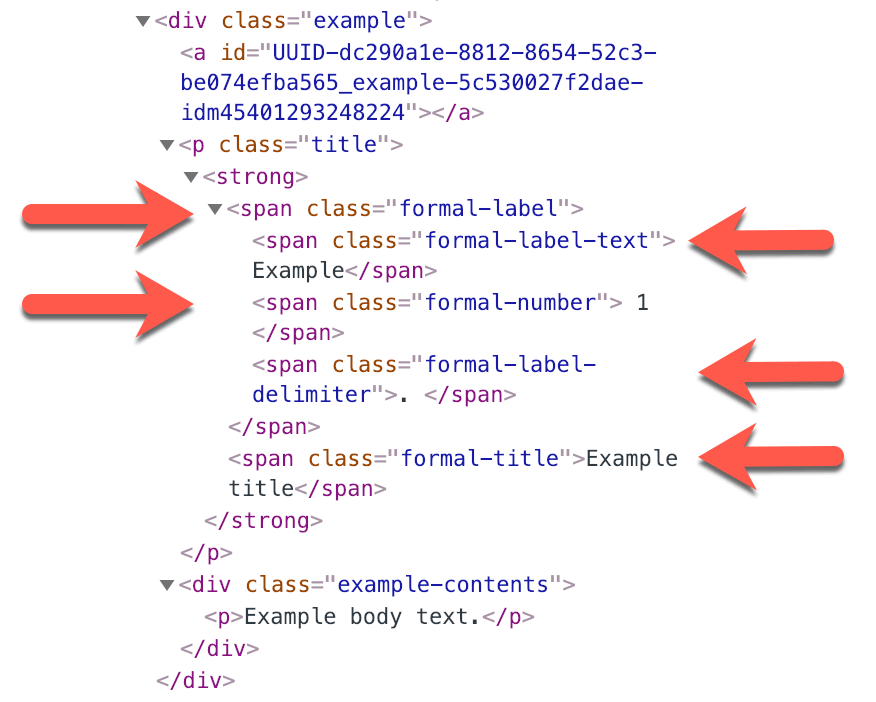
Either create or edit a CSS stylesheet and add the styling changes that you want to make. Then add your stylesheet to your Zendesk Assets and make sure to reference it at the bottom of the list in the document_head.hbs template in Zendesk.
To learn about using CSS, see Customize Zendesk articles using CSS.
Paligo has unlimited levels in the publications, so you can have as many topics and subtopics as you want. Zendesk is more restrictive, as it only has one level for articles, and this can mean that when you publish from Paligo to Zendesk, the heading levels do not match. To handle this difference, you can choose how the Paligo topic titles are mapped to the heading levels of Zendesk articles.
For example, let's say you have a top-level topic in Paligo and a second-level topic below it. Paligo could map these to Zendesk as separate articles, and the top-level topic could have an H1 heading in Zendesk, but the second-level topic would have an H2 as it was a subtopic in Paligo. This might seem strange in Zendesk, as you would have two articles but with different heading levels. By using the Follow Zendesk Heading Levels setting, you can avoid this problem.
Select Layout and then select the layout you want to use to publish to Zendesk.
In the Layout Editor, select Zendesk.
Use the Follow Zendesk heading levels option to choose the mapping:
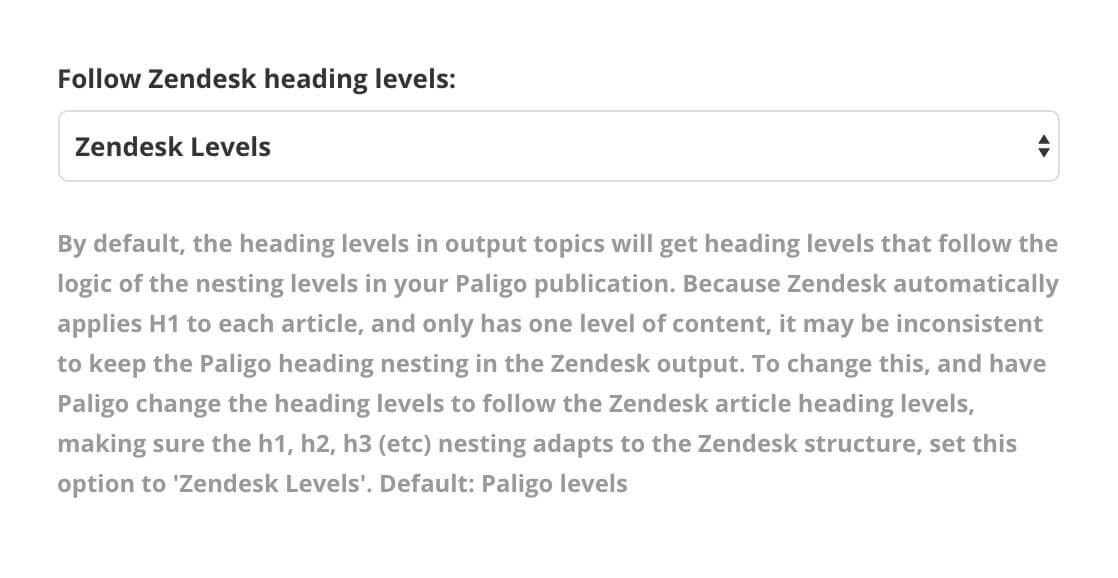
Paligo levels - The
titlesin Paligo topics will map to heading levels that match the structure in Paligo. This can result in articles in Zendesk having different heading levels than expected, for example, you may have a topic with an H4 main heading.Zendesk levels - The
titlesin Paligo topics will map to heading levels that match the structure in Zendesk.
Use the arrow buttons to arrange your topics and reused publications into the order you want. You can set them to display as a flat structure or you can "nest" topics and publications so they have a more complex structure, with multiple levels of content, see Organize a Publication.
If you are on the Paligo Enterprise plan and have an Enterprise license for Zendesk, you can map content to many different section levels. So instead of using the standard Zendesk structure of Category > Section > Article, you can have lots of sections, for example, Category > Section > Section > Section > Article.
To control the number of sections that Paligo will create:
Make sure that you understand how content is mapped to Zendesk Enterprise.
Structure your Paligo publication so that your topics are organized into multiple different levels.
Select Layout and then select the layout you want to use to publish to Zendesk.
Select Toc and chunking.
Use the Chunk section depth option to control how many levels of Paligo content will be mapped to sections in Zendesk. For example, if you set it to 3, it means your top-level and second-level topics will be mapped to sections in Zendesk. Your third-level topics will be mapped to articles, and any lower-level topics will be subsections in those articles.
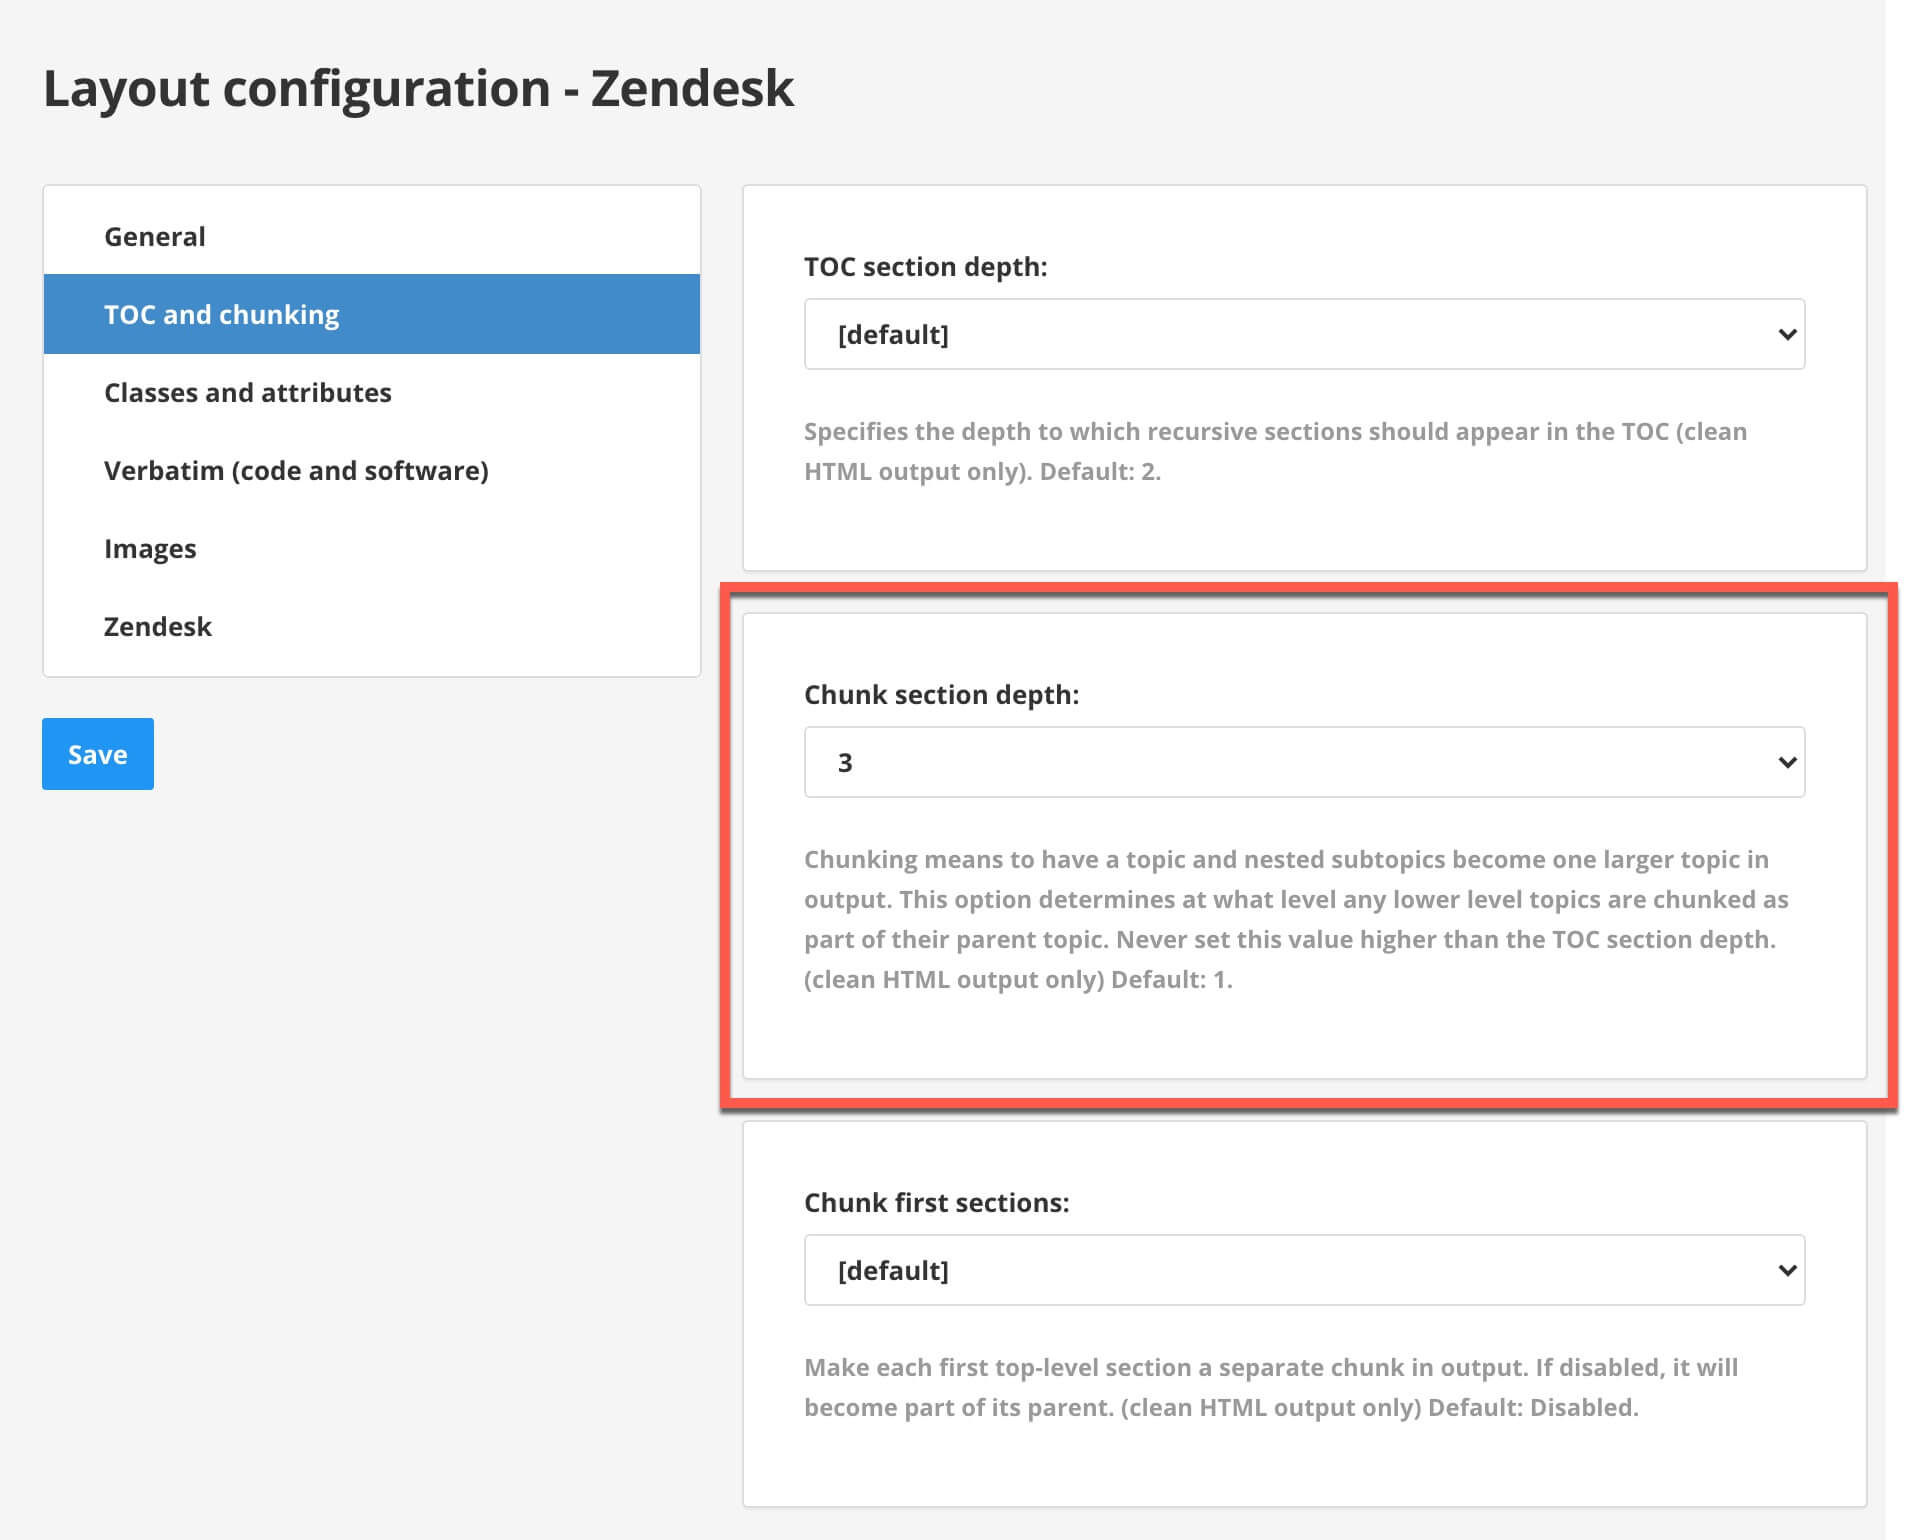
Note
A topic can only be mapped to a section if the topic has lower-level topics (or "children") in the publication structure. If it has no lower-level topics, the topic will be mapped to an article instead.
Use the arrow buttons to arrange your topics and reused publications into the order you want. You can set them to display as a flat structure or you can "nest" topics and publications so they have a more complex structure, with multiple levels of content, see Organize a Publication.
Select Save.
When you publish your Paligo content to Zendesk using this layout, Paligo will map your various levels of topics to sections and articles. It will follow the mapping rules for Zendesk Enterprise layouts, where the chunck section depth defines the section levels.
Use a single-section Zendesk Layout if you want your Paligo content to map to Zendesk like this:
The publication in Paligo becomes a section in Zendesk
The top-level topics in the Paligo publication become articles in Zendesk
Every second-level and lower-level topic in the Paligo publication becomes a subsection of an article.
This means that if you have lots of second-level and lower topics in your Paligo publication, your Zendesk articles can become very long (as a single article could contain many topics from Paligo). For this reason, the single-section layout is only suitable for publications that have the majority of their topics at the top level.
Paligo has a built-in single-section Zendesk layout that you can use or you can Create a Zendesk Layout.
When you publish, select HTML as the output format and then select the Zendesk layout that you want to use.
Note
You can use the Zendesk Preflight feature to Customize Paligo-to-Zendesk Mapping to meet your needs.
Use a multi-section Zendesk layout if you want Paligo content to map to Zendesk like this:
Each top-level topic in Paligo becomes a section in Zendesk
Each top-level topic also becomes an article in Zendesk. The article appears in the section for the same topic.
Second-level topics in Paligo are mapped to articles in Zendesk. These articles appear in the section for the "parent" top-level topic.
Third-level and lower-level topics in Paligo become subsections in their "parent" second-level article.
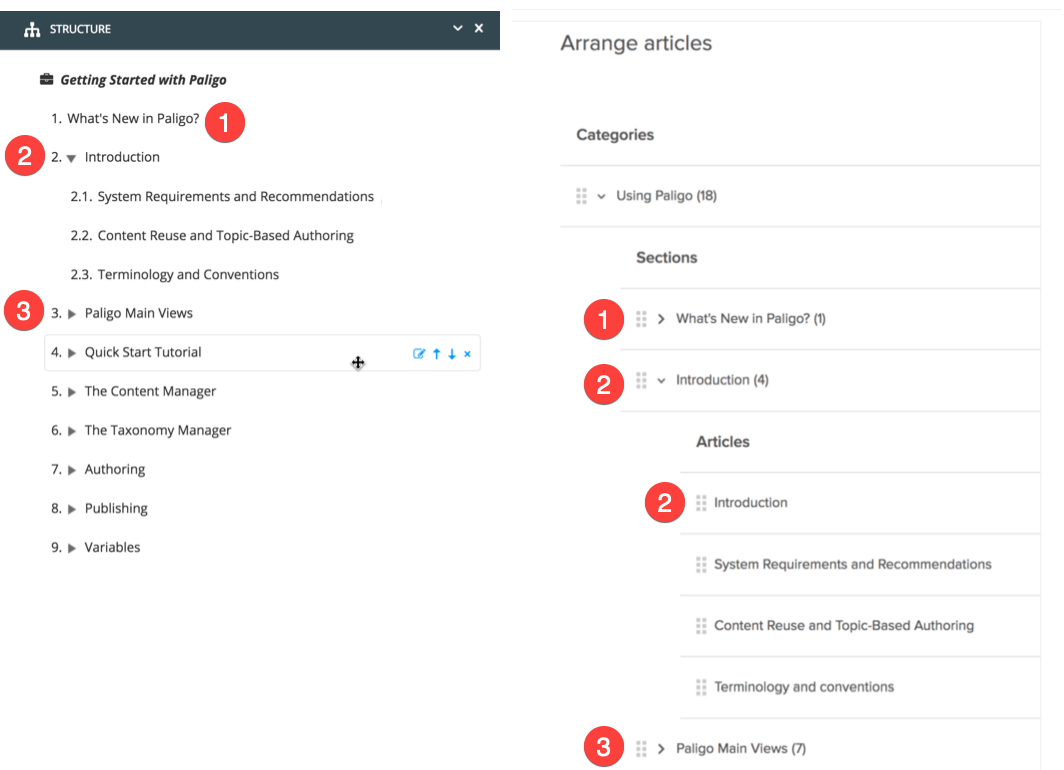 |
The top-level topics in Paligo (1, 2, and 3) are mapped to sections in Zendesk. Paligo also creates an article for the content of the top-level topics. Here, the image shows Paligo has created a section and an article for the "Introduction" topic (2).
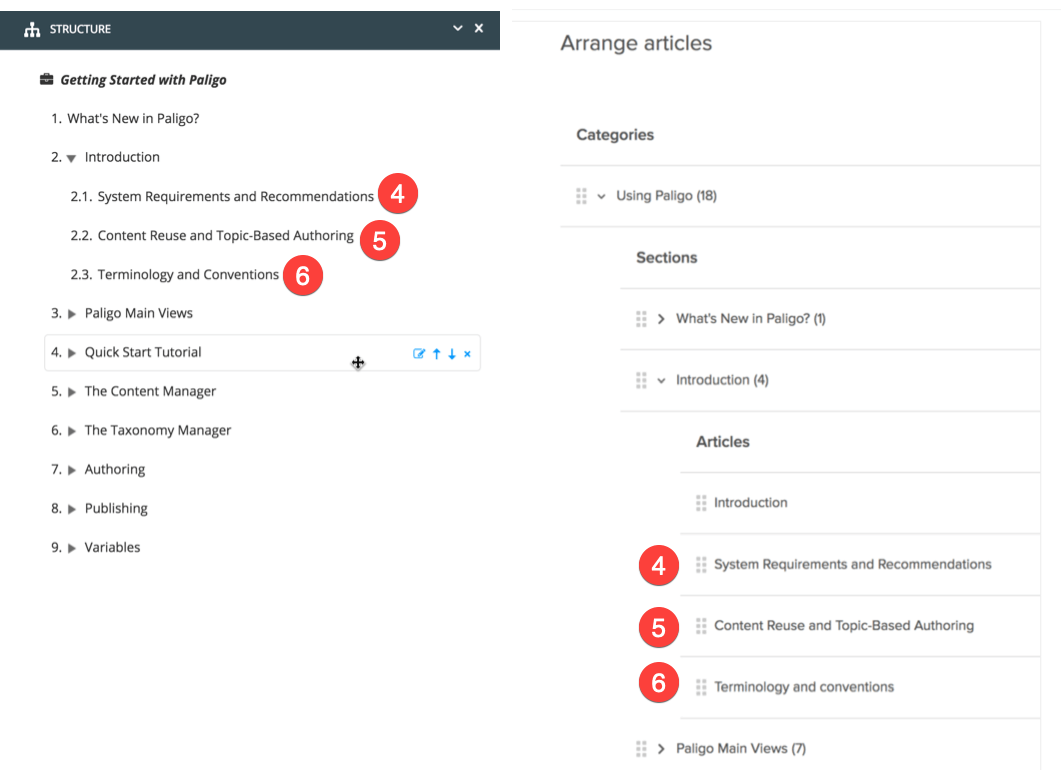 |
The second-level topics (4, 5, 6) are mapped to articles in Zendesk. Any lower-level topics in Paligo are mapped as subsections in the articles.
If you are used to writing content in Zendesk, it may seem strange to have a topic that maps to a section and an article. Because in Zendesk, you would not add content to a section, you would only add it to an article. But in Paligo, it is possible to have content inside top-level articles, and so if those are only mapped to a section, the content would be lost. For this reason, Paligo also creates an article, and that's where the content of the "section" topic goes.
Remember, Paligo is used for publishing to many different outputs, not just Zendesk. Having content inside a top-level topic is a common requirement for PDFs, HTML, and other outputs.
Note
If you prefer, you can control the mapping so that the top-level topics become sections, but not articles. To do this, edit the Zendesk layout and use the Create article for section topic setting (see Generate Extra Articles for Top-Level Content).
Paligo has a built-in multi-section Zendesk layout that you can use or you can Create a Zendesk Layout.
When you publish, select HTML as the output format and then select the Zendesk layout that you want to use.
Note
You can use the Zendesk Preflight feature to Customize Paligo-to-Zendesk Mapping to meet your needs.
You can use the Zendesk Enterprise layout to map topics in your Paligo publication to sections and subsections (sections within sections) in Zendesk. Paligo has a built-in Zendesk Enterprise layout that you can use or you can Create a Zendesk Layout. But please note that you can only use this layout if you are on the enterprise plan for Paligo and also have an enterprise license for Zendesk.
To use the Zendesk Enterprise layout, we recommend that you:
Learn how the Zendesk Enterprise layout mapping works.
Consider how Zendesk separates sections and articles.
Organize your Paligo content so that your publication structure will create sections and articles in an appropriate order in Zendesk.
Use the built-in Zendesk Enterprise layout or Create a Zendesk Layout. You will need to set the the Chunk section depth to define the number of section levels you want.
Publish your content and select HTML as the output type and then select your Zendesk Enterprise layout. Use Zendesk Preflight to View the Paligo-to-Zendesk Mapping and Customize Paligo-to-Zendesk Mapping if needed.
The mapping for Zendesk Enterprise layouts works like this:
Top-level topics in Paligo are mapped to top-level sections in Zendesk.
Second-level topics in Paligo are mapped to second-level sections in Zendesk.
Third-level and lower-level topics are mapped to articles in Zendesk. if required. But with the default settings in place, only the top two levels become sections, with level three and lower becoming articles.
This is the mapping behavior with the default settings for Zendesk Enterprise layouts in place. But you can use the Chunk section depth setting (in the layout) to control how many levels of sections can be used. The default setting is 3, which provides the mapping listed above.
Note
A topic can only map to a section if the topic has lower-level topics in the publication structure. For example, if a second-level topic does not have lower-level topics, it will become an article, not a section.
Let's say you have an "ACME 100 Series" publication and it is going to include all the content for several products in the ACME 100 range.
At the top level, you have topics for each of the products: "ACME 100", "ACME 100X", "ACME 100XE", and "ACME 100SE".
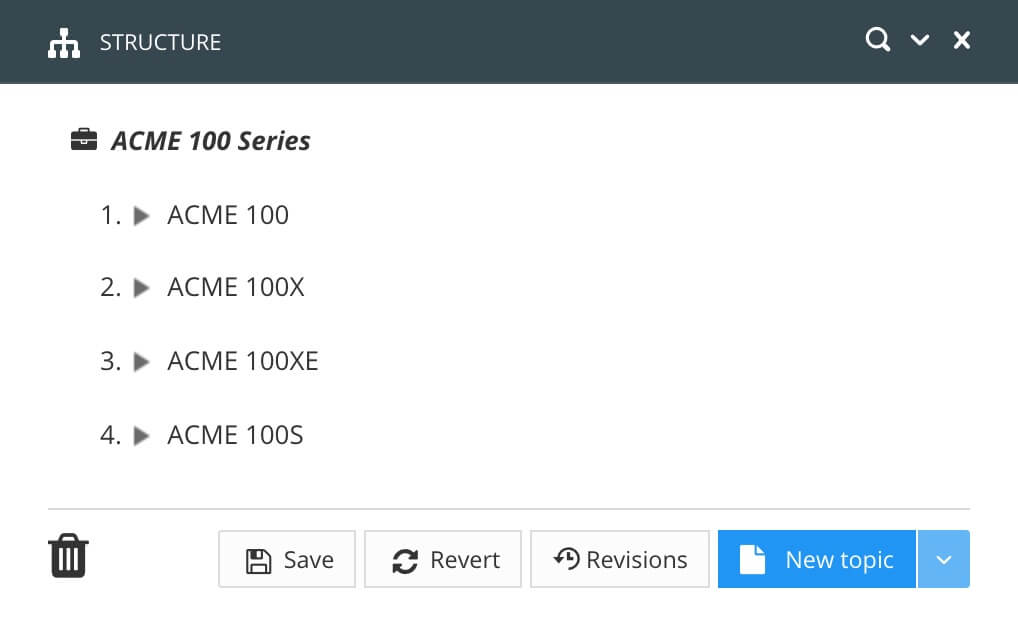 |
Inside each of those, you have topics for 4 different categories of information: "Installation", "User", "Service", and "Maintenance".
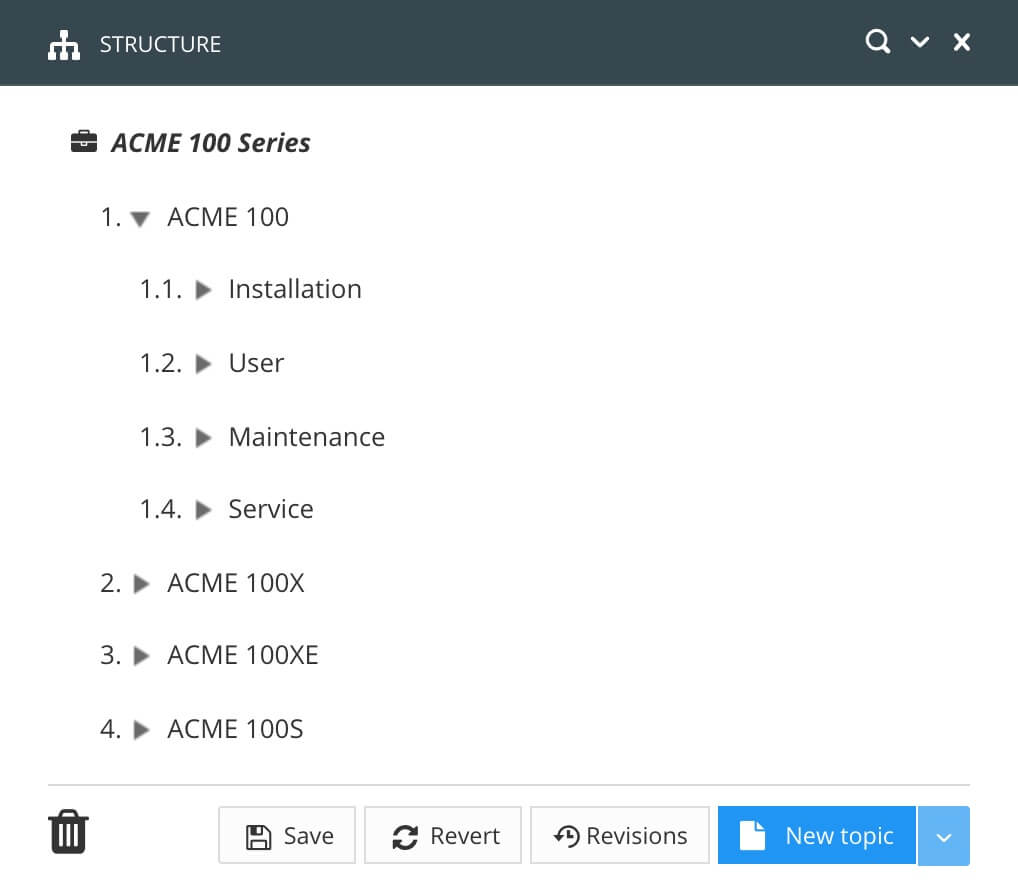 |
Inside each category topic, you have a maximum of three levels of content. For example, in the "Installation" category, you have "Safety and PPE", then a lower level of topics, and a further level of topics inside those.
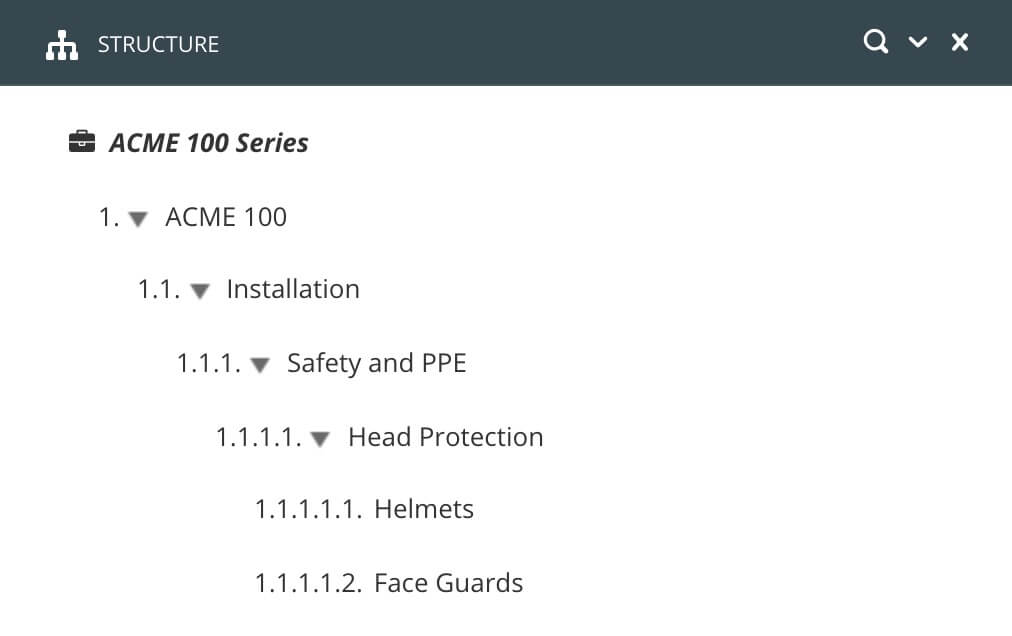 |
In your Zendesk Enterprise layout, you set the Chunk section depth to 4. You then go to the publishing settings, select HTML as the output, and choose your Zendesk Enterprise layout. You then select the Zendesk Preflight tab so that you can see a preview of how your content will be mapped to Zendesk:
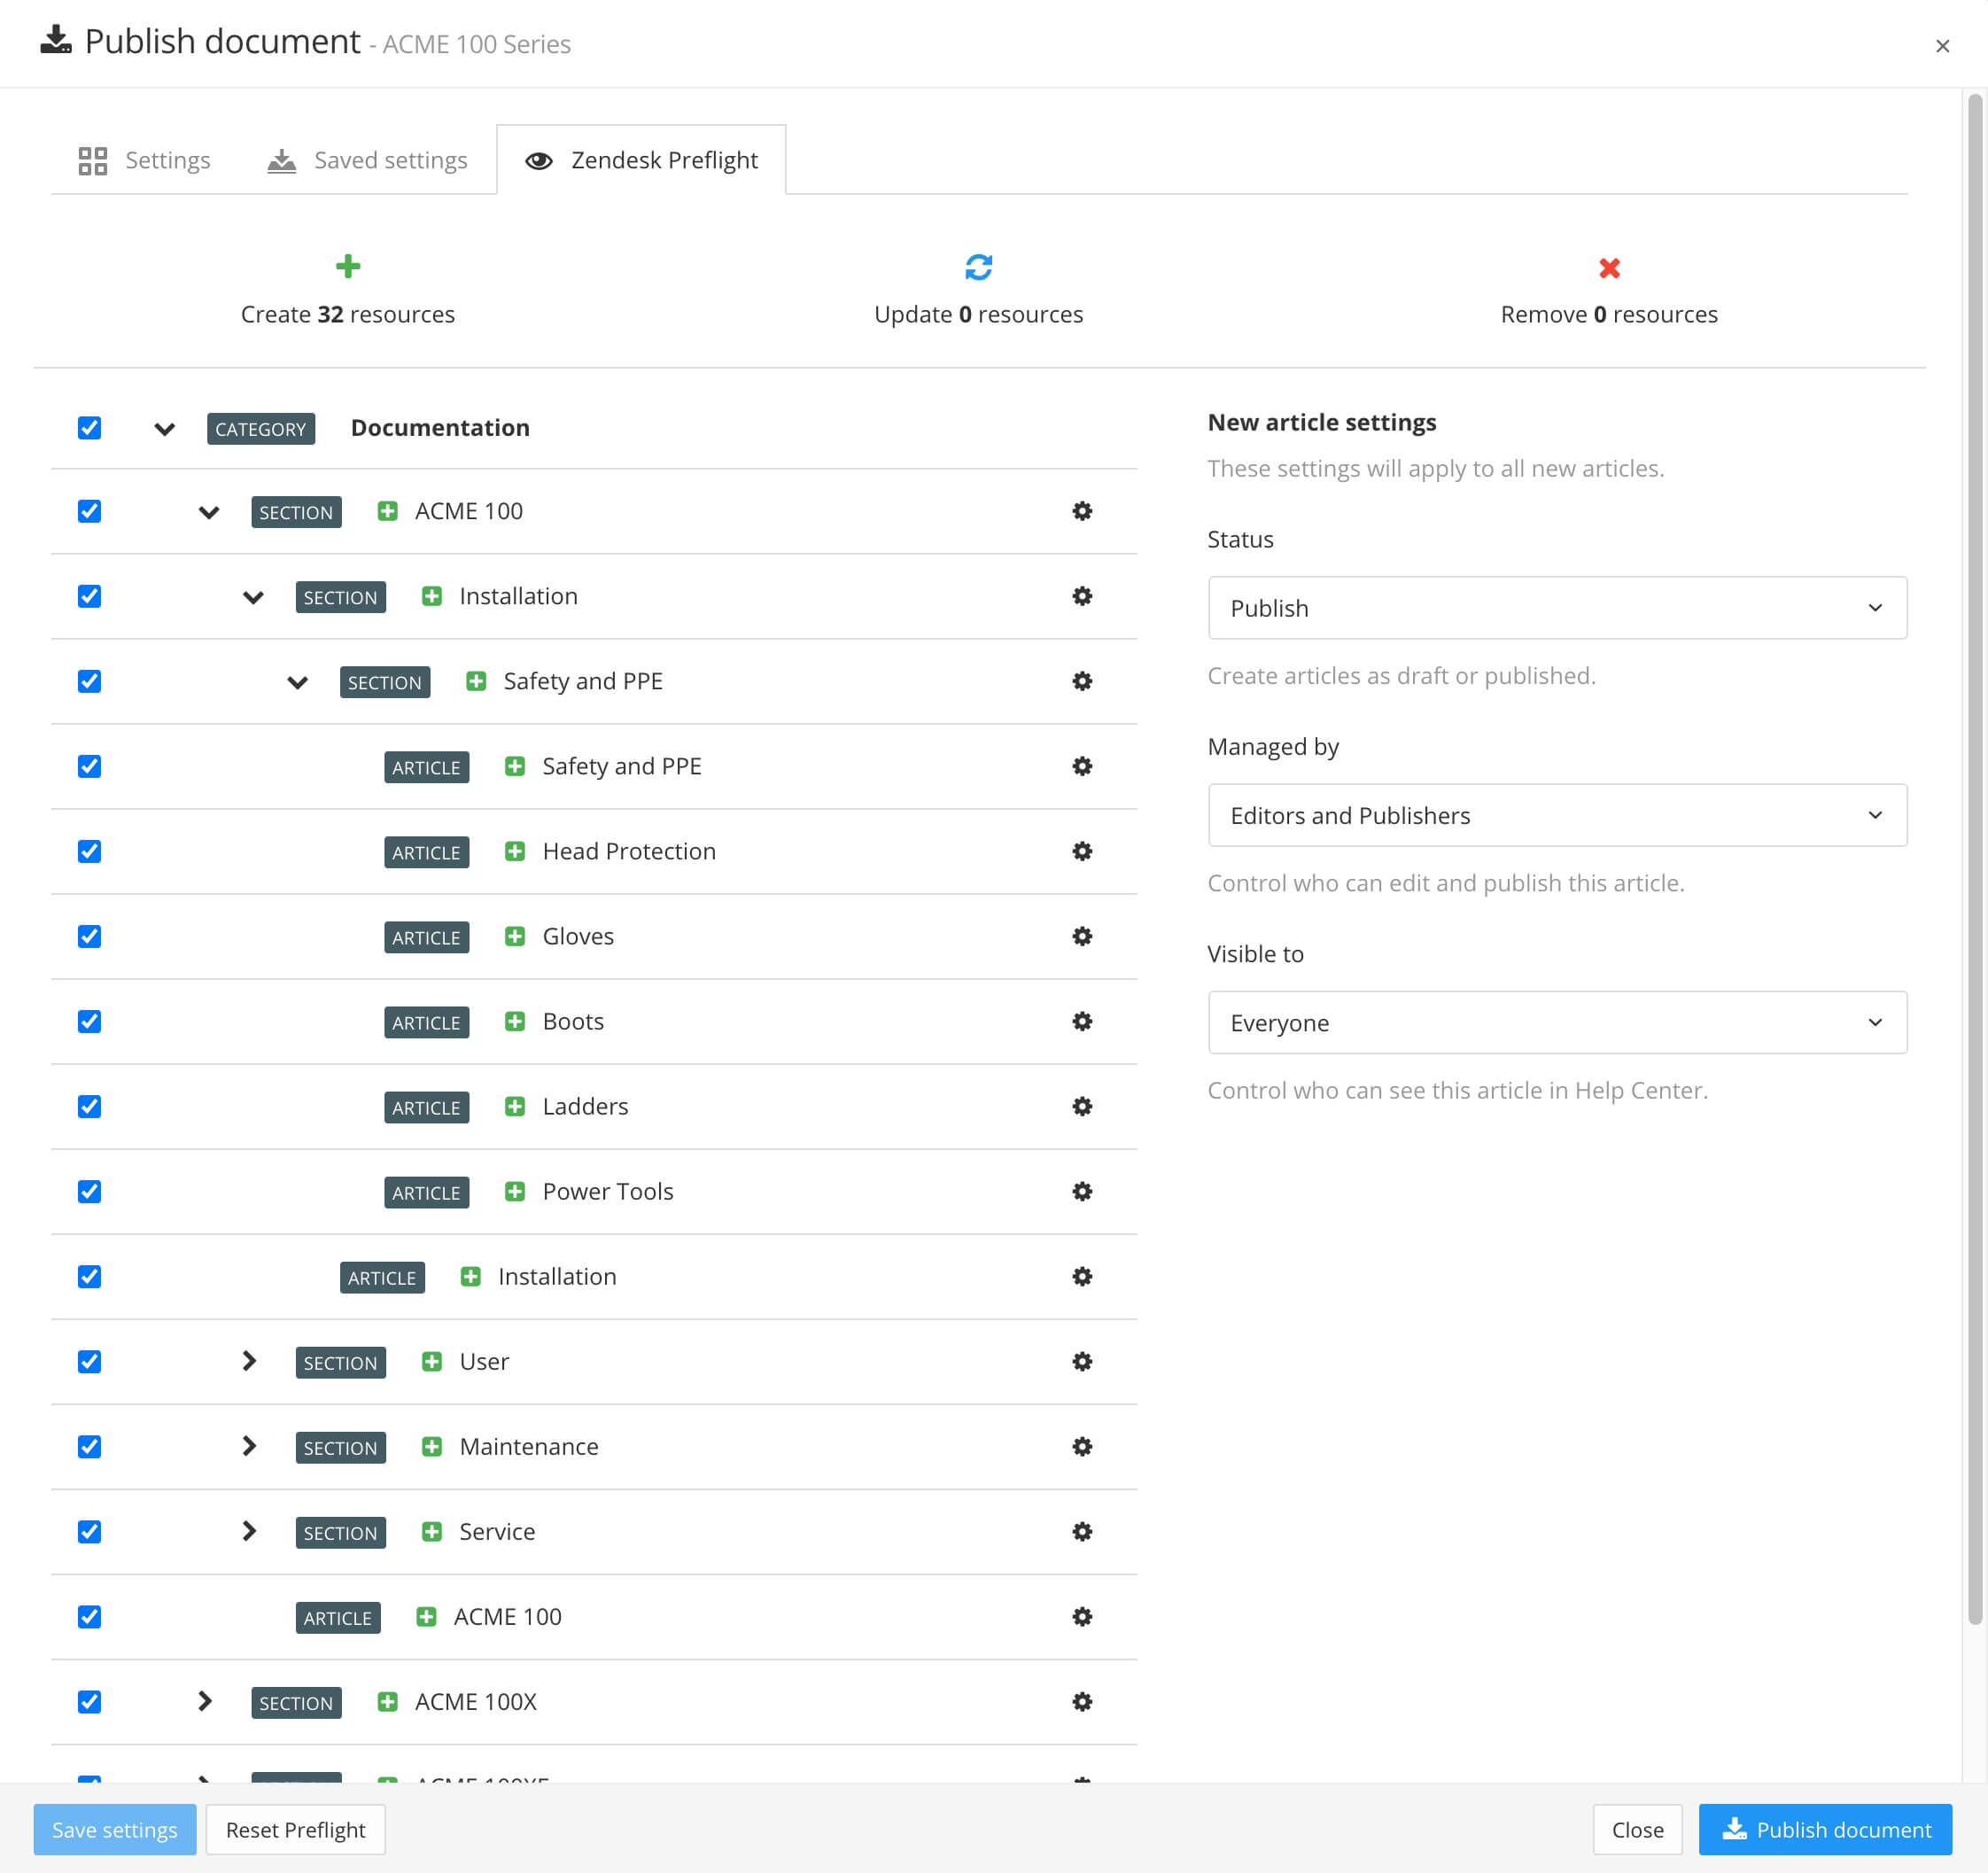 |
Top-level topics, such as "ACME 100" and "ACME 100X" become top-level sections in Zendesk.
Second-level topics, such as "Installation" and "User" become second-level sections in Zendesk.
Third-level topics, such as "Safety and PPE" become third-level sections in Zendesk (as the Chunk section depth is set to 4, so at level 4 the sections stop and topics get mapped to articles).
If you are used to writing content in Zendesk, it may seem strange to have a topic that maps to a section and an article. Because in Zendesk, you would not add content to a section, you would only add it to an article. But in Paligo, it is possible to have content inside top-level articles, and so if those are only mapped to a section, the content would be lost. For this reason, Paligo also creates an article, and that's where the content of the "section" topic goes.
Remember, Paligo is used for publishing to many different outputs, not just Zendesk. Having content inside a top-level topic is a common requirement for PDFs, HTML, and other outputs.
Note
If you prefer, you can control the mapping so that the top-level topics become sections, but not articles. To do this, edit the Zendesk layout and use the Create article for section topic setting (see Generate Extra Articles for Top-Level Content).
When you are planning the structure of your publication in Paligo, it is important to remember that Zendesk separates sections and articles. So in Paligo, you may have a lower-level topic set to become a section in Zendesk. But in Zendesk, that section may not appear in the same position, as sections are shown above articles, see the Example 7, “Order of Sections and Articles in Zendesk”.
Paligo cannot change how Zendesk orders its sections and articles. If you find that the order of sections and articles in Zendesk is confusing for your readers, we recommend that you either:
Reduce the chunk section depth
or
Reorganize your Paligo publication so that it creates an order that you find more acceptable.
If you use your publication for multiple outputs (HTML, PDF, Zendesk), you can create a new publication that uses the same topics. You can then use the new publication for Zendesk only, and change the organization of the topics to suit your Zendesk requirements.
Let's say you have a publication with 5 levels of content and you want to use a section depth (chunk section depth) of 4.
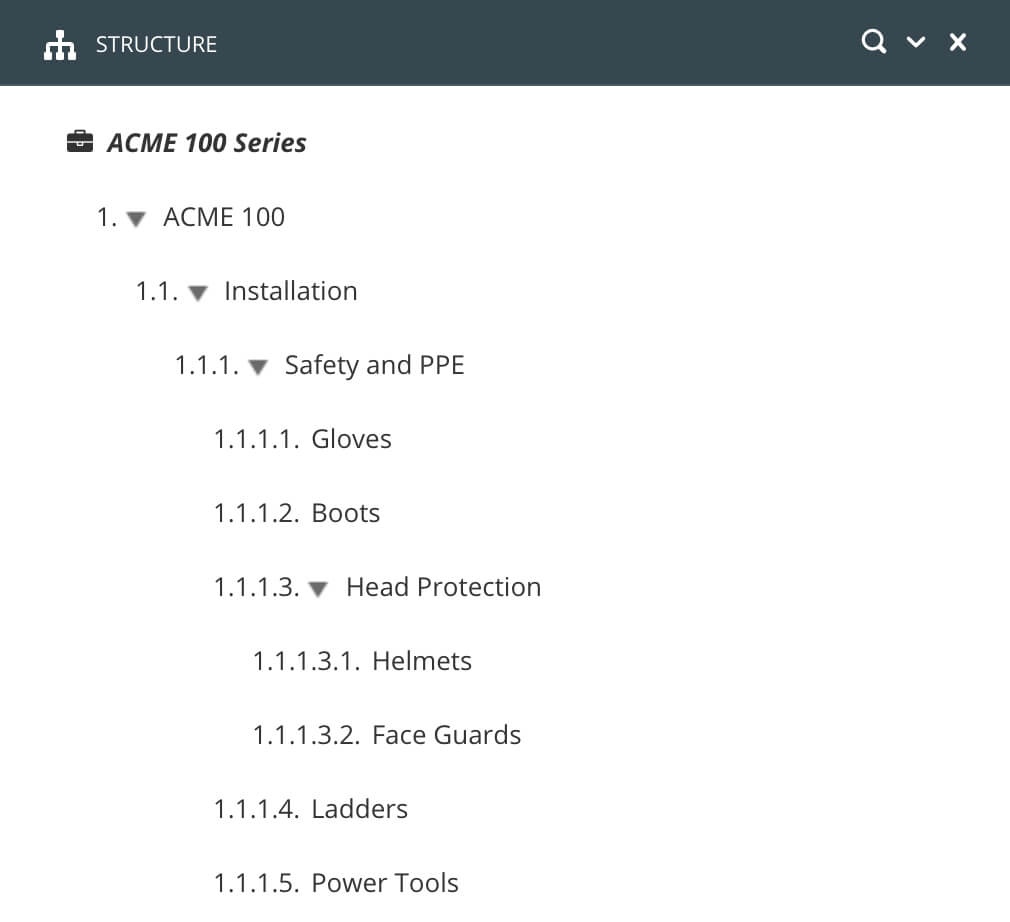 |
In this example, that would mean that:
"ACME 100" becomes a section in Zendesk as it is the top-level topic and it has lower-level topics.
"Installation" becomes a section in Zendesk as it is the second-level topic and it has lower-level topics.
"Safety and PPE" becomes a section in Zendesk as it is the third-level topic and it has lower-level topics.
"Gloves", "Boots", "Ladders" and "Power Tools" become articles in Zendesk. , Although they are at the fourth-level and could become sections in Zendesk, they are mapped to articles as they do not have lower-level topics.
"Head Protection" becomes a section in Zendesk as it is a fourth-level topic and it has lower-level topics. This is where the ordering of your content can become unusual in Zendesk, as Zendesk will display "Head Protection" as a section above the "Gloves", "Boots", "Ladders" and "Power Tools" articles.
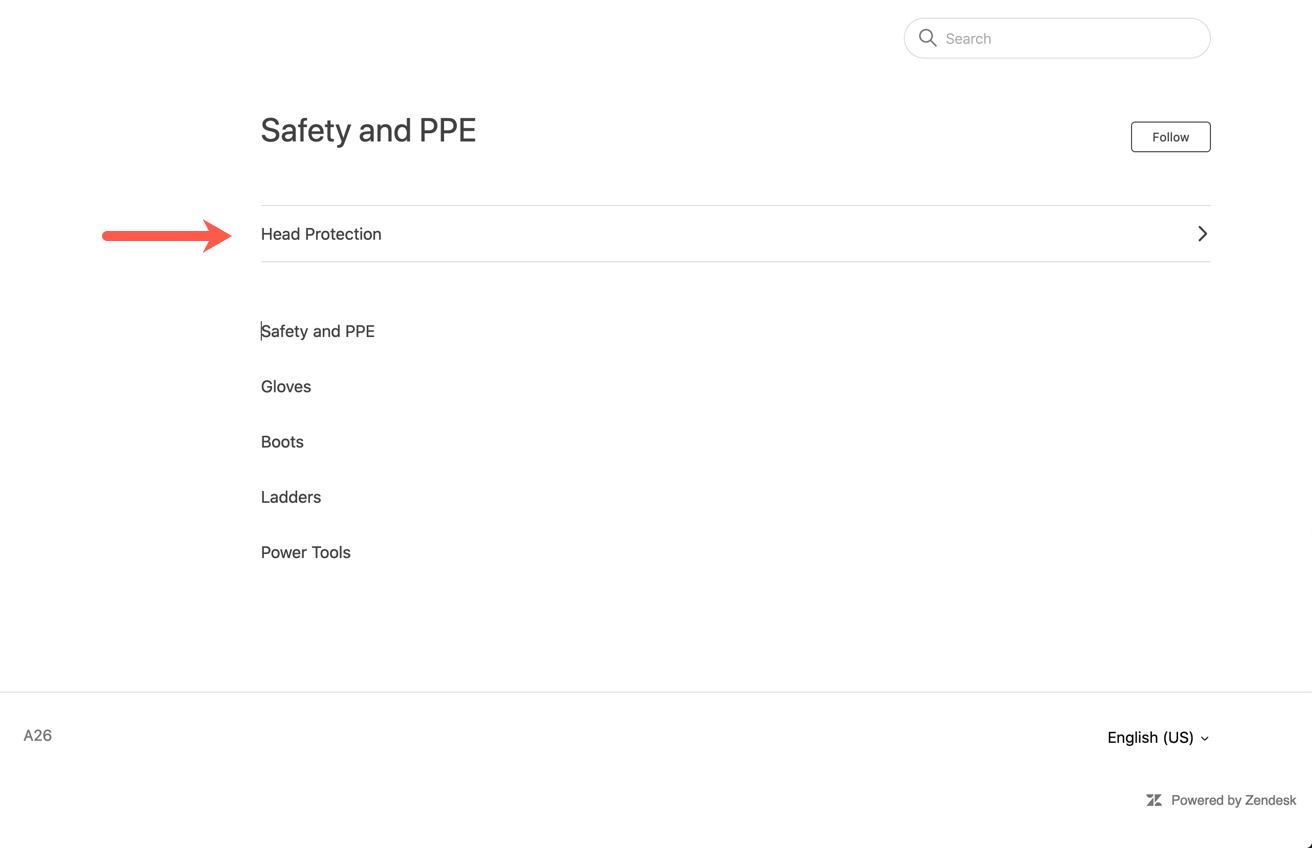
To avoid this issue, you can reduce the chunk section depth in the Zendesk Enterprise layout to 3. This results in "Safety and PPE" being the lowest level of section, so that all of its "child" topics appear as articles in the expected order.
If you have IP restrictions enabled in Zendesk, you need to set Paligo to use a static IP address (via a gateway). Then, in Zendesk, you can allowlist Paligo's IP address so that it can publish to Zendesk.
In Paligo, enable the Use the Paligo provided gateway when connecting to Zendesk option.
 |
You will need to allowlist the IP address 34.249.89.180 in Zendesk. Paligo can then publish to Zendesk even when "IP restrictions" is enabled in Zendesk.
You can use a cascading style sheet (CSS) to change the appearance of the content you publish to Zendesk. For example, if you wanted to change the appearance of notes or warnings, you could use CSS to change the colors, sizing, spacing, etc.
As part of the publishing process, Paligo converts the Paligo content into HTML for Zendesk. The element names in the Paligo content are transformed into divs with class names, for example, the procedure element is converted into a div with class="procedure". In your CSS stylesheet, you can use CSS to style the classes.
If you are new to CSS, the important thing to understand is that a CSS file does not affect your content in Paligo. It just tells a browser how to display your published content.
Tip
If you want to learn about CSS, many websites provide tutorials and information, including www.w3schools.com. There is also an excellent example of what you can achieve with CSS at http://www.csszengarden.com.
To see the underlying code of a page, see Browser Inspection Tool.
You can create your own CSS file and use that to style your Zendesk content. When creating a CSS file, it is important that the:
CSS is valid
CSS file is added to the Assets in Zendesk
CSS file is referenced in the document-head.hbs template in Zendesk.
Here, we assume that you have already published to Zendesk and have added the paligo-zd.css file to your Zendesk assets and referenced it in the document-head.hbs template (as described in Customize Zendesk articles using CSS).
Use your web browser's inspection tool feature to identify the styles that you want to change, see Browser Inspection Tool.
Use a CSS editor to create a new CSS file.
Make your changes to the CSS.
Tip
If you want to learn about CSS, many websites provide tutorials and information, including www.w3schools.com. There is also an excellent example of what you can achieve with CSS at http://www.csszengarden.com.
Save the CSS.
Upload your CSS file to your Zendesk Assets.
To upload, select Customize Design > Edit theme > Edit Code and then add or drag and drop your CSS file into the Assets folder.
Change the reference in the document_head.hbs template in Zendesk.
To edit the document_head.hbs template, select Customize Design > Edit theme > Edit Code and then select the document_head.hbs template. Add the reference to your .css file at the bottom of the list of references, for example, add:
<link href=“{{asset ‘mycustomstyles.css’}}” rel=“stylesheet” type=“text/css” />Important
The order of the references to css files is important. The web browser will apply the styles from the top reference first, then the second reference, and so on. So if there are styles in the last referenced CSS file that conflict with styles in the first CSS file, the browser will use the styles in the last CSS file. The only exception is where "!important" is used in the styles (!important will take priority, unless it conflicts with another !important, in which case, the first-to-last cascading rule applies).
Publish your changes in Zendesk.
In this example, you will see how you can use your own CSS file to change the appearance of tables. We'll start with an "About Space Travel" article that contains a table.
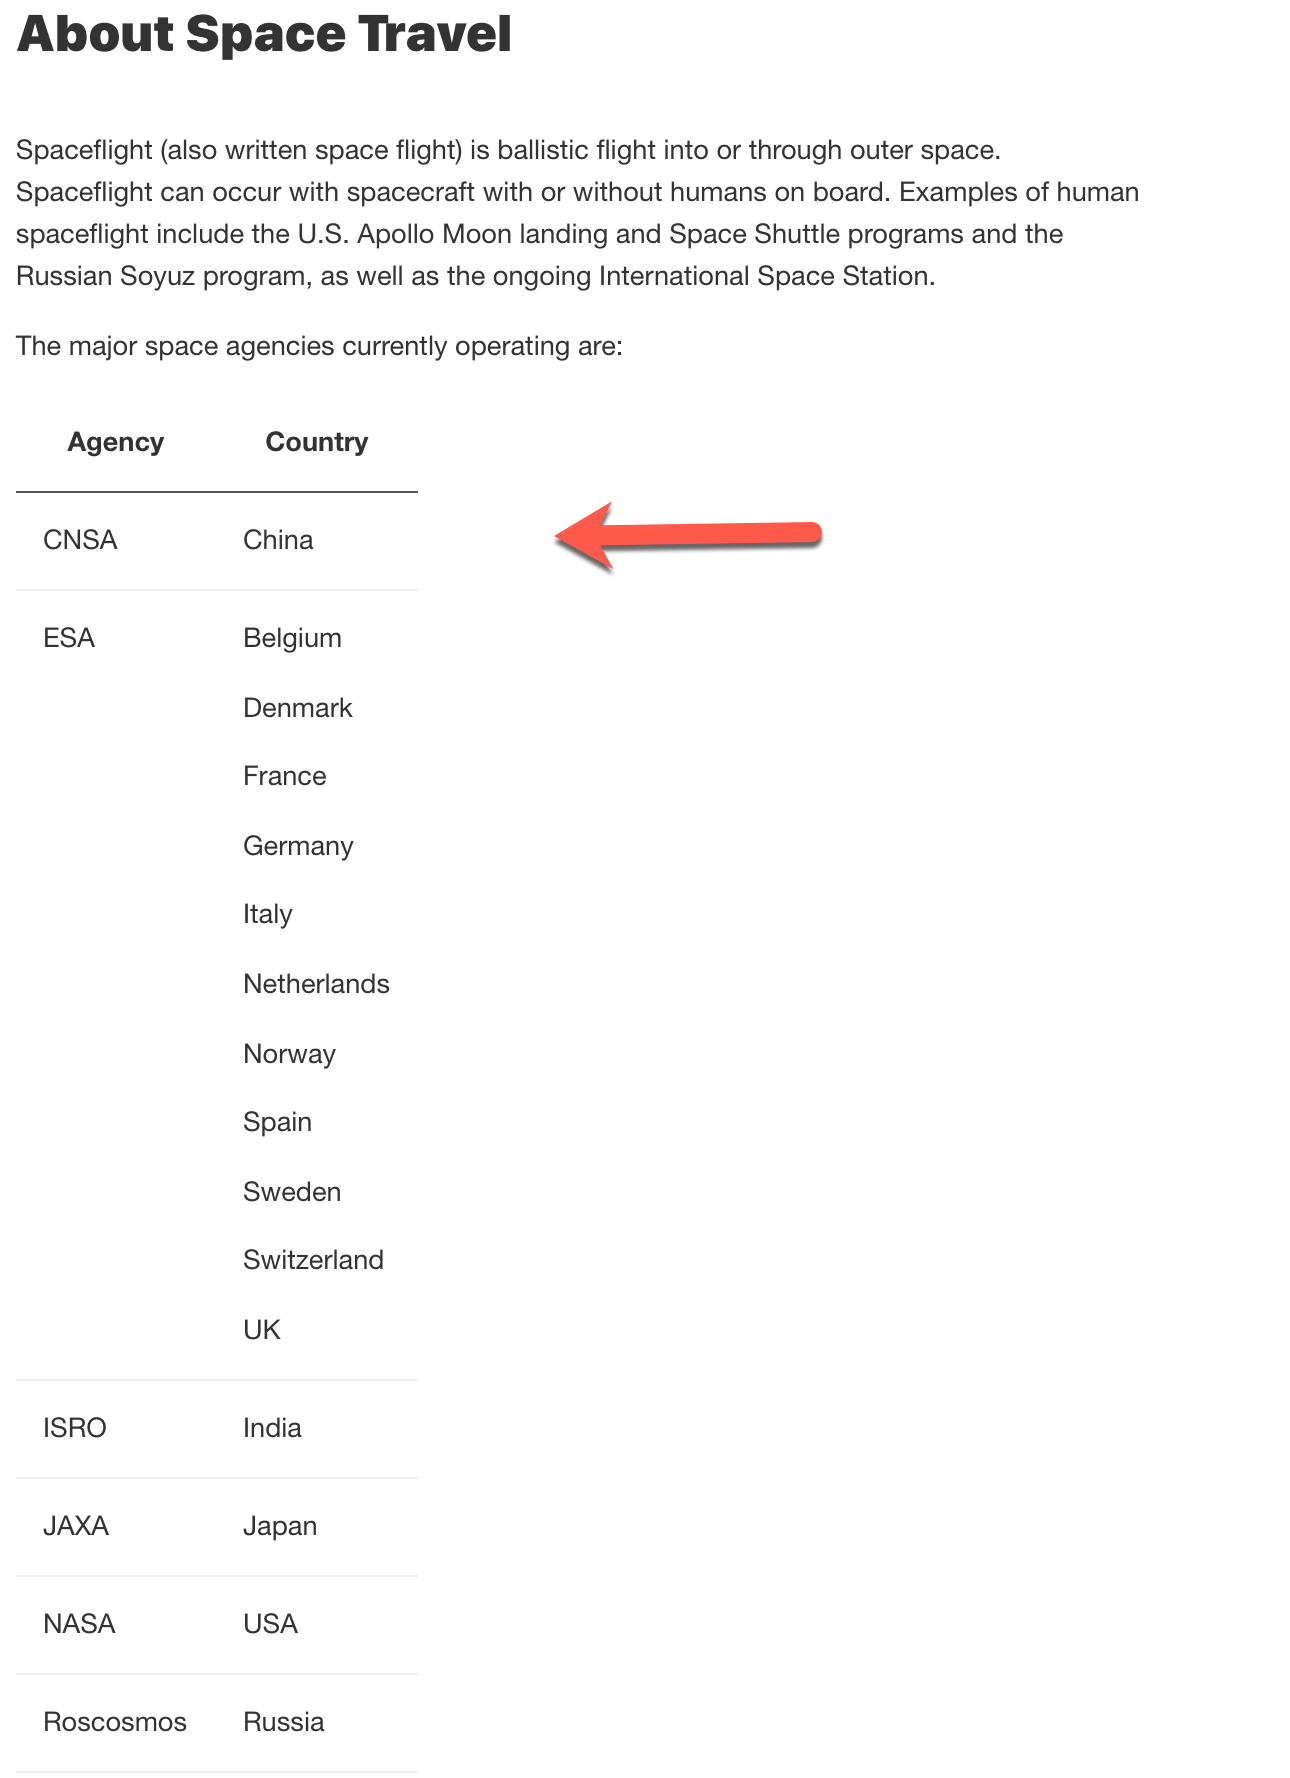
The default table style in paligo-zd.css has no border or colored background.
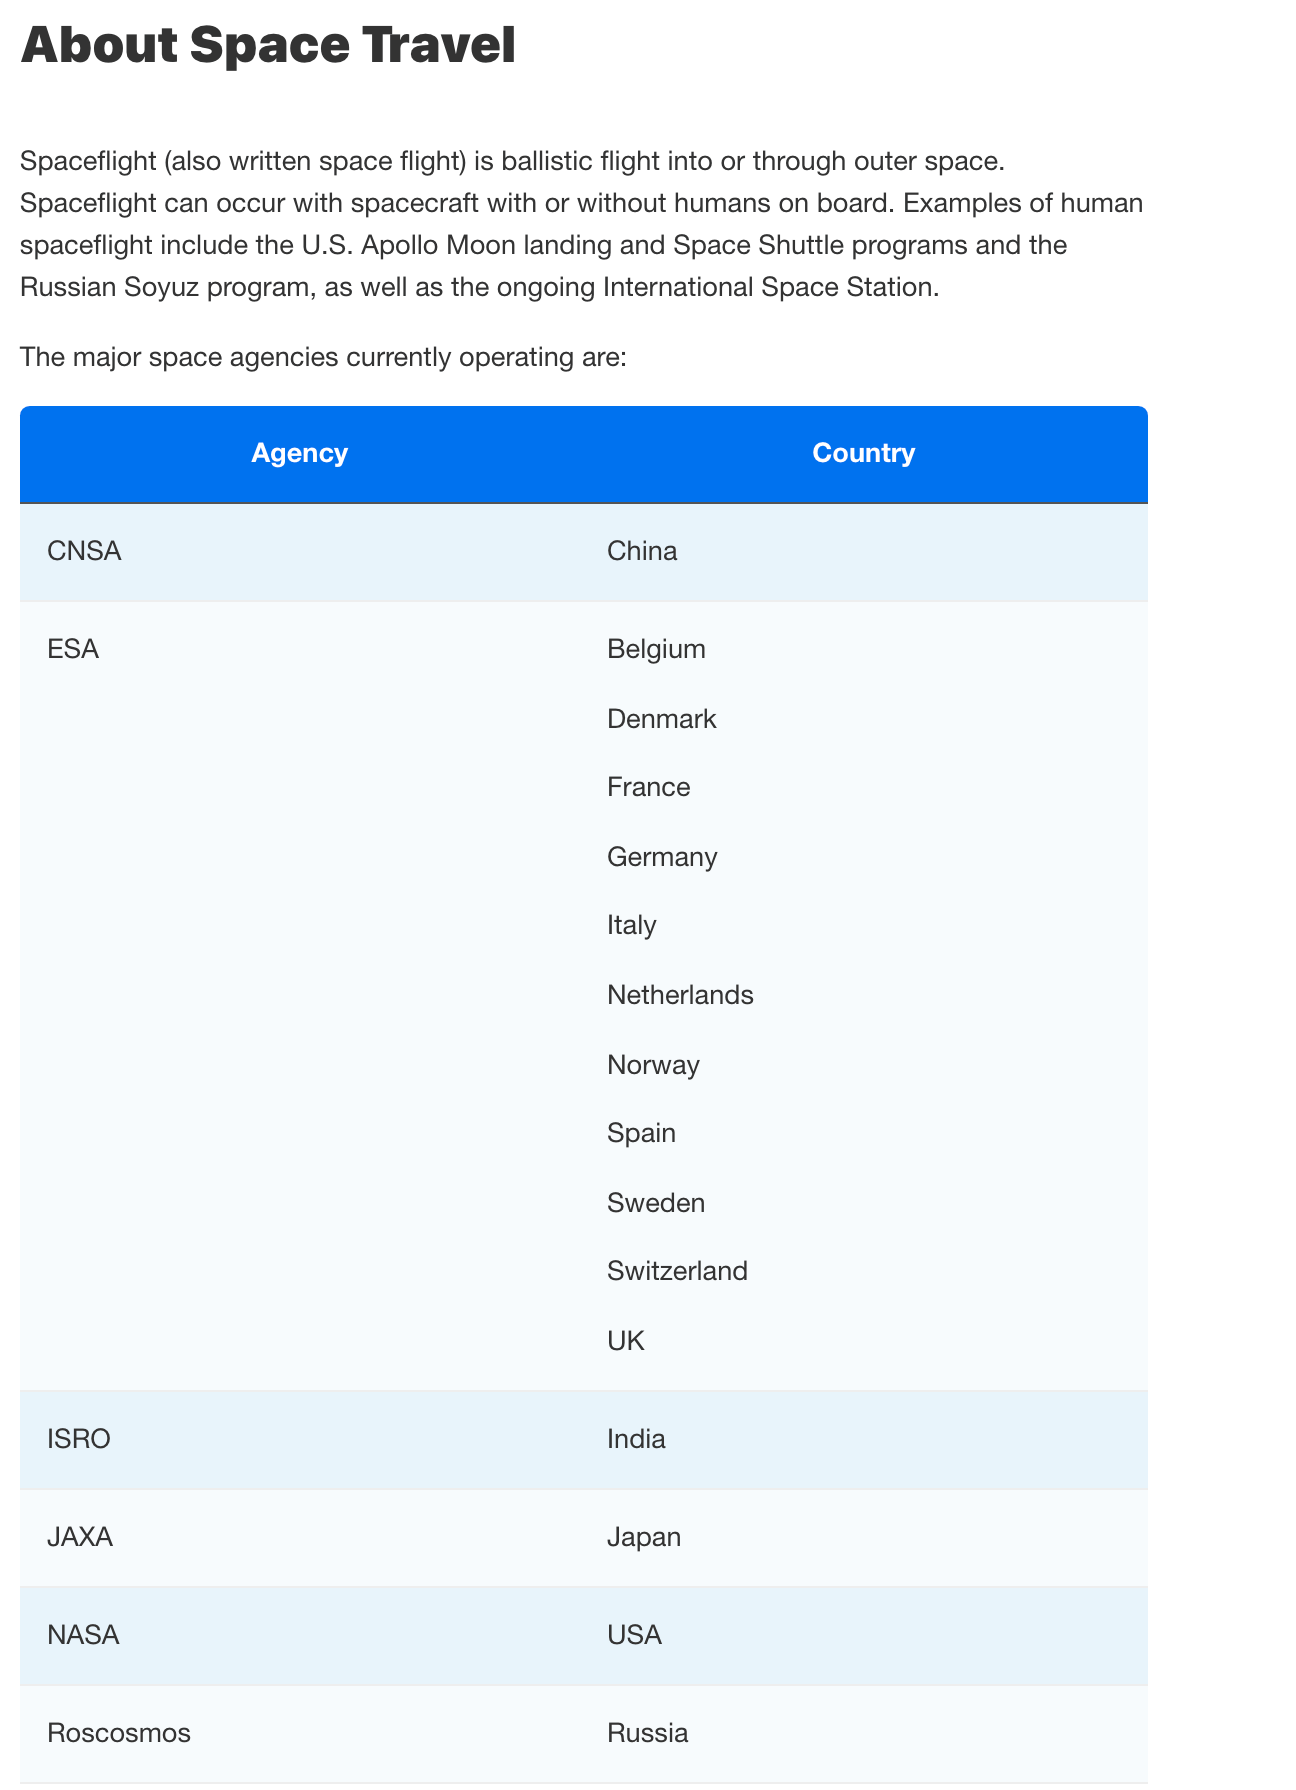
You can use CSS to change the appearance, such as giving the table rows colors and changing the width.
To make the style changes, you start by using the web browser's inspection feature to look at the styles that are currently applied to the content. The parts of the code that you need to style are the overall table (table), table header (th), and table rows (tr).
You decide to create your own css file for styling the table.
Using a CSS editor, you create the following CSS:
        /*Set border on table head and table cells */
        table td,
        table th{
            border: 1px solid #666;
        }

        /*Set width and border spacing for entire table */
        table{
            width: 98%;
            border-spacing: 0px;
        }

       /* alternating table row colors*/
       tr:nth-child(even) {background: #f8fbfd}
       tr:nth-child(odd) {background: #e8f4fb}

        /* set rounded corners to zero initially */
        th, td {
            border-radius: 0;
        }

        /*set amount of rounding per corner */
        thead tr:first-child th:first-child,
        table tr:first-child td:first-child,
        tbody tr:first-child th:first-child {
            border-top-left-radius: 0.6em;
        }
        thead tr:first-child th:last-child,
        table tr:first-child td:last-child,
        tbody tr:first-child th:last-child {
            border-top-right-radius: 0.6em;
        }
        tbody tr:last-child td:first-child,
        table tr:last-child td:first-child,
        tbody tr:last-child th:first-child {
            border-bottom-left-radius: 0.6em;
        }
        tbody tr:last-child td:last-child,
        table tr:last-child td:last-child,
        tbody tr:last-child th:last-child {
            border-bottom-right-radius: 0.6em;
        }

        thead + tbody tr td,
        tr + tr td ,
        tr + tr th {
            border-top: 0;
        }

        tr th + th,
        tr td + td {
            border-left: 0;
        }

        /* shade table header cells */
        table th {
            background-color: #0072ef;
            color: #FFF;
        }
You save the CSS file as "custom-table.css".
Now you need to add the file to Zendesk and set it to be referenced for each Zendesk article. In Zendesk, you browse to Customize design > Edit theme > Edit code and add the custom.table.css as an asset.
You then open the document_head.hbs template and add the following line at the bottom of the list of references to CSS files:
<link href=“{{asset ‘custom-table.css’}}” rel=“stylesheet” type=“text/css” />
You publish the template to save the changes.
Now when you view the "About Space Travel" article, it uses the table styles from your custom CSS file (with the exception of styles that are set to !important in the other CSS files).
You can use JavaScript (JS) to add extra or different functionality to your Zendesk help center. We recommend that you create your own custom JavaScript files rather than make changes to the JS files Paligo provides.
To create your own JS files to customize your Zendesk help center:
Publish your content to Zendesk and then decide on what extra functionality you need.
Create your own JavaScript (JS) files to provide the extra functionality.
In Zendesk, browse to Customize design > Edit theme > Edit code and then add your JavaScript files as assets.
In Zendesk, open the document_head.hbs template and add the following line to the list of references to JavaScript files:
<script src="{{asset 'yourscript.js'}}"></script>Where yourscript.js is the name of your JavaScript file, for example, flagicons.js.
Publish the template to save it in Zendesk.
When Paligo publishes to Zendesk, it provides a package that downloads in your web browser. The package contains CSS files and JavaScript files, and for the first publication to Zendesk, you need to add some of the files to your Zendesk assets.
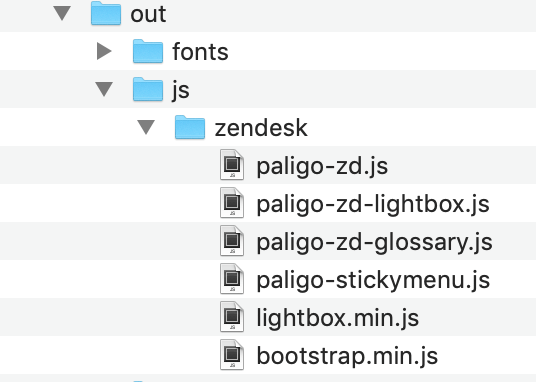 |
We recommend that you create your own custom JavaScript files if you want to add or change functionality in Zendesk. However, if you really need to change the functionality that the Paligo JavaScript files provide, you can customize them. This does have some consequences that you need to be aware of:
In future, Paligo may provide updated versions of the JS files. If you copy the updated versions into your Zendesk assets, you will lose the customizations you have made. So you will need to make your changes again.
If you decide to not use updated versions of the JS files, your customizations will remain in place. But you will not have any of the extra functionality that is included in any updated versions.
The JavaScript files that Paligo provides are:
File | Description |
|---|---|
paligo-zd.js | Used for resolving links between articles and embedding code. |
paligo-zd-lightbox.js | Provides the lightbox functionality for images (when you select an image in an article, a larger version of the image appears). |
paligo-zd-glossary.js | Provides the pop-up glossary functionality. If there is a glossary term in a Zendesk article, you can hover the cursor over it to display the definition of that term. |
paligo-stickymenu.js | Provides extra menu features, including:
|
lightbox.min.js | This script needs to be in place for the lightbox functionality. It is used in conjunction with the paligo-zd-lightbox.js script. |
bootstrap.min.js | This script needs to be in place for the extra menu features. It is used in conjunction with the paligo-stickymenu.js script. |
To get the Paligo JavaScripts to work in Zendesk, add them as assets and reference them in the document_head.hbs template. This only has to be done once, and it is usually setup when the Paligo to Zendesk integration is set up. For details on moving and referencing the assets, which include CSS as well as JavaScript, see Step 4: Add the CSS and JS files to Assets in Zendesk.

