Table of Contents (HTML5)
For HTML5 output there are three types of table of contents (TOC) that you can combine:
TOC sidebar - Positioned on the left side of the portal page is the main navigation and shows the publication content.
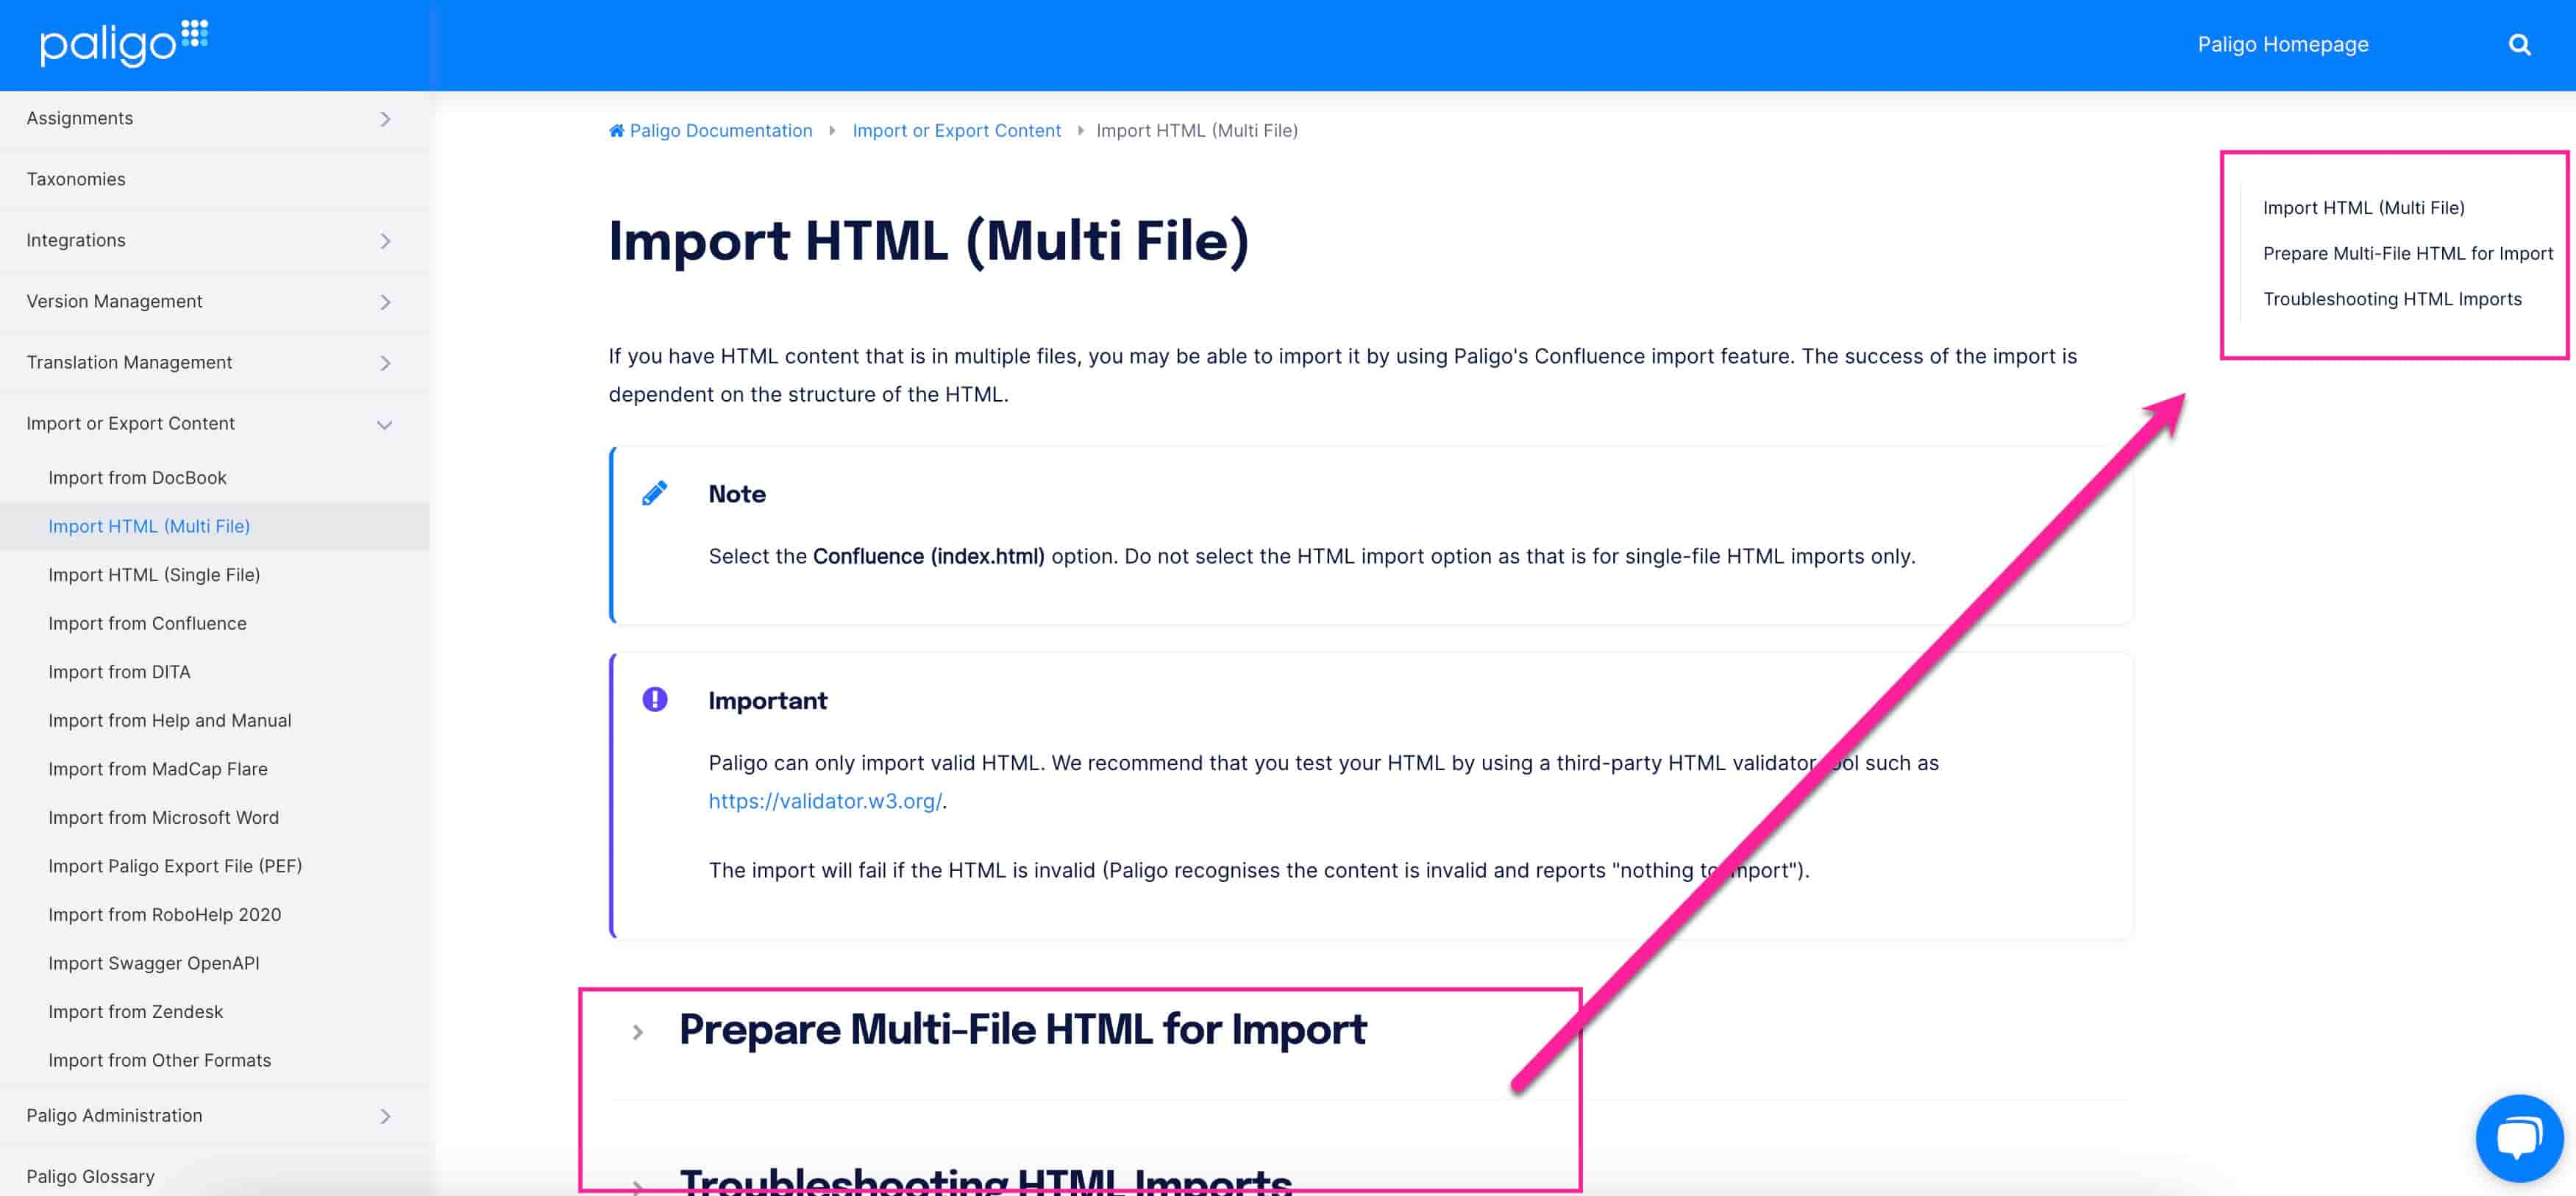
Section TOC - Positioned at the bottom of each topic (called In this section) showing the subtopics outside the topic, see Enable Section TOC (HTML5).
Another option is Automatic Links to Related Topics ("See also" sections) which appear in a "See also" section at the bottom of a topic.
Page TOC - Positioned on the right side of each topic showing the subtopics inside the topic, see Enable Page TOC. It highlights the titles when you scroll through the topic.
 |
Tip
The titleabbrev element is useful if you have long titles, but would prefer a shorter title in the table of contents (PDF), TOC sidebar (HTML5) and for cross-references, see Use Title Abbreviations.
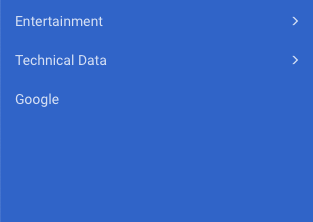
By adding a script to your JavaScript file, you can add an external link to the TOC Sidebar. In this instruction, a link pointing to "https://www.google.com" is added at the bottom of the TOC Sidebar.
 |
Important
If the HTML5 layout already uses a customized JavaScript file, you should add your changes to that file instead of creating a new one.
If you upload a new JavaScript file, the existing one will be replaced and you will lose the functionality in the old JavaScript file.
To add an external link to your TOC sidebar:
Use a text editor or code editor for creating (or updating) the JavaScript file.
Use the following script as a starting point:
$(document).ready(function () {
    /* Insert link in sidebar toc */
    var linktoGoogle = document.createElement("li")
    linktoGoogle.innerHTML = '<a href="https://www.google.com">Google</a>'
    var toclist = document.getElementsByClassName("nav-site-sidebar");
    toclist[0].appendChild(linktoGoogle)
 });
Note
If you have Ajax activated, use this script as starting point instead:
    $(document).ready(() => {
      dropdownText();
      $(document).ajaxComplete(() => {
        dropdownText();
      });
    });

    function dropdownText() {
      const dropdownPortal = document.getElementsByClassName('has-submenu')[0];
      dropdownPortal.innerHTML = '<span class="caret"></span>your text here<span class="sub-arrow"></span>';
      const dropdownTopic = document.getElementsByClassName('has-submenu')[1];
      dropdownTopic.innerHTML = '<span class="caret"></span>your text here<span class="sub-arrow"></span>';
    }
Edit the link.
Save your JavaScript file making sure it has a
.jsfilename extension.
The HTML5 Help Center Layout has a Collapsible TOC feature that allows you to create an output with a collapsible TOC sidebar.
When this setting is enabled, Paligo produces a Help Center that has a "hamburger" menu. Users can select the menu to collapse and expand the left-side panel that contains the table of contents.
The Collapsible TOC feature is designed for HTML5 Help Centers that are set to use Theme 2 (see Themes for HTML5 Help Centers). If you are using a different theme, you may need to use custom CSS to change the styling, see Style with CSS.
 |
"Hamburger" menu
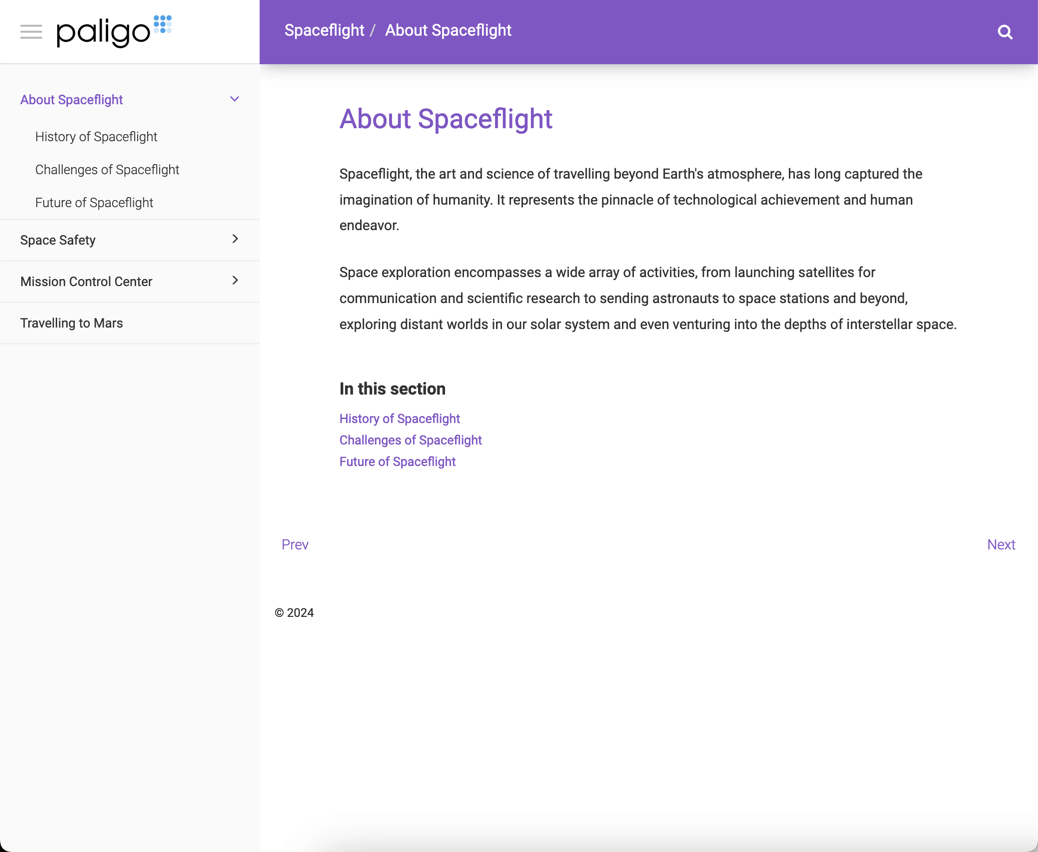
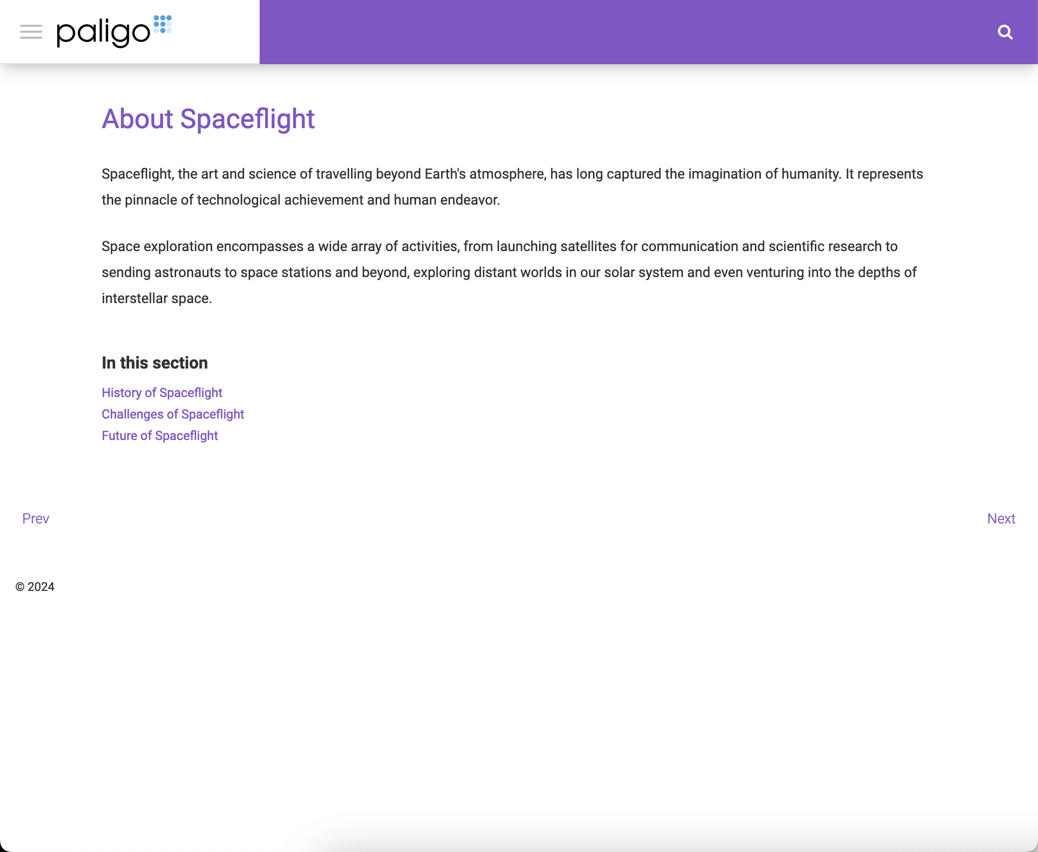
Select the hamburger menu icon to collapse and expand the TOC sidebar.
To set up a collapsible TOC sidebar for HTML5 output:
Select Layout in the top menu.

Paligo displays a list of Layouts. The list is empty if there are no custom Layouts in your Paligo instance.
Select the Layout you want to update or Create a Layout.
Tip
You can copy the URL of the Layout Editor and paste it into a new tab in your browser. This can be useful if you frequently switch between your Paligo content and the Layout settings.
Select TOC and chunking in the sidebar.

Set Collapsible TOC to:
Enable to activate the Collapsible TOC feature
Disable to deactivate the Collapsible TOC feature
Default to inherit the value for this setting from the base Layout. The base Layout is either a built-in Layout provided by Paligo or another custom Layout, see Layout Relationships - Base, New, Duplicate.
Select Save.
When you publish with this layout, Paligo will apply your selection to the output.
Use the HTML5 Help Center Layout to control how the upper-level entries in your table of contents can be:
Expanded to reveal lower-level entries
Collapsed to hide the lower-level entries
By default, higher-level entries will expand when a user clicks on the chevron for the entry or the title of the entry. But it will only collapse again if the user selects the chevron.
If you prefer, you can set the higher-level entries to expand and collapse when a user selects the chevron or the title.
Select Layout in the top menu.
Paligo displays a list of Layouts. The list is empty if there are no custom Layouts in your Paligo instance.
Select the Layout you want to update or Create a Layout.
Tip
You can copy the URL of the Layout Editor and paste it into a new tab in your browser. This can be useful if you frequently switch between your Paligo content and the Layout settings.
Select TOC and chunking in the sidebar.
Use Collapse section in TOC when clicking on the link title to control the collapse behavior. Choose from:
Enable to set the TOC to expand and collapse when the user selects an entry title or chevron.
Disable to set the TOC to expand when the user selects a chevron or title, but collapse only when the chevron is selected. Selecting the title again will not collapse the TOC.
Default to inherit the value for this setting from the base Layout. The base Layout is either a built-in Layout provided by Paligo or another custom Layout, see Layout Relationships - Base, New, Duplicate.
Select Save.
When you publish with this Layout, Paligo will apply the settings you chose.
Add a page TOC (table of contents) to show each page's subheadings. It will highlight the headings when you scroll the topic. This feature is only available for HTML5 Help Center themes 1 and 2 (not the "Preloaded" version).
To avoid headings being repeated in both the TOC Sidebar and Page TOC, you should also enable 'Only include chunks in TOC' together with the Page TOC. This means that only topics that become chunks (according to your settings) will be included in the TOC sidebar. For example, internal section elements in a topic will not be included in the TOC sidebar, only in the Page TOC.
 |
To enable Page TOC for HTML5:
Select Layout in the top menu.
Paligo displays a list of Layouts. The list is empty if there are no custom Layouts in your Paligo instance.
Select the Layout you want to update or Create a Layout.
Tip
You can copy the URL of the Layout Editor and paste it into a new tab in your browser. This can be useful if you frequently switch between your Paligo content and the Layout settings.
Select TOC and chunking in the sidebar.
Select Enable to activate Only include chunks in TOC.
The nested topics or topic's subsections will be excluded from the TOC Sidebar. These will instead be included in the Page TOC.
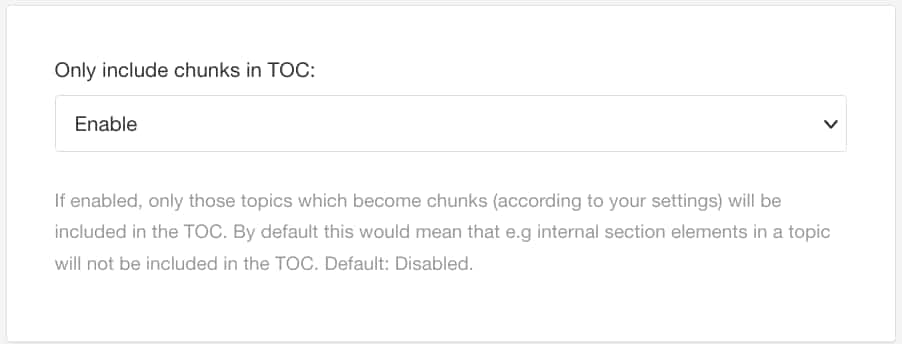
Default is disabled.
Select Enable to activate Use page TOC.
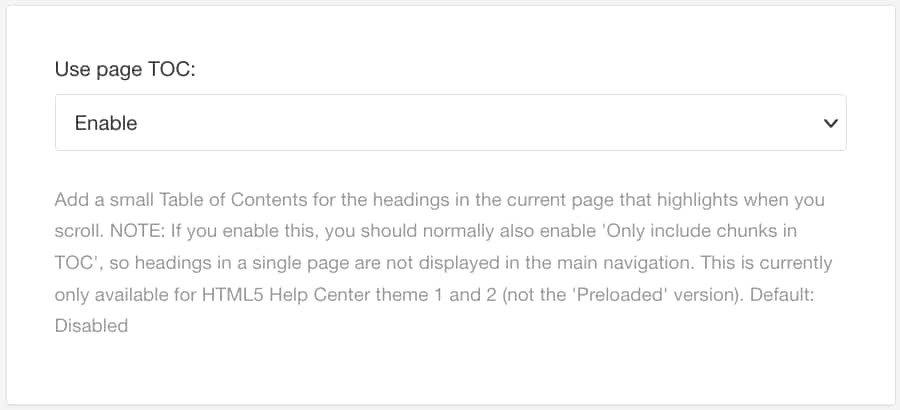
Default is disabled.
Select Save.
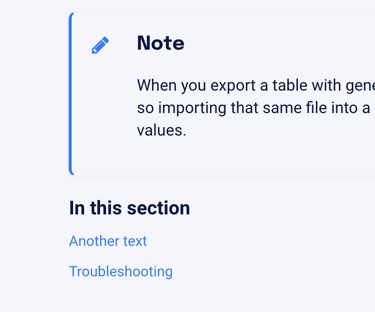
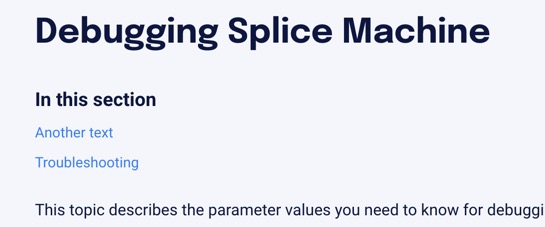
Paligo has a Section TOC feature for adding a table of contents (TOC) inside each topic. In HTML5 outputs, the TOC has a heading called "In this section" containing links to each subsection in the topic. The links are created and managed automatically by Paligo.
 |
The following steps explain how to set up section TOCs for HTML5 outputs. They also explain how to hide the section TOC for specific topics, see Hide Section TOC Individually.
For instructions for PDF, see Set Up a Section TOC with Links to Subsections (PDF).
To set up section TOCS for HTML5:
Select Layout in the top menu.
Paligo displays a list of Layouts. The list is empty if there are no custom Layouts in your Paligo instance.
Select the Layout you want to update or Create a Layout.
Tip
You can copy the URL of the Layout Editor and paste it into a new tab in your browser. This can be useful if you frequently switch between your Paligo content and the Layout settings.
Enable or disable the Section TOC feature:
Select TOC and chunking in the sidebar.
Set Use section TOC to:
After - Generates a hierarchical list of subtopics below the topic. Default
Before - Generates a hierarchical list of subtopics between the topic title and its first paragraph.
None - To turn off the section TOC.
Select Save.
If you want to be able to hide the section TOC in certain topics, you can add a script to your CSS and add the role attribute with the value no-section-toc to those topics.
When you publish, the section TOC for the topics with the value no-section-toc is hidden, but shown for the rest of the topics.
Add the following to your custom CSS file:
.no-section-toc ~ .footer-content .section-toc
 {display: none;}
Upload your custom CSS file to your Paligo layout, see Upload Customized CSS.
Select the topic or component in the Content Manager to open it in the Editor.
Alternatively, you can Create a Topic and edit that.
Select the
sectionin the Element Structure Menu and choose Go to element.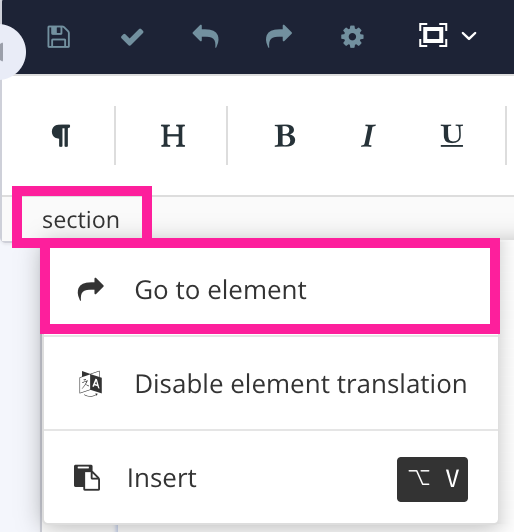
Add the
roleattribute in the Element Attributes Panel.Set the value to
no-section-toc.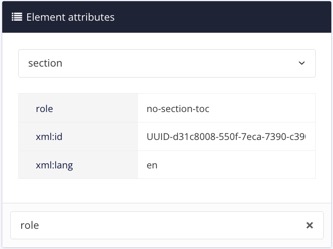
Select Save.

Repeat step 3 to 7 for all topics that is to hide the section TOC.
You can choose to have numbered headings, such as "1.2 Power up the device" in your HTML5 output.
Typically, you apply numbering to all sections (by enabling General > TOC and Chunking > Section Numbering in the Layout Editor) or not using numbered headings at all.
But there may be times when you need a mix of numbered headings and headings without numbering and for that, you can use the element attribute label with its value set to 0.
When you publish topics that use this element attribute, Paligo will not apply numbering to its heading, even if the publication is set to use numbered headings. The heading will appear as text-only, both in the topic itself and in the table of contents.
To prevent a topic from being auto-numbered:
Select the topic or component in the Content Manager to open it in the Editor.
Alternatively, you can Create a Topic and edit that.
Select the
sectionelement in the Element Structure Menu.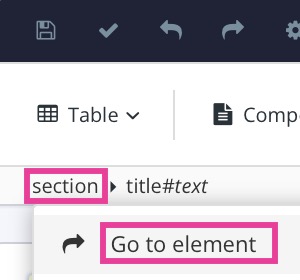
Select Go to element.
Add the label attribute in the Element Attributes Panel.
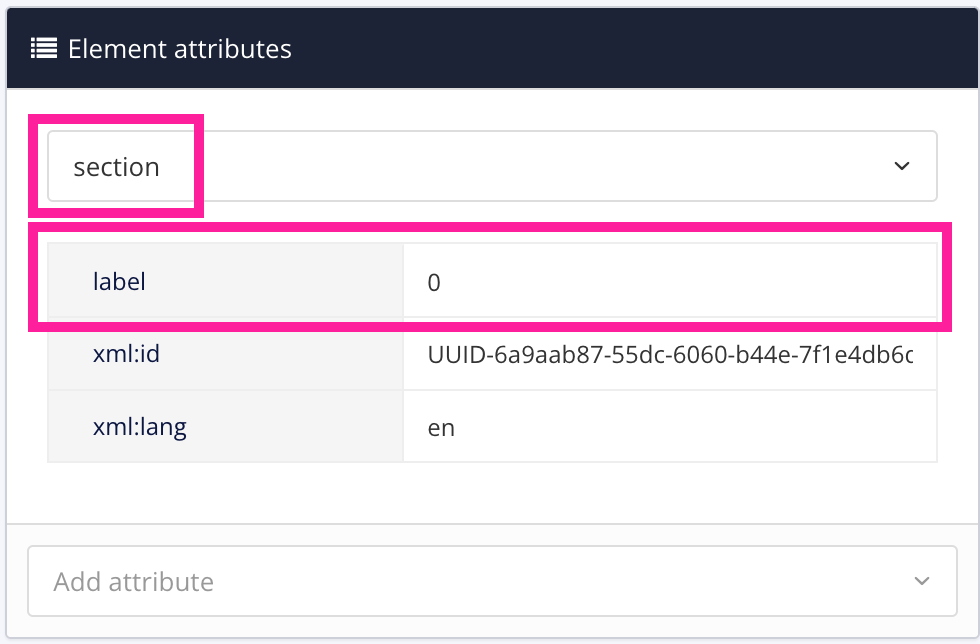
The 0 value instructs Paligo to avoid using numbering for this section.
Set the value to 0.
Select Save.
Note
To enable numbering again, remove the label attribute.
For your HTML and HTML5 outputs, the HTML files need to reference the publication's table of contents (TOC). There are two ways to handle this:
Include the TOC in each HTML file. This minimizes the use of JavaScript, but results in larger HTML files.
Have the TOC separated from the HTML files and use JavaScript to insert the TOC when each HTML page is displayed. This is more efficient, as the HTML files are smaller and so load more quickly, which is better for SEO (Search Engine Optimization).
To control how Paligo includes the TOC, use the Standalone TOC setting on HTML and HTML5 layouts:
Select Layout in the top menu.
Paligo displays a list of Layouts. The list is empty if there are no custom Layouts in your Paligo instance.
Select the Layout you want to update or Create a Layout.
Tip
You can copy the URL of the Layout Editor and paste it into a new tab in your browser. This can be useful if you frequently switch between your Paligo content and the Layout settings.
Select TOC and chunking in the sidebar.
Set Standalone TOC to either:
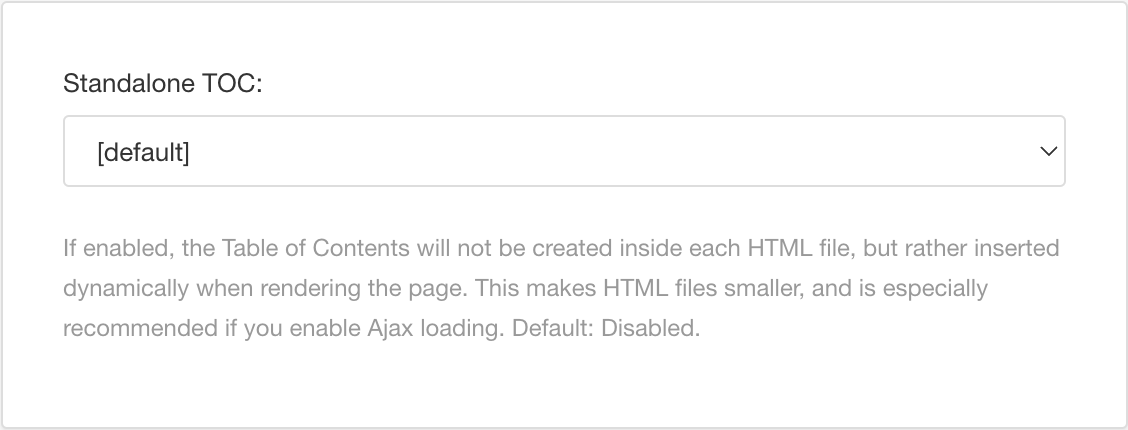
Enable - To use JavaScript to insert the TOC from a separate file. This is more efficient, as the HTML files are smaller and so load more quickly, which is better for SEO. Recommended
Disable - To include the TOC in each HTML in the HTML/HTML5 output. This minimizes the use of JavaScript, but results in larger HTML files.
Default to inherit the value for this setting from the base Layout. The base Layout is either a built-in Layout provided by Paligo or another custom Layout, see Layout Relationships - Base, New, Duplicate.
Typically, it is better to enable the Standalone TOC feature, but in some cases, it can have undesired results. For example, if your help portal is configured to minimize the use of Javascript. It can also make your help port less "crawlable" by older search engine bots.
Select Save.
When you publish, Paligo will apply your choice to the output.