Single Sign On (SSO) and SAML Integration
If you are on the Enterprise plan, you can connect Paligo to a Single Sign On (SSO) service. The benefits of this type of setup include:
Reduced administration time
Manage all of your software-as-a-service (SaaS) user accounts, not just Paligo user accounts, from a single SSO service. This is especially useful in larger organizations where the workforce regularly changes due to people joining, moving departments, leaving and retiring.
Easier access
Users can log in to different applications without entering their username and password each time.
Security
SSO user accounts are centralized, so you can apply security measures, such as password strength, to all users.
To set up Paligo to work with your SSO service:
Learn the basics of how SSO works [optional].
Set up your SSO service to connect to Paligo.
We have some general instructions that apply for many SSO services.
If you are using Okta, Azure, or JumpCloud, those SSO services need to be set up in a different way. We have included instructions for those special cases:
Important
If you set up Paligo to use an SSO service, the SSO takes priority over Paligo's built-in two-factor authentication (2FA).
When your SSO service is set up to connect to Paligo, the sign-in process for users is:
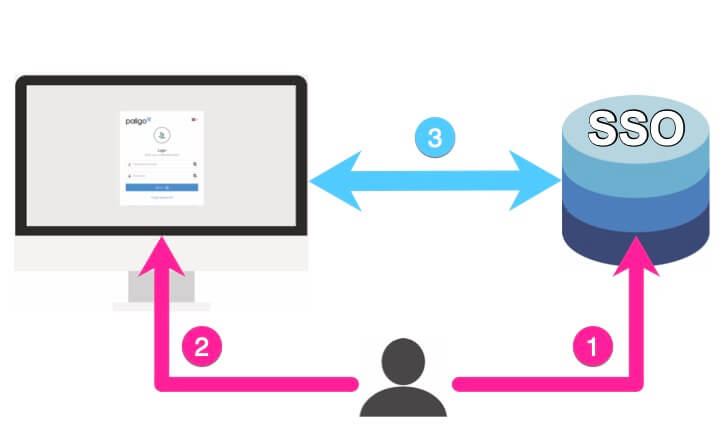 |
User opens Paligo in a browser and selects a Sign in button. They do not need to enter a user name or password.
Paligo redirects to the SSO service for the user's sign-in details.
The SSO service needs to be able to authenticate the user's account, password, and user group.
The SSO service responds to Paligo:
If the user is signed-in to the SSO service already, the SSO service should sign the user into Paligo too. It will provide Paligo with the user's username, password, and user group.
If the user is not signed-in to the SSO service, Paligo redirects them to the SSO service sign-in. When they sign in to the SSO service, they will also be automatically signed in to Paligo.
You can use the SSO service to manage your user accounts and you can add user accounts too. The settings you apply there will apply to the user accounts for all of the applications that are set up to use SSO, including Paligo.
When using an SSO service to manage user accounts, be aware that:
You cannot use an SSO service to delete a Paligo user account. You will need to do that manually in Paligo.
If you use an SSO service to add a new user to a Paligo user group, Paligo will create that user account when the user attempts to sign in.
To use an SSO service with Paligo, the service has to be configured to communicate using Security Assertion Markup Language (SAML). Usually, this configuration work is performed by IT specialists who have an in-depth understanding of the SSO service.
To help you set up your SSO service to work with Paligo, we have:
General instructions (see procedure below).
These cover the main principles and most SSO services require similar information.
Separate instructions for the following SSO services, which are special cases and need different configuration:
In your SSO provider:
Create one user account for each Paligo user account.
Create a custom SAML 2.0 application.
Configure the SAML 2.0 application. The terminology used for the settings can vary, but you will need to:
Set the Assertion Consumer Service (ACS) URL for Paligo, the endpoint where the SSO service provider connects to Paligo.
Use this URL:
https://your.paligoapp.com/saml/acs. Replace your with the domain name of your Paligo instance, for example: https://acme.paligoapp.com/saml/acsSet the Service Provider (SP) URL for Paligo.
Use this URL:
https://your.paligoapp.com/saml/metadata. Replace your.paligoapp.com with the domain name of your Paligo instance.Set the application user name or ID to:
emailCreate attribute mapping for Paligo's user credentials:
user.firstnameuser.lastnameuser.email
Note
There may be additional settings required, depending on your SSO Service.
Map them to the equivalent attributes in your SSO service. Refer to your SSO service documentation for information on those.
Create a group attribute for Paligo. Depending on the SSO service you are using, this should have the name / value
paligo.usergrouporpaligo_usergroup.Export the SSO service's metadata file so that you can import it into Paligo.
Create a user group for each Paligo user group. This step is required in some SSO services, whereas with others, you can add the user group name to the user settings.
In Paligo, every user account belongs to a user group, such as administrators, authors, contributors, reviewers, publishers, it admins or translation managers. When users log in to Paligo using SSO, Paligo needs the SSO service to provide the user group information (as well as the first name, last name and email). User groups are not included in the default metadata, so you need to add them in your SSO service.
Associate each user account with the appropriate user group.
Associate each user group with the SAML 2.0 application that you have created to represent Paligo.
In Paligo, use the SSO integration settings to Connect Paligo to your SSO Service.
Before you connect Paligo to your SSO service, make sure you have set up your SSO service. It needs to be able to provide user authentication data to Paligo. As part of the setup, you will export a metadata file that you will be able to import into Paligo.
When the SSO service is set up, you can connect Paligo to it:
Log in to Paligo via a user account that has administrator permissions.
Sign in to Paligo using a user account that has administrator permissions.
Select the avatar in the top-right corner.

Select Settings from the menu.

Select the Integrations and webhooks tab.

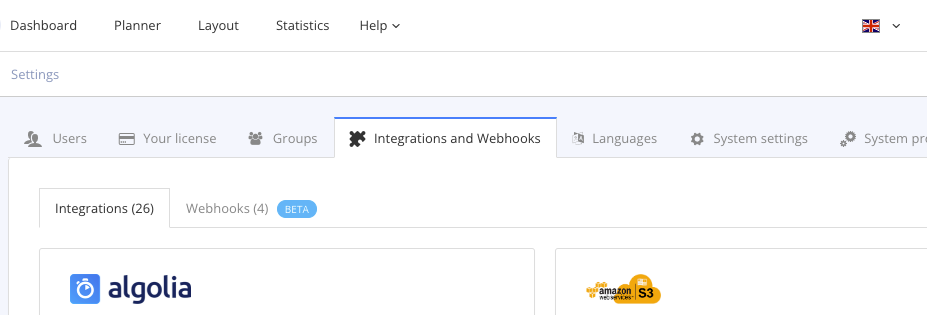
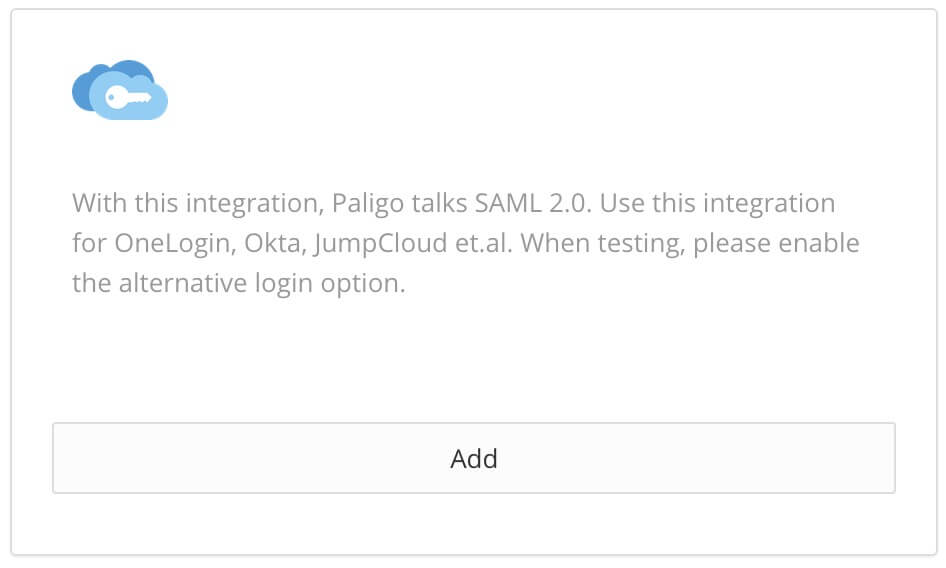
Select Add in the SAML 2.0 section to expand the connection settings.
Enter the Provider Name, a display name for the SSO service, for example, Okta or JumpCloud.
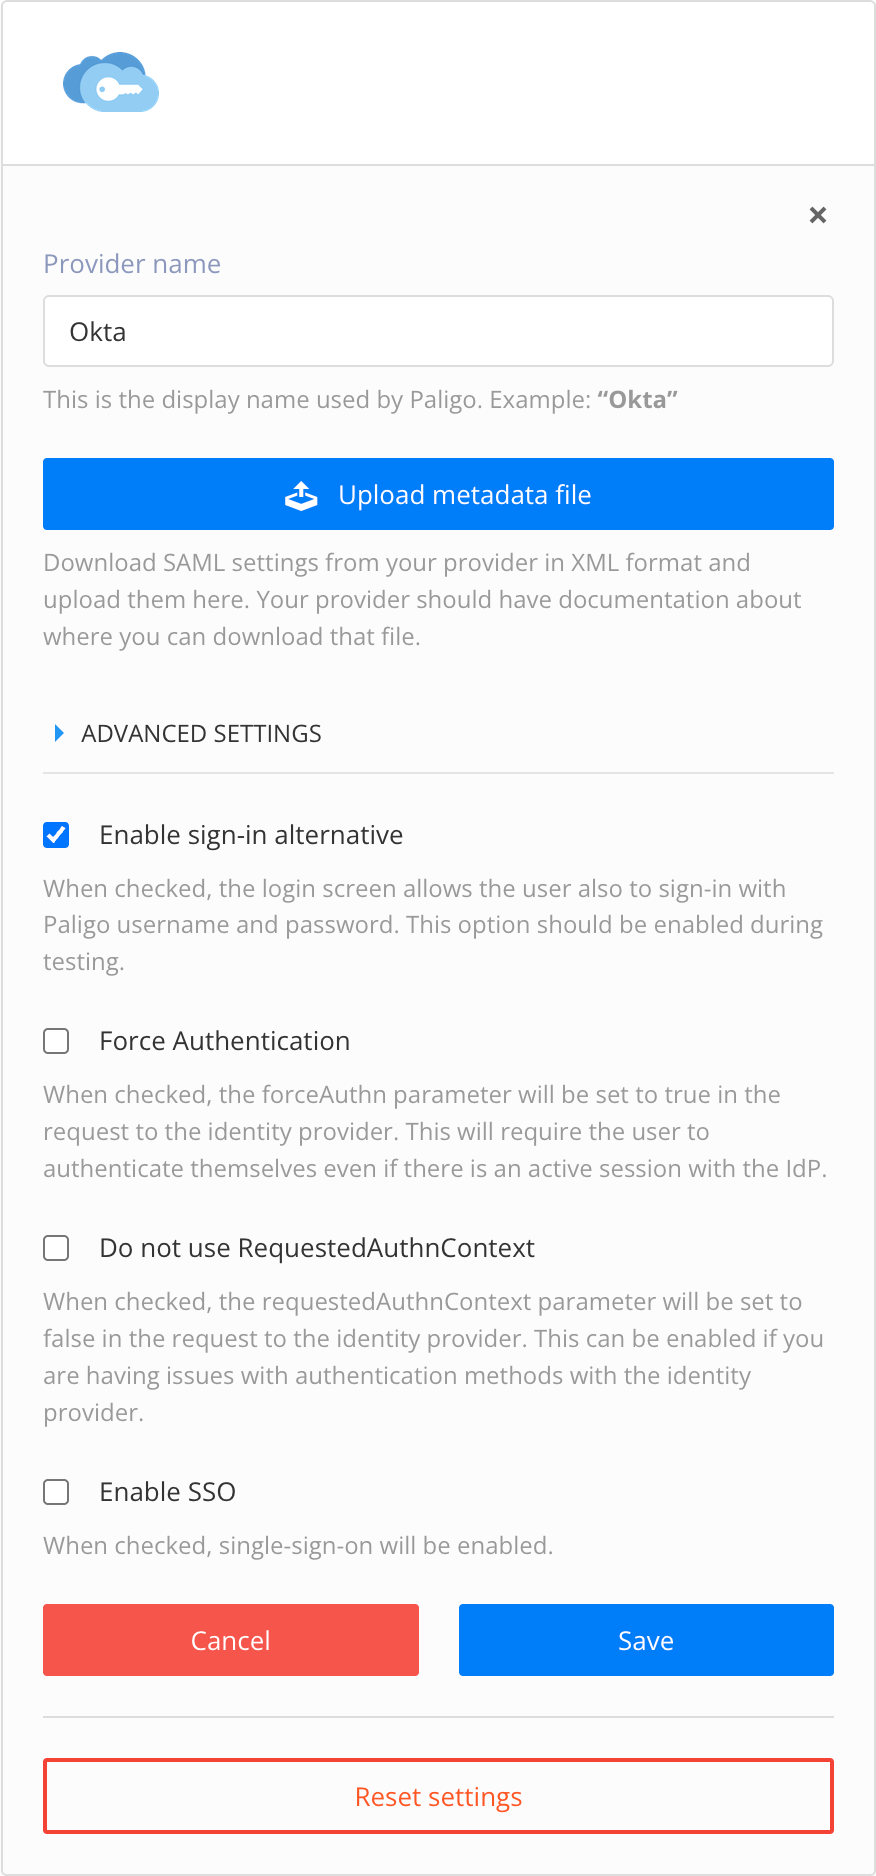
Select Upload metadata file and select the metadata file that you exported from the SSO service when it was set up.
In most cases, you should be able to ignore the Advanced Settings section. These settings are filled automatically, as the values come from the SAML XML file you uploaded in the previous step. If, for some reason, the settings need to be added or changed, you can make the changes manually.
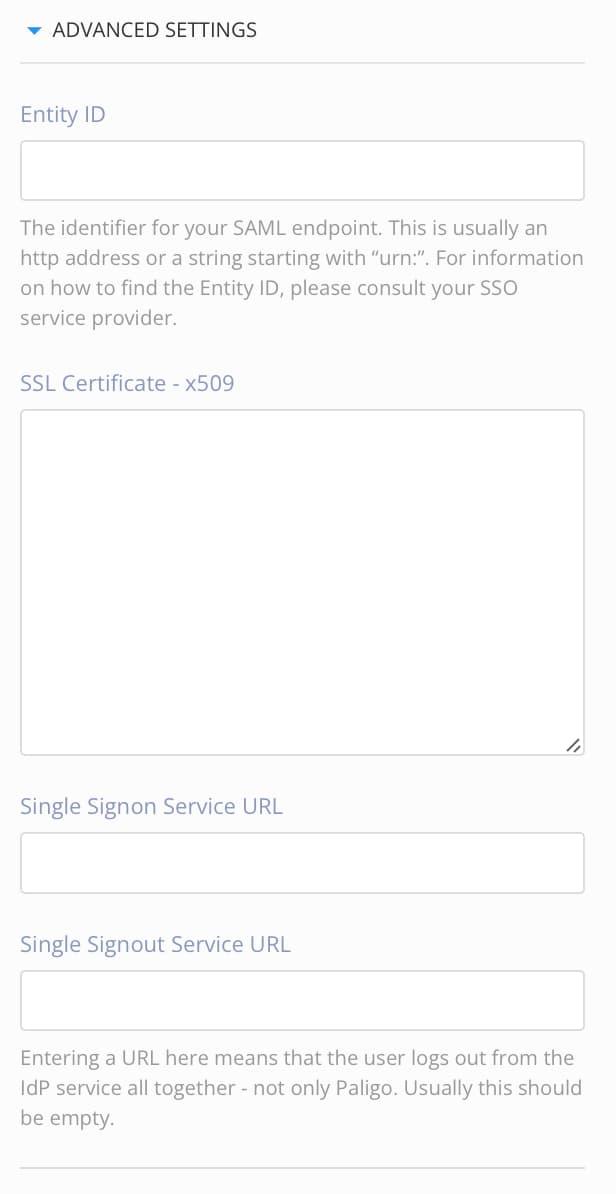
Entity ID - The identifier for your SAML endpoint. This is sometimes called the identity provider issuer.
SSL Certificate - The secure socket layer (SSL) certificate for the SSO service.
Single Signon Service URL - The address of the single sign-on service.
Single Signout Service URL - The address of the single sign-out service, if used. When this is used, logging out of Paligo logs the user out of the SSO service as well, not just Paligo. This is empty if the feature is not used.
Check the Enable sign-in alternative checkbox so that users can sign in to Paligo manually as well with SSO. This is important the first time you set up SSO, as if there is an error, you will need to be able to log in to Paligo without SSO to fix it.

Check the Force authentication to set the
forceAuthnparameter to true in the request to the identity provider. This will require the user to authenticate themselves even if there is an active session with the IdP.
Check the Do not use RequestedAuthnContext if you are having issues with authentication methods with the identity provider. This will set the RequestedAuthnContext parameter to
false.
Check the Enable SSO box to activate single-sign in.

Note
If you want to store the settings without activating SSO, clear this checkbox. You can return to this page and enable SSO later if needed.
Select Save.
Log out of Paligo.
Caution
Do not log out of Paligo if the Enable sign-in alternative setting is not checked and you have not yet tested SSO. Logging out could result in you being unable to log in to Paligo.
Log back in again. You should now see an SSO sign in option that, when selected, logs you into Paligo.
Note
If you do not see the SSO sign in option or if the SSO sign-in attempt is unsuccessful, log in with your username and password and check that you have completed the steps described in this topic correctly.
Usually, failed SSO sign-ins are due to incorrect configuration in the SSO service. Please make sure that you have entered the correct URLs and have set the correct attributes for firstname, lastname and email.
The most common error is that the user group is incorrectly set up in the SSO service. The SSO service has to be able to provide Paligo with the username, email, and usergroup metadata. For more information on the SSO service settings, see Connect an SSO Service to Paligo.
Once SSO works as expected, enter the SAML 2.0 settings.
Clear the checkbox for Enable sign-in alternative.
If this option is disabled the users can no longer use username and password to login. They have to use SSO to log in.
Select Save.
To set up Azure SSO to connect with Paligo:
Create an enterprise app registration for Paligo. For instructions, see the official Microsoft documentation at Quickstart: Add an enterprise application.
Find the SSO settings in Enterprise Applications.
Select the app you registered and then Single sign-on.
Enter the Basic SAML configuration. You need to provide the following details and replace instancename with the name of your Paligo instance, for example, https://acme.paligoapp.com.
Identifier
https://instancename.paligoapp.com/saml/metadata
Reply URL
https://instancename.paligoapp.com/saml/acs
Sign On URL
https://instancename.paligoapp.com/saml/login
Relay State and Logout URL
https://instancename.paligoapp.com
Select Edit next to Attributes and Claims.
Select Add a new claim and then enter the details for the new claim. For Paligo, you will need to create 5 claims, so you will repeat this step. We have included the name and source attribute details for each claim below.
Name
Source attribute
user.email
user.mail
user.firstname
user.givenname
user.lastname
user.surname
paligo.usergroup
user.assignedroles
Unique User Identifier
user.mail
Note
Each claim should be a regular claim, not a group claim. This applies to all of the claims for Paligo, including the paligo.usergroup claim.
Repeat the previous step until you have added all 5 of the required claims and their appropriate source attributes.
Create the App roles for each Paligo user group.
Go to Microsoft Entra ID.
Select App registrations.
Select Paligo (or whatever you named the app during registration).
Select App roles.
Select Create app role.
Enter the details for the app role. For Paligo, you will need to create several app roles and so you will repeat this process. We have included the details for each app row below.
Display name*
Description*
Allowed member types
Value
Enable app role?
Admin
Paligo admin
Users/Groups
paligo.admin
Yes (check box)
Contributor
Paligo contributor
Users/Groups
paligo.contributor
Yes (check box)
User
Paligo user
Users/Groups
paligo.user
Yes (check box)
Reviewer
Paligo reviewer
Users/Groups
paligo.reviewer
Yes (check box)
* The Display name and Description can be anything, the entries we have provided are just suggestions. But note that the Allowed member types and Value have to match exactly what is shown above and all of the app roles have to be enabled.
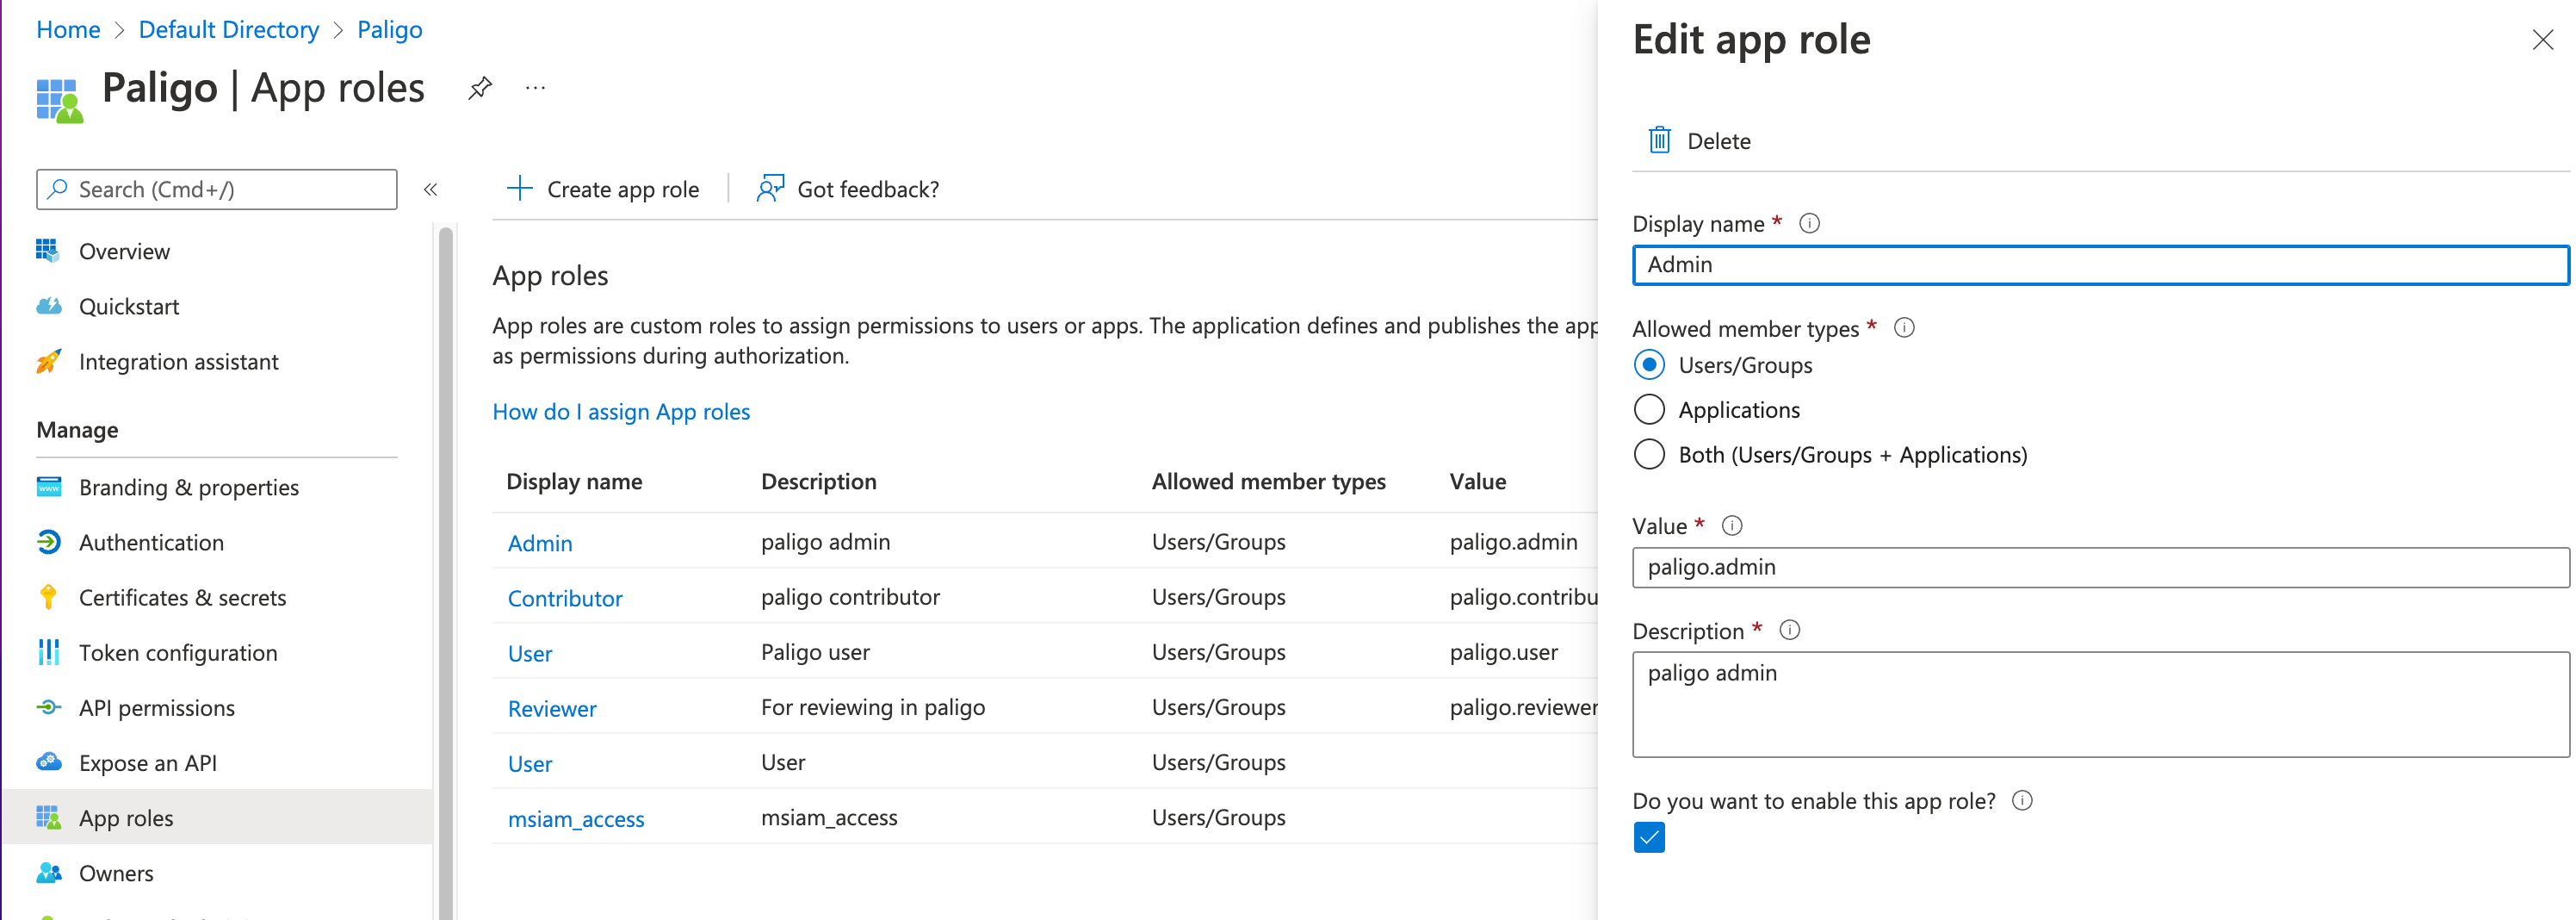
Repeat the previous two steps until you have created all of the required app roles.
Return to your Paligo Enterprise application settings and select Users and groups. Here, you are going to add the Azure users that you created in the Microsoft Entry ID directory.
Create the users:
Select ✚ Add user/group and choose a user.
Assign the appropriate User role to the user. The user roles are those that you created in the App roles earlier).
Repeat these steps until you have created all of the users and assigned the appropriate user roles.
Return to your Paligo enterprise application settings. In the Single sign-on settings, create a certificate.
Download the Federation metadata XML.
Sign in to Paligo using a user account that has administrator permissions.
Select the avatar in the top-right corner.

Select Settings from the menu.

Select the Integrations and webhooks tab.


Select Add or Change in the SAML SSO panel.
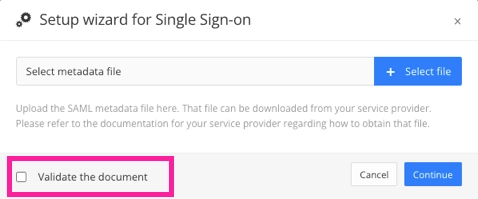
Use Upload metadata file to upload the Federation metadata XML file from Azure.
Note
If the validation fails, try to upload the Federation metadata XML file again, only this time clear the Validate the document checkbox on the upload dialog.
After your metadata uploads, expand the Advanced settings and delete the Single Signout Service URL. It is important that this field is empty.
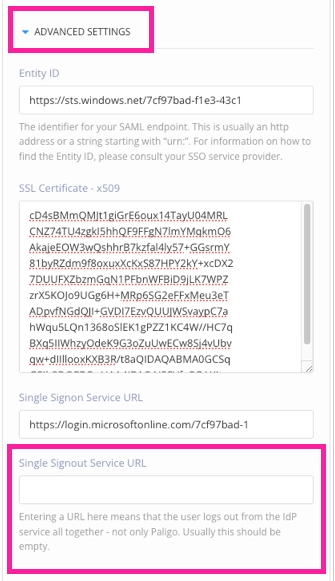
Make sure that Enable sign-in alternative is checked for first-time testing of the SSO sign-in.
Check the Enable SSO box.
Select Save.
Your Azure service should now be connected to Paligo. Try signing in using SSO.
If you are able to sign in using SSO, go back to the SAML SSO panel and clear the Enable sign-in alternative box.
If you are unable to sign in using SSO, go back through the steps above and make sure you have followed the instructions carefully. Look out for typing mistakes and copy and paste mistakes, as they are often the cause of problems. If you continue to have problems signing in, please contact customer support.
Note
When you have set up SSO, all user management is done in the SSO service, in this case, Azure. This includes changing license types and passwords and adding and removing users. You cannot manage users in Paligo when SSO is being used.
You can connect Paligo to Okta for single sign on (SSO). This is only available on the Enterprise plan.
To use Okta with Paligo, you need to set up Okta to provide metadata to Paligo. The metadata includes the name of the user, the user's email address, and the user group that the user belongs to.
Note
The metadata describing the user group is not part of the standard metadata. You must add this metadata to the SAML response.
To be able to Connect Paligo to your SSO Service you need to set up Okta to integrate with Paligo.
Note
For this section, we assume that you have already created your user accounts in Okta.
Create a New Application Connector for Paligo in Okta
The first stage of setting up Okta to communicate with Paligo is to create a new application connector.
In Okta:
Locate your applications and select Add application and then Create New App.
Apply the following settings for your new application:
Platform - set to Web
Sign on method - set to SAML 2.0
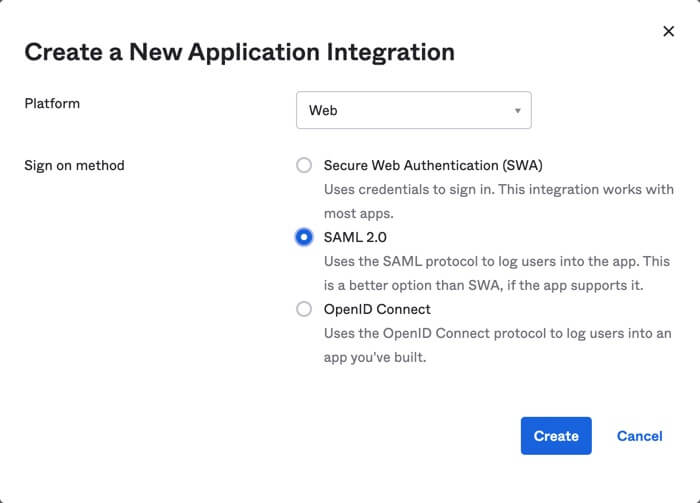
Select Create.
In the General settings, enter
Paligoas the App name and then select Next.Define the SAML settings.
In the General section, enter the following (replace my.paligoapp.com with your Paligo instance name, for example:
acme.paligoapp.com).Setting
Value
Single sign on URL
https://my.paligoapp.com/saml/acs
Audience URL
https://my.paligoapp.com/saml/metadata
Default RelayState
https://my.paligoapp.com
Application username
Choose email
In the Attribute statements section, add the following attributes:
Name
Name format
Value
user.firstname
Basic
user.firstName
user.lastname
Basic
user.lastName
user.email
Basic
user.email
paligo.usergroup
Basic
appuser.paligo_usergroup
Your settings should look like this:
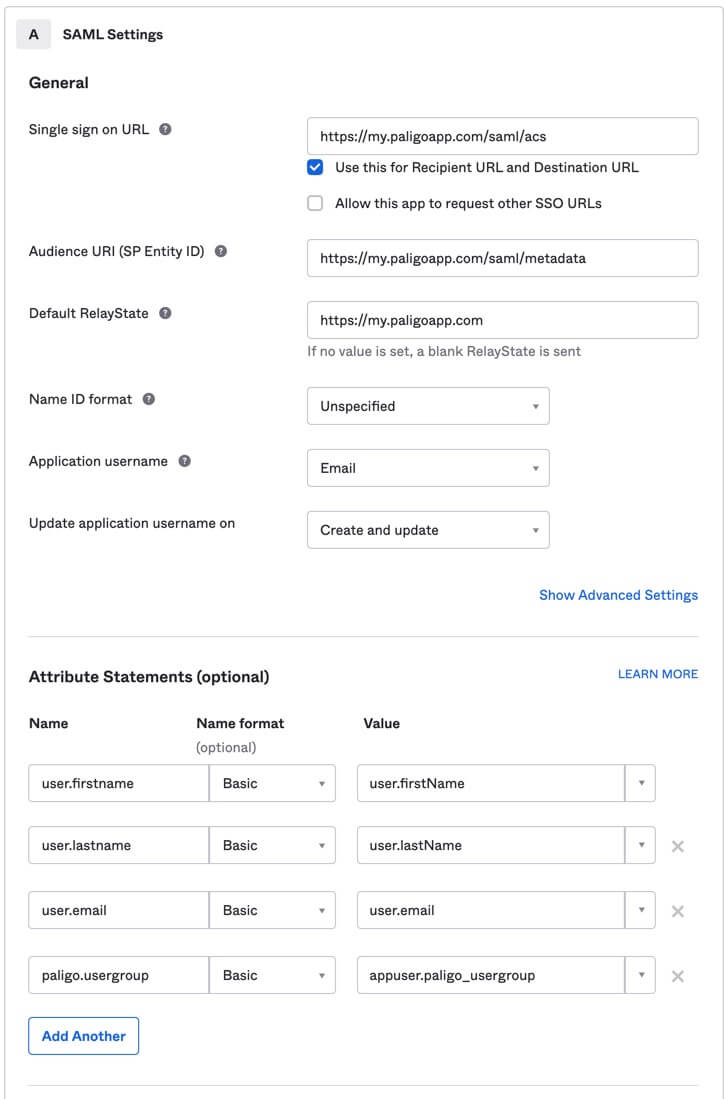
Double-check that your attribute statements are exactly as described in the previous step. Look out for typing mistakes as any errors may prevent the connector from working.
Select Next.
The next stage in Okta is to Add the User Group to the Okta SAML Response.
Add the User Group to the Okta SAML Response
You need to add the Paligo user group information to the Okta SMLA assertion details. This is because the user group is required for user's signing in to Paligo, but it is not included in the default Okta metadata.
In Okta:
Select Directory and then Profile Editor.
Select the Profile button for the Paligo app.
Select Add attribute and enter the details for the Paligo user group.
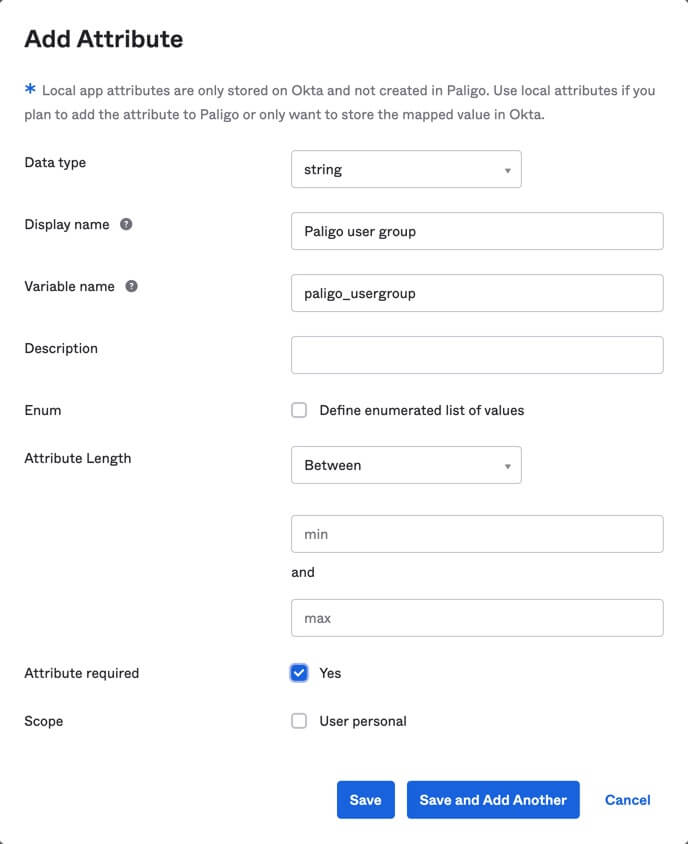
Setting
Value
Display name
Paligo user group
Variable name
paligo_usergroup
Description
Optional. You can leave this blank or add a description to explain the purpose of the user group attribute.
Data type
string
Attribute length
Between. You do not need to define a min and max value, leave those fields empty.
Attribute required
Check Yes.
Scope
Check the User personal box if you want to assign the user group attribute (for Paligo) to user accounts individually.
If you clear the User personal box, the user group attribute (for Paligo) will apply to all user accounts in the Okta user group. Please refer to Okta documentation for more information.
Check that you have entered the correct details for the Paligo user group. Look out for typing mistakes as they could prevent the login from working as expected.
Save the attribute.
Next: Assign the Users to Paligo .
Assign the Users to Paligo
Assign both of the following to each user that is going to use Okta to sign in to Paligo:
Paligo application
Paligo user group
In Okta:
Select Directory and then People.
Select a user account.
On the Applications tab, select Assign Applications.
Select Assign for the Paligo application.
In the Paligo user group field, enter the appropriate syntax for the user's role in Paligo. The following table shows the possible values you can use:
Save the user.
Repeat this process for each user account that is going to have access to Paligo via Okta.
Check your users to make sure that you have entered the correct syntax. Look out for typing mistakes as any errors could prevent the logins from working.
Note
Next: Get the Metadata from Okta.
Get the Metadata from Okta
Set Okta to get the metadata file that is needed for the connection:.
In Okta:
Select Applications and then Applications.
Select Sign On.
Right-click on the Identity Provider Metadata link and choose to save the link as a file. Give the file a name and an .xml extension, for example, metadata.xml. You will need this XML when you set up the Paligo connection.
You have now completed the configuration that is needed in Okta. The next step is to Connect Paligo to your SSO Service.
You can connect Paligo to JumpCloud (https://www.jumpcloud.com) for single sign on (SSO). This is only available on the Enterprise plan.
To use JumpCloud with Paligo, you need to set up JumpCloud to provide metadata to Paligo. The metadata includes the name of the user, the user's email address, and the user group that the user belongs to. The metadata describing the user group is not part of standard metadata. You must add this metadata to the SAML response.
Note
For this section, we assume that you have already created your user accounts in JumpCloud.
To be able to Connect Paligo to your SSO Service you need to set up JumpCloud to integrate with Paligo.
The first stage of setting up JumpCloud to communicate with Paligo is to create a new application connector.
In JumpCloud:
Go to the JumpCloud console and select SSO and then add an application.
Select Custom SAML App.
In the Settings panel, apply these values (replace the your in your.paligoapp.com with the address of your Paligo instance, for example, acme.paligoapp.com).
Name
Value
Display Label
Paligo (example)IDP Entity ID
paligo/jumpcloud/sso
SP Entity ID
https://your.paligoapp.com/saml/metadataACS URL
https://your.paligoapp.com/saml/acsSamlsubject NameID
emailSamlsubject NameID Format
urn:oasis:names:tc:SAML:1.1:nameid-format:emailAddressSignature algorithm
RSA-SHA256
Attributes
Create attributes for:
user.firstnamefirstnameuser.lastnamelastnameuser.emailemailGroups Attributes
Include Group Attribute
Checked. This option must be checked/enabled.
Groups Attribute Name
paligo.usergroupSelect Save.
Next, you need to Create User Groups in JumpCloud .
You should create one user group for each Paligo user group (administrators, authors, contributors, reviewers, publishers, it admins or translation managers) in JumpCloud.
Select Groups.
Create a user group for each Paligo user group.
Select the Applications tab.
Select Paligo to associate the Paligo application with the user group.
Select Save Group.
Repeat this procedure for all Paligo user groups.
In JumpCloud, you need to associate the user accounts with the user groups that you have set up for Paligo.
Select Users.
Select the user you want to add to a Paligo user group.
Select the User Groups tab.
Select the checkbox for the Paligo user group that the user should belong to.
Select Save user.
Repeat this process for each user account that needs access to Paligo.
You can now Connect Paligo to your SSO Service.