Edit a Salesforce Layout
Discover how to change the settings of a Salesforce Nested Layout. You can control the mapping, set the image size, and more.
Each custom Salesforce Layout has settings that you can use to control how Paligo publishes content to Salesforce Knowledge. These include options for changing the image resolution, mapping (Salesforce Nested Layouts only), and labels.
Note
We recommend that you do not change the settings in a Salesforce Layout until you understand how the mapping works (see Mapping with a Salesforce Knowledge Layout and Mapping with a Salesforce Nested Layout. If you change the settings without understanding how they affect the mapping, you may get unexpected results.
To edit a Salesforce Layout:
Select Layout in the top menu.

Paligo displays a list of Layouts. The list is empty if there are no custom Layouts in your Paligo instance.
Select the Salesforce Knowledge Layout or Salesforce Nested Layout that you want to edit.
Apply your changes to the layout. The settings are:
Classes and attributes
Output Profile/filtering attributes as class names, when enabled, profile attribute values will be output as class names for almost all elements. Default is disabled.
TOC and chunking (Salesforce Nested Layout only)
Chunk section depth, see Control the Mapping to Navigational Topics.
Images
Image size, see Set the Image Size for Salesforce Knowledge.
Languages
Hide missing translations, see Hide Missing Translations for Salesforce Knowledge.
Salesforce
Create article for the section topic, see Generate Articles for Navigational Topics (Salesforce Nested Layout only)
Use Separate styling for label, number, and title in formal elements, see Add a Class to Labels, Numbers, and Titles in Salesforce.
Select Save.
You can now use your custom Salesforce Layout to Publish to Salesforce Knowledge.
Salesforce Nested Layouts have a Chunking section depth setting that affects the mapping of content. It tells Paligo how many levels of the publication structure can be mapped to "Navigational Topics" in Salesforce.
Note
Note that a fork being inside the Chunk section depth level does not guarantee that it will be mapped to a navigational topic. There are other criteria that also have to be met, as explained in Rules for Mapping with a Salesforce Nested Layout
Select Layout in the top menu.
Paligo displays a list of Layouts. The list is empty if there are no custom Layouts in your Paligo instance.
Select the Salesforce Nested Layout that you want to edit.
To change the amount of levels that can be mapped to navigational topics:
Increase the Chunk section depth number to map more levels. The default is 3 and the maximum depth is 8.
Decrease the Chunk section depth number to map fewer levels.
Paligo can only map to a navigational topic if the topic's fork is within the Chunk section depth and it has a lower-level "child" fork. For more details, see Mapping with a Salesforce Nested Layout.
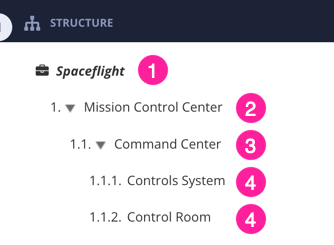
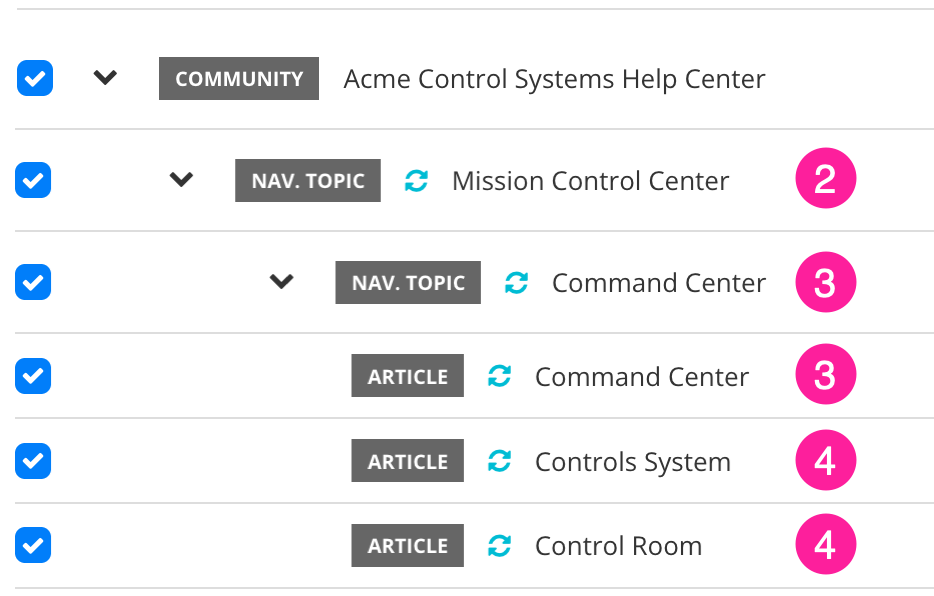
For example, in the following images, the Chunk section depth is 3, where the top level is the publication, the second level is "Mission Control Center" and the third level is "Command Center". When you publish, the publication itself is not mapped, the "Mission Control Center" level 2 topic is mapped to a navigational topic, and the "Command Center" level 3 topic is mapped to both a navigational topic and an article. The lower-level "Controls System" and "Control Room" topics are mapped to articles.
Note
If you only want Paligo to map content to articles, with no navigational topics, use a Salesforce Knowledge Layout for publishing (see Publish to Salesforce Knowledge.
Select Save.
Note
By default, Paligo will create extra articles to contain any content from the topics that are mapped to navigational topics. You can stop Paligo from creating the extra articles, if you prefer. For details, see Generate Articles for Navigational Topics.
When you publish to Salesforce Knowledge, Paligo leaves the images in their original size and resolution, by default. If you prefer, you can set the images to be a different size. This is available on Salesforce Knowledge Layouts and Salesforce Nested Layouts.
Select Layout in the top menu.
Paligo displays a list of Layouts. The list is empty if there are no custom Layouts in your Paligo instance.
Select the Salesforce Knowledge Layout or Salesforce Nested Layout that you want to edit.
Select Images.
Set the Image Size.
The higher the number of pixels and dots-per-inch (dpi), the greater the file size and quality of the image.
Do not include images
Use original images
Full size (2500 × 2500px, 120dpi)
Large (800 × 800px, 72dpi)
Medium (400 × 400, 72dpi)
Small (250 × 250px, 72dpi)
Select Save.
When you publish to Salesforce Knowledge, you can choose which languages to include in the output. If you choose a language that has no translation, Paligo will either:
Hide the language
Use the source language in place of the missing translation.
To control how Paligo handles missing translations, use the Hide Missing Translation setting in the Salesforce Layout:
Select Layout in the top menu.
Paligo displays a list of Layouts. The list is empty if there are no custom Layouts in your Paligo instance.
Select the Salesforce Knowledge Layout or Salesforce Nested Layout that you want to edit.
Select Language.
Set Hide Missing Translations to:
Enable - To set Paligo to hide the missing translations in the output. When you publish, if you choose a language that has no translation, Paligo will hide that language in the output.
Disable - To set Paligo to show missing translations in the output. Any missing translations are shown in the source language.
Default to inherit the value for this setting from the base Layout. The base Layout is either a built-in Layout provided by Paligo or another custom Layout, see Layout Relationships - Base, New, Duplicate.
Select Save.
When you publish with this Salesforce Layout, Paligo will apply the choice you made.
In Paligo, topics at all levels of your publication can contain content. But in Salesforce Knowledge, only articles can contain content. This means that if a Paligo topic contains content and it is mapped to a Navigational Topic, its content is unavailable in Salesforce. To solve this problem, you can enable Create article for the section topic on your Salesforce Nested Layout.
Select Layout in the top menu.
Paligo displays a list of Layouts. The list is empty if there are no custom Layouts in your Paligo instance.
Select the Salesforce Knowledge Layout or Salesforce Nested Layout that you want to edit.
Set Create Article for the Section Topic to:
Enable
To set Paligo to create an extra article for a Navigational Topic. The extra article will have the same name as the Navigational Topic. Paligo will add the content from the topic (that is mapped to the Navigational Topic) into the extra article.
Disable
To prevent Paligo from creating an extra article for the topics that map to Navigational Topics. If there is any content in these topics, it will be unavailable to Salesforce users.
Default to inherit the value for this setting from the base Layout. The base Layout is either a built-in Layout provided by Paligo or another custom Layout, see Layout Relationships - Base, New, Duplicate.
To learn about which topics are mapped to Navigational Topics, see Rules for Mapping with a Salesforce Nested Layout.
Select Save.
Paligo automatically adds elements such as labels, numbers and titles to some types of content. For instance, when you add an example element, Paligo automatically gives it a title element too. For HTML-based outputs, including Salesforce, you can set Paligo to create <span> elements for each part of the label/number/title and also to add a class name. You can then use CSS to style these classes.
Select Layout in the top menu.
Paligo displays a list of Layouts. The list is empty if there are no custom Layouts in your Paligo instance.
Select the Salesforce Knowledge Layout or Salesforce Nested Layout that you want to edit.
Set the Use separate styling for label, number, and title in formal elements to:
Enabled: To set Paligo to create a span element (in the HTML output) for each part of a label, number, or title. It will also create a class name for each span element.
Disabled: To set Paligo to output HTML that does not have span elements for each part of labels, numbers, or title elements.
Default to inherit the value for this setting from the base Layout. The base Layout is either a built-in Layout provided by Paligo or another custom Layout, see Layout Relationships - Base, New, Duplicate.
Select Save.
If you enabled the span elements and class names, those will be applied to the labels, numbers, and titles in the HTML when you publish. You can use the Browser Inspection Tool to view the HTML, find the class names, and test changes to the CSS. Then you can write a new CSS file.
To learn about writing CSS to style Salesforce Knowledge content, please refer to the official Salesforce documentation.