Section Subtitle Styling (PDF)
By default, Paligo topics do not contain a subtitle element, but you can add subtitles as needed. The subtitle element is available from the Element Context Menu. For PDF outputs, you can use the PDF Layout to style your subtitles.
The PDF Layout has a Section subtitles category. It contains the settings for styling all levels at once and also for styling each level separately. The individual level settings take priority.
To learn how to use the settings, see:
Note
The Section subtitles settings are for styling subtitle elements that appear in your "regular" topics. They do not apply to a subtitle that appears in a publication topic. To style the subtitle in a publication topic (which will appear on the cover or in the "front matter" pages), see Style the Subtitle for a Cover.
PDF Layouts have Level All settings that you can use to style all levels of section subtitles at once. This saves time if you want most subtitles to use the same settings.

Paligo will apply a Level All setting if:
The equivalent setting in the Level 1 - Level 5 is set to default (or blank where appropriate)
The equivalent setting in the base Layout is also set to default (or blank where appropriate)
To set the Level All styles for subtitles:
Select Layout in the top menu.

Paligo displays a list of Layouts. The list is empty if there are no custom Layouts in your Paligo instance.
Select the PDF Layout you are going to use for publishing. Alternatively, create a new one (see Create a Layout).
Select Section subtitles.
Select Level all.
Use the Set the font size for level all subtitles setting to control the size of the subtitle lettering.
Use Font weight for level all subtitles to set the thickness of the characters.
Use Font style for level all subtitles to add or remove emphasis styling from the text. Choose Normal for regular text, Italic for forward leaning text, or Backslant for backwards-leaning text.
Note
Using Backslant can produce poor results, as many fonts do not support it as a separate outline.
Set the Font variant for level all subtitles to Normal for regular sized, mixed case letters or Small-caps for smaller, upper-case letters.
Use Set Color for level all subtitles to apply a custom color to the text in the subtitle.
Clear the Use default color checkbox to select a color of your own choice.
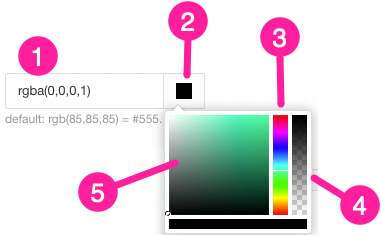
Set the color either by:
Entering an RGBA code for the color you want (1).
Selecting the Color square to display the color selector (2).
Choose the color with the spectrum bar (3).
Control the transparency with the opacity bar (4).
Choose the color shade with the main color panel (5).
Use Set background color for level all subtitles to apply a custom color behind the text in the subtitle.
As with the Set color for level all subtitles option, clear the Use default color checkbox to set a color of your own choice. Use the color selector to choose the color.
Set the Line height for level all subtitles. The line height is the amount of space between lines of text in the subtitle.
Enter either:
An absolute value with the units of measurement, for example, 14pt
A relative value, such as 0.8em or 80%
normal for 120% (multiplies font size by 1.2).
Leave the field blank to inherit this value from the base Layout (see Layout Relationships - Base, New, Duplicate).
Use Font-family for level all subtitles to choose the typeface for the text.
Set the Capitalization for level all subtitles. This controls whether characters are shown in upper case, lower case, or a combination of the two.
Set the Letter spacing for level all subtitles. This is the amount of horizontal spacing between each letter.
To increase the amount of spacing, enter:
A relative amount and units of measurement, for example, 0.2rem
An absolute amount and units of measurement, for example, 1px
To decrease the amount of spacing, enter a negative relative or absolute amount, for example, -1px.
Use the space settings to control the amount of space above and below the
subtitleelement.The Space-before for level all subtitles is for the space above and the Space-after for level all subtitles is for the space below. Enter a value and its units of measurement.
You can use absolute values, such as 1.2em or 6pt, or you can use relative values, for example, 110%. Relative values are calculated as a percentage of the main body font size.
Use the indent settings to add a margin to the left and/or right side of the subtitle block:
Start-indent for level all subtitles
Adds space at the start of the subtitle, measured from the first letters in the text. Enter an amount and the units of measurement, for example, 2.5em.
End-indent for level all subtitles
Adds space at the end of the subtitle, measured from the last characters in the text. Enter an amount and the units of measurement, for example, 2.5em.
The start and end indents are designed to match the language-direction. For left-to-right languages, the start indent is on the left and the end indent is on the right. For right-to-left languages, the start is on the right and the end is on the left.
Set the Alignment for section level all subtitles.
Choose from:
Select Save.
When you use this Layout to publish to PDF, Paligo will apply the styles you have set to all subtitle elements. If the Layout has subtitle styles set in the Level 1 - Level 5 categories, Paligo uses those settings for the relevant subtitle level. The Level 1 - Level 5 settings take priority over the Level all settings.
If you have added the subtitle element to your topics, you can use the PDF Layout to style them (for PDF outputs).
The PDF Layout has a Section subtitles category. Inside that, you can find settings for each subsection level from Level 1 to Level 5. There are many options for styling the font, spacing, color and more. For example, you can style a subtitle element that follows a Level 2 heading by using the Level 2 subtitle settings.
Note
The Section subtitles category also has Level all settings that apply to every subtitle level. But your choices for the individual levels take priority over the Level all settings.
To style the subtitles for the various levels:
Select Layout in the top menu.
Paligo displays a list of Layouts. The list is empty if there are no custom Layouts in your Paligo instance.
Select the PDF Layout you are going to use for publishing. Alternatively, create a new one (see Create a Layout).
Select Section subtitles.
Select the level that you want to style. For example, to style subtitles that appear at level 3 in the structure, select Level 3.
Use the Set the font size for subtitle setting to control the size of the subtitle lettering.
Use Font weight for level n subtitles to set the thickness of the characters.
Use Font style for level n subtitles to add or remove emphasis styling from the text. Choose Normal for regular text, Italic for forward leaning text, or Backslant for backwards-leaning text.
Note
Using Backslant can produce poor results, as many fonts do not support it as a separate outline.
Set the Font variant for level n subtitles to normal for regular sized, mixed case letters or small-caps for smaller, upper-case letters.
Use Set Color for level <n> subtitles to apply a custom color to the text in the subtitle.
Clear the Use default color checkbox to select a color of your own choice.
Set the color either by:
Entering an RGBA code for the color you want (1).
Selecting the Color square to display the color selector (2).
Choose the color with the spectrum bar (3).
Control the transparency with the opacity bar (4).
Choose the color shade with the main color panel (5).
Use Set background color for level <n> subtitles to apply a custom color behind the text in the subtitle.
As with the Set color for level <n> subtitles option, clear the Use default color checkbox to set a color of your own choice. Use the color selector to choose the color.
Set the Line height for level <n> subtitles. The line height is the amount of space between lines of text in the subtitle.
Enter either:
An absolute value with the units of measurement, for example, 14pt
A relative value, such as 0.8em or 80%
normal for 120% (multiplies font size by 1.2).
Leave the field blank to inherit this value from the base Layout (see Layout Relationships - Base, New, Duplicate).
Use Font-family for level <n> subtitles to choose the typeface for the text.
Set the Capitalization for level <n> subtitles. This controls whether characters are shown in upper case, lower case, or a combination of the two.
Set the Letter spacing for level <n> subtitles. This is the amount of horizontal spacing between each letter.
To increase the amount of spacing, enter:
A relative amount and units of measurement, for example, 0.2rem
An absolute amount and units of measurement, for example, 1px
To decrease the amount of spacing, enter a negative relative or absolute amount, for example, -1px.
Use the space settings to control the amount of space above and below the
subtitleelement.The Space-before for level n subtitles is for the space above and the Space-after for level n subtitles is for the space below. Enter a value and its units of measurement.
You can use absolute values, such as 1.2em or 6pt, or you can use relative values, for example, 110%. Relative values are calculated as a percentage of the main body font size.
Use the indent settings to add a margin to the left and/or right side of the subtitle block:
Start-indent for level n subtitles
Adds space at the start of the subtitle, measured from the first letters in the text. Enter an amount and the units of measurement, for example, 2.5em.
End-indent for level n subtitles
Adds space at the end of the subtitle, measured from the last characters in the text. Enter an amount and the units of measurement, for example, 2.5em.
The start and end indents are designed to match the language-direction. For left-to-right languages, the start indent is on the left and the end indent is on the right. For right-to-left languages, the start is on the right and the end is on the left.
Set the Alignment for section level n subtitles.
Choose from:
Select Save.
Repeat the same steps for the other levels of subtitle, as needed. When you use this Layout to publish to PDF, Paligo will apply the subtitle styles to your content.