Topic File Names
For HTML5 outputs, the file names are normally generated automatically, but it is also possible to set it individually.
Paligo has a number of options for how the HTML5 output file name is auto-generated. It uses either the UUID (Universally Unique Identifier), the title of a topic, or the name of the resource to generate the HTML5 file name, depending on your settings in the Layout Editor.
However, you can also set the output file name individually for particular topics if needed. This can be useful if you are using the option to create the file name from the topic title, for instance, and then need to change the title. By setting the output file as below, you make sure it does not change even though you change the title.
To manually set the file name for a topic:
Select the topic or component in the Content Manager to open it in the Editor.
Alternatively, you can Create a Topic and edit that.
Select the
sectionelement in the Element Structure Menu.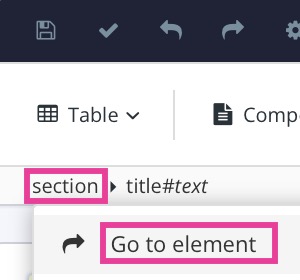
Select Go to element.
Add
xinfo:outnamein the Element Attributes Panel.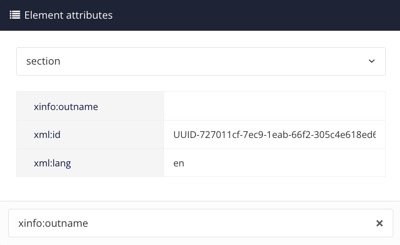
Set the value to the name you want for the published file.
Note
You only need to enter the file name. Do not include the file extension at the end.
Select Save.

When you publish to HTML5, the file name for the topic is set to the value you defined for the xinfo:outname attribute.