[en] List Styling (PDF)
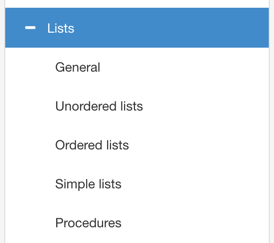
[en] For PDF outputs, use a PDF Layout to style your lists and procedures. Each PDF Layout has a Lists category that contains subcategories. There are subcategories for General (applies to all lists), Unordered lists (bullet lists), Ordered lists (numbered lists), Simple lists, and Procedures.
 |
[en] We recommend that you start by styling the General list settings. Then use the other subcategories to style the specific types of list, such as procedure and unordered list.
Tipp
[en] When styling lists, it is a good idea to create a test topic that contains each type of list. Then use the preview feature in the Layout Editor to see the effect of any changes. In the Layout editor, select Choose document and select your test topic. When you make a change to a list setting, select Save and then Update preview. The preview will show the effect of the change you made.
[en] For details on the preview feature, see Vorschau einer PDF-Publikation im Layout-Editor anzeigen).
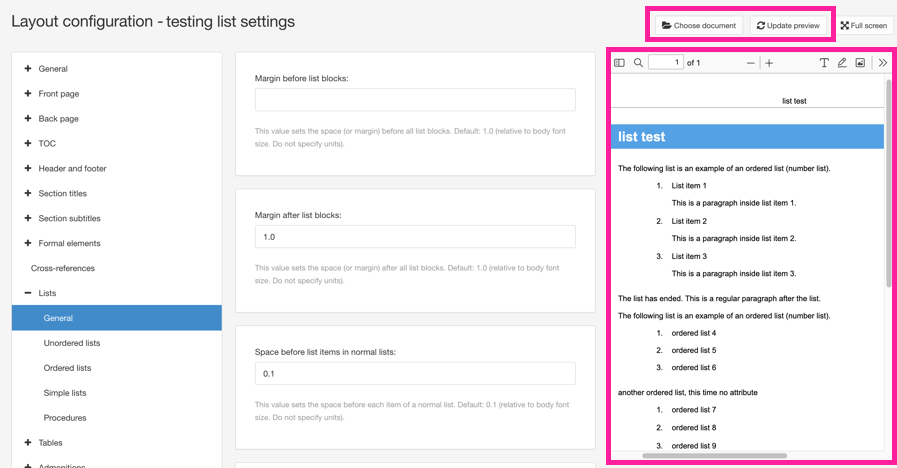
[en] Layout editor. The highlighted frames show where you can load a topic and preview any changes you make.
[en] To learn how to style the different types of lists for PDFs, see:
[en] PDF Layouts have General list settings that apply to many types of list. For example, if you set the spacing in the General list settings, the same spacing will apply to ordered lists, bullet lists, and procedures. The idea is that you set your General preferences for all lists and then use the other subcategories to define the settings for each type of list.
[en] To set your preferences for all lists:
-
Wählen Sie im oberen Menü Layout aus.

Paligo zeigt eine Liste von Layouts an. Die Liste ist leer, wenn keine benutzerdefinierten Layouts in Ihrer Paligo-Instanz vorhanden sind.
-
Wählen Sie das PDF-Layout, das Sie für die Veröffentlichung verwenden möchten. Alternativ können Sie auch ein neues erstellen (siehe Ein Layout erstellen).
-
[en] Select the Lists category and then select the General subcategory.
-
[en] Set the amount of space above and below each list. This spacing applies to entire lists, not the list items inside the lists.
[en] Use:
-
[en] Margin before list blocks to set the amount of space above each list
-
[en] Margin after list blocks to set the amount of space below each list.
[en] For both settings, enter a value that is relative to the body font size, for example, 1.5 to add a space that is 1.5 times larger than the font size. Do not include units of measurement, enter the value only.
-
-
[en] Set the amount of space above and below each list item in lists that have normal list spacing.
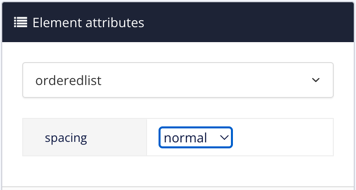
[en] Use:
-
[en] Space before list items in normal lists to set the space above each list item
-
[en] Space after list items in normal lists to set the space below each list item.
[en] For both settings, enter a value that is relative to the body font size, for example, 1.5 to add a space that is 1.5 times larger than the font size. Do not include units of measurement, enter the value only.
-
-
[en] Set the amount of space above and below each list item in lists that have compact list spacing.
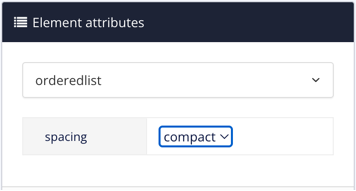
[en] Use:
-
[en] Space before list items in compact lists to set the space above each list item
-
[en] Space after list items in compact lists to set the space below each list item.
[en] For both settings, enter a value that is relative to the body font size, for example, 1.5 to add a space that is 1.5 times larger than the font size. Do not include units of measurement, enter the value only.
-
-
[en] Choose your preferred behavior for the Space-after (optimum) for paragraphs inside list items or procedure steps setting. By default, this setting applies to block elements inside a list item or step, with the exception of the last block element. For example, if you have a step that contains three paragraphs, the space-after will apply to the first and second paragraphs, but not the third. This is for compliance with the XSL FO specification.

[en] List on the left has space after third paragraph inside a list item. The list on the right does not have a space after the third paragraph.
[en] Use the Apply selected space after property for last block child elements in lists setting to control the behavior.
[en] Choose:
-
[en] Enabled to apply the space-after (optimum) to all block elements inside a step or list item, including the last block.
-
[en] Disabled to keep the default behavior, where the space-after (optimum) does not apply to the last block inside a step or list item.
-
Standard – um den Wert für diese Einstellung aus dem Basislayout zu übernehmen. Das Basislayout kann ein von Paligo bereitgestelltes integriertes Layout oder ein anderes kundenspezifisches Layout ein. Weitere Informationen finden Sie unter Layoutbeziehungen – Basis, Neu, Duplizieren.
-
-
[en] Set the preferred amount of space after paragraphs and other block elements that are inside a list item or step. Enter the amount and its units of measurement in the Space-after (optimum) for paragraphs inside list items or procedure steps field. For example, 0.6em.
Anmerkung
[en] By default, Paligo does not apply the spacing after the last block element inside the list item or step. To change this behavior, set Apply selected space after property for last block child elements in lists to Enabled (see previous step).
-
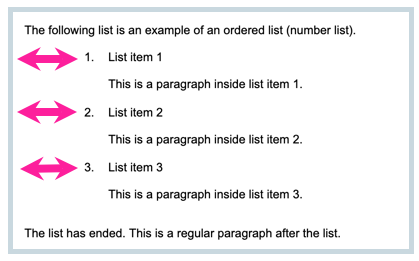
[en] Set the Left margin for list blocks. This is an indent to move the list in from the regular starting position. Enter the amount and include the units of measurement, for example, 3em.
-
[en] Set the Font family for list titles. This is the style of lettering for each list's
titleelement.[en] Choose a typeface from the list of available fonts.
Anmerkung
[en] The effect of font-related settings, such as weight and style, varies depending on the font family.
Anmerkung
[en] By default, lists do not have a
titleelement, but you can add one manually if required (see Elemente hinzufügen ). -
[en] Set the Font size for list titles. This is the size of the text in each list's
titleelement (if atitleelement is in place). -
[en] Set the Font weight for list titles. This sets the boldness of the font. The effect varies depending on what font-family is set for list titles.
-
[en] Set the Font style for list titles.
[en] Choose from:
-
[en] Set the Font variant for list titles to Normal for regular sized, mixed case letters or Small-caps for smaller, upper-case letters.
-
[en] Use Color for list titles to apply a custom color to the text in the title.
-
Deaktivieren Sie das Kontrollkästchen für Standardfarbe verwenden und wählen Sie eine Farbe Ihrer Wahl aus.
-
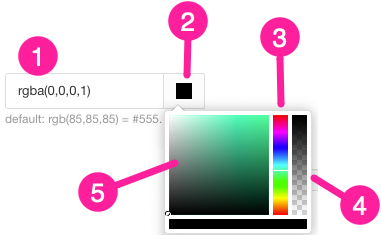
Sie können die Farbe wie folgt festlegen:
-
Eingabe eines RGBA-Codes für die gewünschte Farbe (1).
-
Auswahl des Farbquadrats zur Anzeige des Farb-Selektors (2).
-
Wählen Sie die Farbe aus, indem Sie den Spektrumbalken verwenden (3).
-
Legen Sie die Transparenz fest, indem Sie den Durchsichtigkeitsbalken verwenden (4).
-
Wählen Sie den Farbton aus, indem Sie die Hauptfarbpalette verwenden (5).
-
-
-
-
[en] Set the Capitalization for list titles. This controls whether title characters are shown in upper case, lower case, or a combination of the two.
-
[en] Set the Letter-spacing for list titles. This is the amount of horizontal spacing between each letter in the title.
Um den Abstand zu vergrößern, geben Sie ein:
-
Einen relativen Wert und Maßeinheiten, zum Beispiel 0,2 rem.
-
Einen absoluten Wert und Maßeinheiten, zum Beispiel 1px
Um den Abstand zu verringern, geben Sie einen negativen relativen oder absoluten Wert ein, z. B. -1px.
-
-
Drücken Sie Speichern.
[en] You have now defined the default settings for lists. If you want different styling for each type of list, define that styling in the Unordered lists, Ordered lists, Simple lists, and Procedures subcategories. Any settings you define in those subcategories will take priority over the settings in the General subcategory.
[en] When you use this Layout to publish to PDF, Paligo will apply your choices when it creates the PDF output file.
Über das Attribut role können Sie Breite und Ausrichtung von Listenbeschriftungen für einzelne Listen ändern. Auf diese Weise können Sie die Standardeinstellungen für Layout-Editor überschreiben.
Wenn es Unterlisten haben, erben diese die Breite und Ausrichtung von der übergeordneten Liste (können jedoch durch das Attribut role überschrieben werden, wenn notwendig).
Anmerkung
Das Element qandaset verfügt ebenfalls über Beschriftungen, die die Ausrichtung erben, wenn es eine Vorgängerliste gibt.
Es erbt jedoch nicht die Breite, da die Breite der Listenbeschriftung für das Element qandaset eine komplexe Logik verwendet, um die Breite abhängig von Typ, absteigenden Beschriftungen und mehr festzulegen.
Sie können die Standardausrichtung oder -breite für das Element qandaset im Layout-Editor nicht festlegen. Sie können jedoch mit dem Attribut „role“ Ausrichtung der
Beschriftung für ein einzelnes quandaset-Element festlegen: role="label-align:end;".
So legen Sie die Listenbeschriftung für eine einzelne nummerierte Liste fest:
-
Wählen Sie das Topic oder die Komponente im Content Manager aus, um es/sie im Editor zu öffnen.

Alternativ können Sie Topics erstellen und dieses bearbeiten.
-
Positionieren Sie den Cursor in der nummerierten Liste.
-
Wählen Sie das Element orderedlist im Menü „Elementstruktur“ und anschließend Zu Element wechseln aus.
-
Fügen Sie das Attribut
roleim Panel „Elementattribute“ hinzu.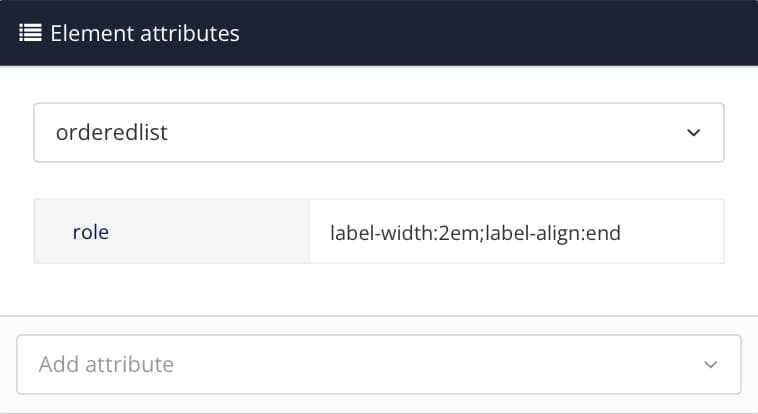
-
Geben Sie
label-width:2em;label-align:end;als Wert ein. -
Ändern Sie die Zahl in
label-width:2em;, um den Abstand zwischen Listenbeschriftung und Listenelementtext zu ändern.Die Standardbreite beträgt
1,75 em. -
Ersetzen Sie „end“ in
label-align:end;, um die Positionierung der Listenbeschriftung zu ändern.Die Standardausrichtung ist
start. -
Drücken Sie Speichern.

[en] For PDF outputs, use your PDF Layout to style the ordered lists in your content.
Anmerkung
[en] Ordered lists are affected by the styles in the General and Ordered Lists subcategories of the Lists settings.
[en] To learn about the General settings, see [en] Set the General Preferences for Lists (PDF).
-
Wählen Sie im oberen Menü Layout aus.

Paligo zeigt eine Liste von Layouts an. Die Liste ist leer, wenn keine benutzerdefinierten Layouts in Ihrer Paligo-Instanz vorhanden sind.
-
Wählen Sie das PDF-Layout, das Sie für die Veröffentlichung verwenden möchten. Alternativ können Sie auch ein neues erstellen (siehe Ein Layout erstellen).
-
[en] Select the Lists category and then select the Ordered lists subcategory.
-
[en] Use Distance between start of label and content to set the margin between the number and the text for the list item.
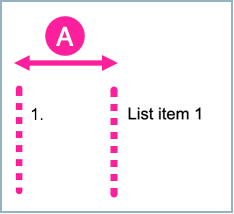
[en] Enter the value as an integer or a decimal number, followed by its unit of measurement. You can use any of these units:
-
[en] cm (centimeters)
-
[en] mm (millimeters)
-
[en] in (inches)
-
[en] pt (points)
-
[en] pc (picas)
-
[en] px (pixels)
-
[en] em (relative to font size)
[en] Examples: 1.5em, 12pt, 1cm.
Anmerkung
[en] Ordered lists can also have their label styling defined in an attribute on each individual list. The attribute styling takes priority over the Layout settings (see Ändern einzelner Listenbeschriftungen).
-
-
[en] Set the Label alignment. This positions the label (number) for list items within the label space.
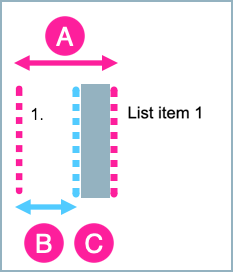
[en] In the diagram, A is the Distance between start of label and content and B is the label space. The shaded area labelled C is the default amount of space Paligo includes automatically. The alignment applies to the space labelled B.
[en] Choose from:
Anmerkung
[en] Ordered lists can also have their label styling defined in an attribute on each individual list. The attribute styling takes priority over the Layout settings (see Ändern einzelner Listenbeschriftungen).
-
[en] Choose whether you want to use language-specific numbering.
[en] By default, Paligo uses 1,2,3, and a, b, c for sub-procedures. Some languages use different characters for numbering. Use the Render ordered list and procedure item labels in language-specific number system setting to control which numbers and letters are used.
[en] Choose:
-
[en] Enable to use language-specific numbers and letters
-
[en] Disable to use 1,2, 3, and a, b, c numbers and letters
-
Standard – um den Wert für diese Einstellung aus dem Basislayout zu übernehmen. Das Basislayout kann ein von Paligo bereitgestelltes integriertes Layout oder ein anderes kundenspezifisches Layout ein. Weitere Informationen finden Sie unter Layoutbeziehungen – Basis, Neu, Duplizieren.
-
-
Drücken Sie Speichern.
[en] When you use this Layout to publish to PDF, Paligo will apply your choices.
[en] For PDF outputs, use your PDF Layout to style the unordered lists in your content. Unordered lists are also called bullet lists or itemized lists. They use the itemizedlist element in Paligo XML (see Eine Liste oder ein Verfahren erstellen).
Anmerkung
[en] Bullet lists are affected by the styles in the General and Unordered lists subcategories of the Lists settings. The Unordered lists settings take priority over the General settings.
[en] To learn about the General settings, see [en] Set the General Preferences for Lists (PDF).
-
Wählen Sie im oberen Menü Layout aus.

Paligo zeigt eine Liste von Layouts an. Die Liste ist leer, wenn keine benutzerdefinierten Layouts in Ihrer Paligo-Instanz vorhanden sind.
-
Wählen Sie das PDF-Layout, das Sie für die Veröffentlichung verwenden möchten. Alternativ können Sie auch ein neues erstellen (siehe Ein Layout erstellen).
-
[en] Select the Lists category and then select the Unordered lists subcategory.
-
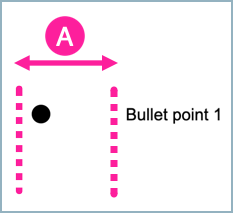
[en] Set the Distance between start of label and content. This is shown as A in the following diagram.
[en] Enter the value as an integer or a decimal number, followed by its unit of measurement. You can use any of these units:
-
[en] cm (centimeters)
-
[en] mm (millimeters)
-
[en] in (inches)
-
[en] pt (points)
-
[en] pc (picas)
-
[en] px (pixels)
-
[en] em (relative to font size)
[en] Examples: 1.5em, 12pt, 1cm.
-
-
[en] Set the Label alignment. This positions the label (bullet) for list items within the label space.
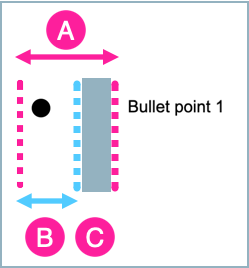
[en] In the diagram, A is the Distance between start of label and content and B is the label space. The shaded area labelled C is the default amount of space Paligo includes automatically. The alignment applies to the space labelled B.
[en] Choose from:
-
[en] Use Label color to set the color of the bullet point.
-
Deaktivieren Sie das Kontrollkästchen für Standardfarbe verwenden und wählen Sie eine Farbe Ihrer Wahl aus.
-
Sie können die Farbe wie folgt festlegen:
-
Eingabe eines RGBA-Codes für die gewünschte Farbe (1).
-
Auswahl des Farbquadrats zur Anzeige des Farb-Selektors (2).
-
Wählen Sie die Farbe aus, indem Sie den Spektrumbalken verwenden (3).
-
Legen Sie die Transparenz fest, indem Sie den Durchsichtigkeitsbalken verwenden (4).
-
Wählen Sie den Farbton aus, indem Sie die Hauptfarbpalette verwenden (5).

-
-
-
-
[en] Use Label font size to set the size of the bullet icon.
[en] Enter the value and the units of measurement in the field. For example, 1.4em.
Anmerkung
[en] Increasing the size of the bullet point can cause the text in the list item to become misaligned with the bullet point. For this reason, we recommend that you only change the bullet size by a small amount.
-
[en] Use Label line height to set the amount of space between the items in the bullet list.
[en] Enter the value and the units of measurement in the field. For example, 2em.
-
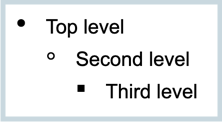
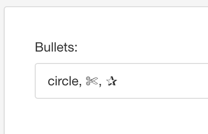
[en] Use Bullet types to set the style of the bullet labels. Enter the term for the style of bullet you want at each level and separate them with commas. For example:
[en]
disk, circle, square[en] This means that the top-level of a bullet list will use a disk, the second level will use a circle, and the third level will use a square.
[en] You can use the following bullet types: none, disk (bullet), circle (white bullet), square (black small square), white small square, endash, emdash, +, -, and most of the characters in the Zapf Dingbats font family. You can copy the character from https://www.unicode.org/charts/PDF/U2700.pdf. Do not use the code, just copy the actual icon and paste it into the field on the Layout.
-
Drücken Sie Speichern.
[en] When you publish with this Layout, Paligo will apply your choices to the bullet lists in your PDF output.
[en] Use the settings in your PDF Layout to style simple lists for PDF outputs. Simple lists are lists that you create by inserting the simplelist element, where each
list item is a member (see [en] Create a
Simple List).
Anmerkung
[en] The simple list settings only apply to simple lists that have the type attribute with a value of inline.
[en] To style a simplelist for PDF outputs, use the settings on your PDF Layout.
-
Wählen Sie im oberen Menü Layout aus.

Paligo zeigt eine Liste von Layouts an. Die Liste ist leer, wenn keine benutzerdefinierten Layouts in Ihrer Paligo-Instanz vorhanden sind.
-
Wählen Sie das PDF-Layout, das Sie für die Veröffentlichung verwenden möchten. Alternativ können Sie auch ein neues erstellen (siehe Ein Layout erstellen).
-
[en] Select the Lists category and then select the Simple lists subcategory.
-
[en] Set the Simplelist inline separator. This is the character that will appear between each item (member) in the list. By default, Paligo uses a comma.
[en] Either:
-
[en] Leave the default character, a comma, in place
-
[en] Enter a different character to use instead of the comma
-
[en] Clear the field completely to set the Layout to inherit the inline separator from the base Layout.
[en] You can learn about Layouts inheriting their values from Base Layouts in Layoutbeziehungen – Basis, Neu, Duplizieren.
-
-
[en] Set the Simplelist inline separator length. This defines the amount of space between each list item (member) in the list.
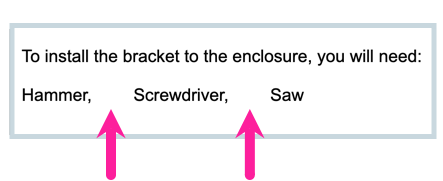
[en] Enter a value and its units of measurement, for example, 8pt. You can also use relative values, such as em.
-
Drücken Sie Speichern.
[en] When you publish with this Layout, Paligo will apply your choices to the simple lists (that are set to type: inline) in the PDF
output.
[en] For PDF outputs, use your PDF Layout to style the procedures in your content.
Anmerkung
[en] Procedures are affected by the styles in the General and Procedures subcategories of the Lists settings. The Procedures settings take priority over the General settings.
[en] To learn about the General settings, see [en] Set the General Preferences for Lists (PDF).
-
Wählen Sie im oberen Menü Layout aus.

Paligo zeigt eine Liste von Layouts an. Die Liste ist leer, wenn keine benutzerdefinierten Layouts in Ihrer Paligo-Instanz vorhanden sind.
-
Wählen Sie das PDF-Layout, das Sie für die Veröffentlichung verwenden möchten. Alternativ können Sie auch ein neues erstellen (siehe Ein Layout erstellen).
-
[en] Select the Lists category and then select the Procedures subcategory.
-
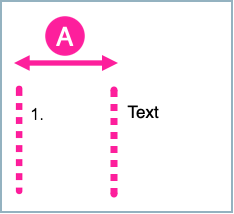
[en] Set the Distance between start of label and content. This is shown as A in the following diagram.
[en] Enter the value as an integer or a decimal number, followed by its unit of measurement. You can use any of these units:
-
[en] cm (centimeters)
-
[en] mm (millimeters)
-
[en] in (inches)
-
[en] pt (points)
-
[en] pc (picas)
-
[en] px (pixels)
-
[en] em (relative to font size)
[en] Examples: 1.5em, 12pt, 1cm.
-
-
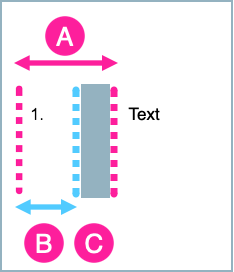
[en] Set the Label alignment. This positions the label (number) for list items within the label space.
[en] In the diagram, A is the Distance between start of label and content and B is the label space. The shaded area labelled C is the default amount of space Paligo includes automatically. The alignment applies to the space labelled B.
[en] Choose from:
-
[en] Set the Label font weight. This is the line thickness for the step number.
-
[en] Choose whether you want Numbering for single-step procedures.
[en] By default, a procedure with a single step will use a bullet point instead of a number. If you prefer, you can set it to use a number.
[en] Choose from:
-
[en] Enable to use a number
-
[en] Disable to use a bullet point
-
Standard – um den Wert für diese Einstellung aus dem Basislayout zu übernehmen. Das Basislayout kann ein von Paligo bereitgestelltes integriertes Layout oder ein anderes kundenspezifisches Layout ein. Weitere Informationen finden Sie unter Layoutbeziehungen – Basis, Neu, Duplizieren.
Anmerkung
[en] Lists and procedures are designed to have many steps. If you have a single-step list or procedure, consider making it a regular paragraph instead.
-
-
[en] Set the Font family for procedure titles. This is the style of lettering for the procedure's
titleelement.[en] Choose a typeface from the list of available fonts.
Anmerkung
[en] By default, procedures do not have a
titleelement, but you can add one manually if required (see Elemente hinzufügen ). -
[en] Set the Font size for procedure titles. This is the size of the text in the procedure's
titleelement (if atitleelement is in place). -
[en] Set the Font weight for procedure titles. This sets the thickness of the characters in the procedure titles.
-
[en] Set the Font style for procedure titles.
[en] Choose from:
-
[en] Set the Font variant for procedure titles to normal for regular sized, mixed case letters or small-caps for smaller, upper-case letters.
-
[en] Use Color for procedure titles to apply a custom color to the text in the title.
-
Deaktivieren Sie das Kontrollkästchen für Standardfarbe verwenden und wählen Sie eine Farbe Ihrer Wahl aus.
-
Sie können die Farbe wie folgt festlegen:
-
Eingabe eines RGBA-Codes für die gewünschte Farbe (1).
-
Auswahl des Farbquadrats zur Anzeige des Farb-Selektors (2).
-
Wählen Sie die Farbe aus, indem Sie den Spektrumbalken verwenden (3).
-
Legen Sie die Transparenz fest, indem Sie den Durchsichtigkeitsbalken verwenden (4).
-
Wählen Sie den Farbton aus, indem Sie die Hauptfarbpalette verwenden (5).

-
-
-
-
[en] Set the Capitalization for procedure titles. This controls whether characters are shown in upper case, lower case, or a combination of the two.
-
[en] Set the Letter spacing for procedure titles. This is the amount of horizontal spacing between each letter.
Um den Abstand zu vergrößern, geben Sie ein:
-
Einen relativen Wert und Maßeinheiten, zum Beispiel 0,2 rem.
-
Einen absoluten Wert und Maßeinheiten, zum Beispiel 1px
Um den Abstand zu verringern, geben Sie einen negativen relativen oder absoluten Wert ein, z. B. -1px.
-
-
Drücken Sie Speichern.
[en] When you publish with this Layout, Paligo will apply your chosen settings.
[en] For PDF outputs, you can swap out the regular bullet "disc" character for another character. For instructions, see [en] Style an Unordered List (PDF).
[en] For PDF outputs, use the PDF Layout to change the spacing in and around a list. This includes margins, space above and below the list as well as spacing above and below each list item or step. For details, see [en] Set the General Preferences for Lists (PDF).
[en] For PDF outputs, use the PDF Layout to change the styling of list titles and procedure titles. For details, see [en] Set the General Preferences for Lists (PDF).
[en] To control the numbering in ordered lists, use the following attributes:
-
[en] To start an ordered list at a specific number, select the
orderedlistelement and give it thestartingnumberattribute. Set the value to the starting number you want. For details, see Anfangsnummer festlegen. -
[en] To get an ordered list to continue its numbering from the previous ordered list, select the
orderedlistelement and give it thecontinuationattribute. Set the value to continues. For details, see Anfangsnummer festlegen. -
[en] To get a procedure to continue the numbering from a parent procedure, select the
procedureelement and give it theroleattribute. Set the value to reuse-range. This is useful if you want to reuse a procedure inside another procedure. For example, if you have some common steps saved in an informal topic and you insert the informal topic into another procedure.[en] For details, see Eine Sequenz von Listenelementen wiederverwenden.