
Categorize Content with Taxonomies

To use taxonomies to classify your content, you will need Create Taxonomy Tags, add tags and associate those tags with your content.

Your Paligo authors will then be able to find content much more easily, see Search with Taxonomy Tags.

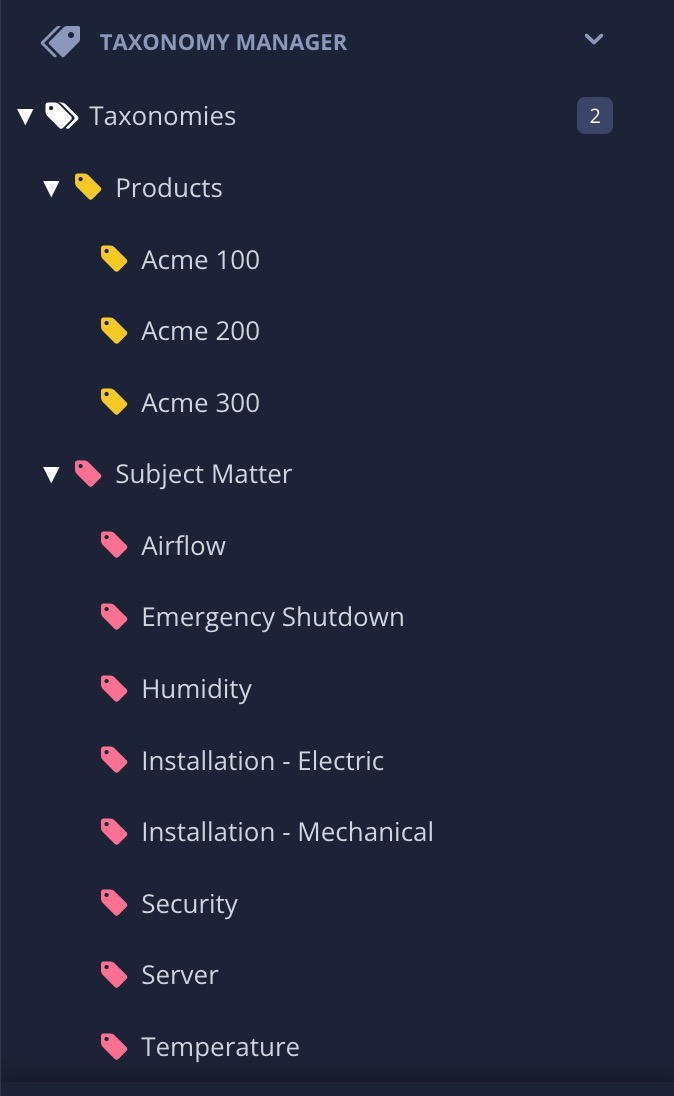
To make taxonomies for categorizing your content, follow the steps in the Taxonomies Workflow. With the taxonomy hierarchies created, you would then add the tags to the relevant topics and images.

Taxonomy hierarchy. It has a taxonomy for Products, with child tags for each product. It also has a taxonomy for Subject Matter with child tags for different subjects, including temperature, humidity, airflow, and security.

Creating a taxonomy is very much like creating a nested folder structure. Before you begin, we recommend that you plan the taxonomy structure so that you know what tag you are going to use as the "parent" and how you are going to name the "child" tags. You can give taxonomy tags a color to make it easier to identify different types of taxonomies, see Set Colors for Taxonomy Tags. We recommend that you:

  • Create a "parent tag" for each purpose - If you are going to use taxonomies for multiple different reasons, create a different parent tag for each purpose. For example, you could create one parent tag for "filtering", another parent tag for "relationships" and a third for categorizing by "product name". Then create the subordinate tags (child tags) that you need for each purpose. This is important for distinguishing between the different uses for taxonomies.

  • Consider where taxonomies can be used - You can apply a taxonomy to a topic, a publication or an image. They cannot be applied to individual block elements, such as paragraphs.

  • Use recognizable names - Give the tags names that are easy for people to understand, even if they are unfamiliar with your content. When naming child tags, consider the name tags in other parts of the taxonomy hierarchy. If you duplicate the tag names, it can be confusing for Paligo authors.

    Repeated tag names can also be a problem if you set Paligo to output the taxonomy tags as class names in HTML outputs. This is because it would result in classes sharing the same name too, meaning CSS styling would apply to all styles with a matching name. To avoid this, use the Value structure for taxonomy class names setting on the HTML5 Layout. There, you can set the class to include the parent tag's name as well, see Use Taxonomies as HTML Classes.

Tip

It's also possible to:

  • Create taxonomy tags via API. See the API documentation for information on the endpoints.

  • Get your taxonomy values output as class values in HTML5 output if you enable this in the Layout Settings for a HTML5 layout that you have created.

To create taxonomies:

  1. Select the Taxonomy Manager in the Content Manager to open the structure. Taxonomy_Manager.jpg

    Taxonomy_Manager_Expanded.jpg
  2. Select the the Dotted menu (...) for:

    • Taxonomies.png the Taxonomies to create a Parent tag for a new hierarchy.

      Parent_Tag.jpg
    • Taxonomy_Tag.jpg an existing tag to create a Child tag.

      Child_Tag.jpg

    Note

    You can use the Taxonomy Floating Content Panel instead of the Taxonomy Manager if you prefer.

  3. Select Create taxonomy tag.

    Create_Taxonomy_Tag.jpg
  4. Enter a tag name and confirm it. Checkmark_small.png

  5. Repeat this process until you have created all of the parent and child taxonomy tags you need.

Tip

By coloring the tags it can be easier to differentiate the taxonomies, see Set Colors for Taxonomy Tags

Note

When the taxonomy tags are created, you can Add Taxonomy Tags to content. Just drag and drop tags, from the Taxonomy Manager, to the component you want to tag. The action is confirmed with a pop-up message: Link was successfully created!

You can select multiple taxonomies at once and drag to a component, to tag it with multiple tags at once. You can also do the other way around, by selecting multiple components and drag them to a taxonomy tag.

Once you have created taxonomy tags in Paligo, you can add them to the appropriate topics, publications, and images. One way to do this is to drag and drop the tags from the Taxonomy Manager onto the files in the Content Manager. But you might prefer to use the Taxonomy Floating Content Panel instead, as this lets you see all of the taxonomy tags and scroll up and down the Content Manager at the same time.

When taxonomy tags are added to your content, it shows in the Activity Feed Panel.

Floating content panel showing taxonomy hierarchy. It is a moveable panel that is not fixed to any position on the user interface.

To add taxonomy tags via the Taxonomy Floating Content Panel:

  1. Expand the Taxonomy Manager.

    Taxonomy_Floating_Content_Panel_small.jpg
  2. Select the dotted menu (...) for Taxonomies and choose Floating Content Panel. Floating_Content_Panel.png

  3. Find the topic(s) that you want to give taxonomy tags in the Content Manager.

  4. To apply the taxonomy tags to your content, you can either:

    • Drag and drop the taxonomy tags on to topics in your Content Manager.

      Taxonomy tag dragged from Floating Content Panel onto a topic in the Content Manager.
    • Drag and drop topics from the Content Manager on to the tag in the Taxonomy Floating Content Panel. This approach is useful when you want to associate multiple topics with a tag at the same time.

      Use Alt or cmd when selecting multiple topics or Shift when the topics are located next to each other.

      Multiple topics are selected. Callout arrows show that the topics can be dragged from the content manager onto a taxonomy tag in the floating content panel.
    • Drag and drop the taxonomy tags on to a folder in the Content Manager. With this approach, you can add a taxonomy tag to all topics in a folder.

      A taxonomy tag is selected in the Taxonomy floating content panel. A callout arrow shows that the tag can be dragged from the taxonomy floating content panel on to a folder in the Content Manager.

      When you drag a taxonomy tag on to a folder, Paligo displays an Apply taxonomy dialog.

      Apply taxonomy dialog is shown when a taxonomy tag is dragged on to a folder. It has an Apply to children in subfolders checkbox and an Apply button.

      By default, the Apply to children in subfolders box is clear (unchecked). This means that the taxonomy tag will only apply to topics that in the folder ("direct children" of the folder). Paligo will not apply it to topics that are in subfolders. Also, the taxonomy tag is not applied to publications.

      If you check the box, Paligo will apply the taxonomy tag to all topics in the folder and its subfolders.

      Select Apply to add the taxonomy tag.

    • Drag and drop a taxonomy tag on to a publication in the Content Manager. With this approach, you can add a taxonomy tag to the publication and optionally, also its topics.

      A taxonomy tag is selected in the Taxonomy floating content panel. A callout arrow shows that the tag can be dragged from the taxonomy floating content panel on to a publication in the Content Manager.

      When you drag a taxonomy tag on to a publication, Paligo displays an Apply taxonomy dialog.

      Apply taxonomy dialog is shown when a taxonomy tag is dragged on to a publication. It has an Apply to children checkbox and an Apply button.

      By default, the Apply to children box is clear (unchecked) and Paligo will only add the tag to the publication.

      If you check the box, Paligo will apply the tag to the publication and any topics directly in the publication. It will not apply the tag to sub-publications or topics inside sub-publications.

    Use the same techniques to apply your tags to publications and also images (your images are in the Media section of the Content Manager).

    Taxonomies floating content panel. A callout arrow indicates a taxonomy tag being dragged from the floating content panel on to an image. The image is in the Media section of the Content Manager.

When you have applied the taxonomy tags to your content, we recommend that you check to see that they are in place, see Search with Taxonomy Tags.

Tip

It's also possible to add taxonomy tags via API. See the API documentation for information.

When you have added taxonomy tags to your resources, there may come a time when you need to remove some of them. For example, you may have decided on a different taxonomy strategy or you may have tags that were accidentally assigned to the wrong topics.

To remove tags, you can either:

  • Delete a tag completely, so that it is removed from all Paligo resources and will no longer exist in Paligo

  • Remove a tag from one or more resources, but still have the tag available in Paligo. With this approach, you only remove the association between the tag and a topic, publication or image.

Tip

It's also possible to remove taxonomy tags via API. See the API documentation for information.

To completely remove a taxonomy tag from Paligo, so that no resources can be associated with it:

  1. Expand the Taxonomy Manager and navigate to the tag that you want to edit.

    Paligo content manager side bar. The Taxonomy Manager is a subsection of the Content Manager and is highlighted.

    Note

    Alternatively, you can use the Taxonomy Floating Content Panel to navigate to the tag.

  2. Select the dotted menu (...) for the tag and choose Delete.

  3. Select Delete to confirm the deletion of the taxonomy tag.

    Paligo removes the taxonomy tag from your instance. It is automatically removed from any topics, publications, or images that were associated with it.

You can remove a taxonomy tag from a topic or publication, without affecting other resources or losing the taxonomy tag from Paligo. The taxonomy tag can still be used with any other resources or re-applied later if needed. There are two ways to do this, via the Resource View or via the Taxonomies View.

Here we will explain how to use the Resource View to remove a taxonomy tag:

  1. Select the folder containing the content in Content Manager. Folder_small.jpg

    If the content is not in a folder, select the top-level folder Documents. Document_folder_small.png

    ContentManager.jpg

    This will open the Resource View.

  2. Select the X on the taxonomy label to remove it.

    Close up of a taxonomy label on a list. The cursor is positioned over the top right corner of the label, where there is a gray circle with a cross icon.

Tip

This can also be done from via the Taxonomies View, see Remove Taxonomy Tags from Image.

You can remove a taxonomy tag from an image, without affecting other resources or losing the taxonomy tag from Paligo. The taxonomy tag can still be used with any other resources or re-applied later if needed.

To remove a taxonomy tag via Taxonomies View:

  1. Expand the Taxonomy Manager.

    Paligo content manager side bar. The Taxonomy Manager is a subsection of the Content Manager and is highlighted.

    Note

    Alternatively, you can use the Taxonomy Floating Content Panel to navigate to the tag.

  2. Select the tag to display it in the Taxonomies View.

    A list of all content (topics, publications and images) that use this tag is shown.

  3. Select the X on the taxonomy label to remove it.

    A list showing an entry for an image. The name of the image is shown and it has a taxonomy label. The cursor is positioned over the top right corner of the label, where there is a gray circle with a cross icon.

Use the Advanced Search feature to remove taxonomy tags from many topics at once. This is much quicker than removing taxonomy tags from topics individually.

  1. Select Quick Search in the top menu. Search.png

    Close up of top part of Paligo user interface. A callout box highlights the search icon in the top-right corner.
  2. Select Advanced Search. Filter_symbol_small.png

    Quick search bar. There is a down arrow button, a quick search field, a search icon, and a funnel icon.
  3. Perform an Advanced Search that will return the topics with the taxonomy tags you want to remove. For example, you could search for content in a particular folder or search for topics that have a particular parent taxonomy tag.

  4. In the list of results, check the box for each topic that will have one or more of its taxonomy tags removed.

    Close up of advanced search results. There is a list of results. Next to each result row is a checkbox. For each result, Paligo shows the name of the component and also the taxonomies it has.

    Note

    Paligo lists the first 200 matching results. If you need to remove the tags from more than 200 results, you will need to repeat the process multiple times.

  5. Select the arrow button Button with downward-facing arrow at the bottom of the checkbox column.

  6. Select Remove Taxonomies.

  7. Check the box for each taxonomy tag that you want to remove from the selected topics.

    Remove taxonomies dialog. It lists the taxonomies for the selected components. Each taxonomy has a checkbox so that you can choose to remove it or leave it in place.
  8. Select Remove.

  9. Confirm you want to remove the taxonomy tags.

By default, taxonomy tags are shown as white tag icons, but if you prefer, you can change the colors. For example, you might want to have a specific color for each different taxonomy hierarchy, so that users can quickly differentiate between the tags.

There are six colors available to choose from, plus the default white color. You cannot add your own colors.

  1. Expand the Taxonomy Manager and navigate to the tag that you want to edit.

    Tip

    Alternatively, you can use the Taxonomy Floating Content Panel to navigate to the tag.

  2. Select the dotted menu (...) for the taxonomy tag and choose a color from the selection at the bottom of the menu.

    To remove a color, select the white circle with a gray cross. The tag will return to its default white color.

    Taxonomy Manager. A taxonomy tag's options menu is shown. A callout box highlights the color selection options on the menu.

Tip

It's also possible to set colors for taxonomy tags via API. See the API documentation for information.

You can move the taxonomy tags to different locations in the taxonomy hierarchy. This is useful if you decide to change your taxonomies strategy and so need a different structure, and also if you accidentally add or move a tag to an incorrect location.

To move a taxonomy tag, select it in the Taxonomy Manager or Floating Content Panel and then drag and drop it to the new position.

Taxonomies floating content panel shows taxonomy hierarchy. A callout arrow indicates that a tag in one taxonomy can be dragged into a different taxonomy.

Tip

It's also possible to move taxonomy tags via API. See the API documentation for more information.