Aus Zendesk importieren
Sie können Ihre Zendesk-Artikel direkt in Paligo importieren. Im Rahmen des Imports erstellt Paligo passend zu Ihren Artikeln neue Topics. Anschließend können Sie die Topics wieder den Artikeln zuordnen, um Aktualisierungen in Paligo vornehmen und die Änderungen in Zendesk veröffentlichen zu können.
Sie können Inhalte direkt aus Ihrem Zendesk Knowledge Helpcenter in Paligo importieren. Während des Imports konvertiert Paligo Ihre Zendesk-Inhalte in strukturierte Inhalte, damit Sie sie in Paligo verwenden können. Sie können Paligo auch so einrichten, dass Sie Änderungen an Ihren importierten Topics vornehmen und diese wieder in Zendesk veröffentlichen können.
Verwenden Sie zum Importieren aus Zendesk die Paligo-Zendesk-Integration. Wenn Sie dies noch nicht eingerichtet haben, fahren Sie fort und tun Sie dies jetzt, indem Sie den Anweisungen in Paligo mit Zendesk verbinden folgen.
Wenn Sie Paligo mit Zendesk verbunden haben, können Sie den Importvorgang starten. Wir haben dies in drei Teile unterteilt:
Wichtig
Wenn Sie über die Zendesk Multibrand-Funktion verfügen, setzen Sie das Zendesk-Konto, aus dem Sie importieren möchten, ganz oben in die Multibrand-Liste. Paligo importiert aus dem ersten Konto in der Multibrand-Liste. Informationen zum Ändern der Reihenfolge in der Liste finden Sie unter Paligo mit Zendesk verbinden.
Anmerkung
Die Architektur mit mehreren Abschnitten von Zendesk Enterprise wird für den Import in Paligo nicht unterstützt. Wenn Sie eine Architektur mit mehreren Abschnitten importieren müssen, wenden Sie sich bitte an den Kundensupport.
Zendesk-Kategorien in Paligo importieren
Paligo kann jeweils eine Zendesk-Kategorie (und ihre Artikel) importieren. In Paligo wird die Kategorie zu einer Publikation und die Artikel innerhalb der Kategorie werden zu Topics.
So importieren Sie eine Kategorie:
Erstellen Sie im Content Manager einen Ordner für Ihre Importinhalte. Alternativ können Sie einen vorhandenen Ordner verwenden.
Sie können einen Ordner über das Punktmenü (...) eines beliebigen vorhandenen Ordners oder über die Schaltfläche Inhalt erstellen erstellen.
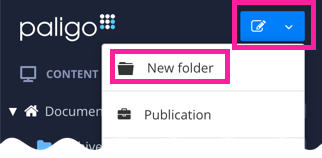
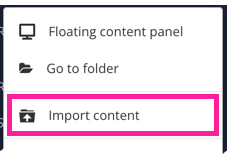
Wählen Sie das Punktemenü (...) für den Ordner und wählen Sie dann Inhalt importieren.
Wählen Sie Zendesk (über Zendesk-Integration) im Dialogfeld „Inhalt importieren“.
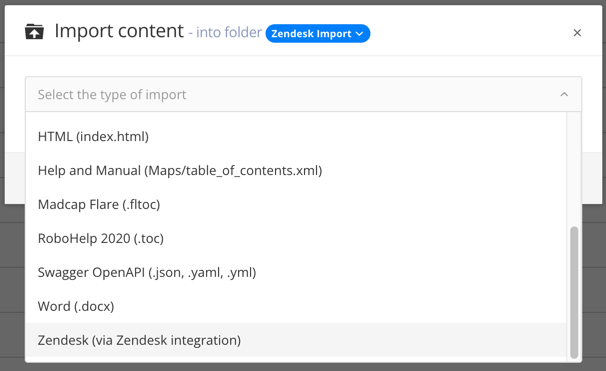
Ignorieren Sie die Einstellung Archivdatei auswählen. Sie wird für Zendesk-Importe nicht benötigt.
Wählen Sie die Kategorie aus, die Sie importieren möchten. Paligo kann die Kategorien in Ihrem Zendesk-Helpcenter erkennen, solange Sie die Paligo-zu-Zendesk-Verbindung korrekt eingerichtet haben.
Legen Sie Ihre Präferenzen für die Registerkarte Allgemeine Optionen fest:
Versuchen, Komponenten vorhandenen Komponenten zuzuordnen
Aktivieren Sie dieses Kontrollkästchen, wenn Paligo Komponenten erkennen soll, die mit in Paligo bereits vorhandenen Komponenten identisch sind. Wenn diese Einstellung aktiviert ist, importiert Paligo keine bereits vorhandenen Inhalte und verwendet stattdessen die vorhandenen Inhalte wieder. Wir empfehlen, das Kontrollkästchen zu aktivieren, um Ihre Importe effizienter zu gestalten und die Wiederverwendungsfunktionen von Paligo nutzen zu können.
Warnmeldungen als separate Komponenten importieren
Paligo empfiehlt, dieses Kontrollkästchen zu aktivieren, wenn Sie wissen, dass Sie über viele identische Warnmeldungen (Hinweise, Warnungen usw.) verfügen. Wenn die meisten jedoch einzigartig sind, aktivieren Sie diese Einstellung nicht.
Warnungen bei Importvalidierung ignorieren
In den meisten Fällen empfiehlt Paligo, dieses Kontrollkästchen zu aktivieren, sofern Sie keine Probleme beim Importversuch haben. Paligo behebt kleinere Probleme während des Importprozesses in der Regel automatisch. Wenn Sie diese Funktion deaktivieren, lehnt Paligo ungültige XML ab, zeigt eine Warnmeldung an und stoppt den Importprozess.
Anmerkung
Diese Option wird für den Import von Paligo-Exportdateien (PEF) standardmäßig nicht angezeigt.
Fehlende Bilder importieren
Wenn aktiviert, werden Platzhalter für fehlende Bilder zu Ihrem Medienordner hinzugefügt. Dies ist die Standardeinstellung. Deaktivieren Sie diese Option, um fehlende Bilder einfach zu ignorieren.
Legen Sie Ihre Präferenzen für die Registerkarte Benutzerdefinierte Optionen fest:
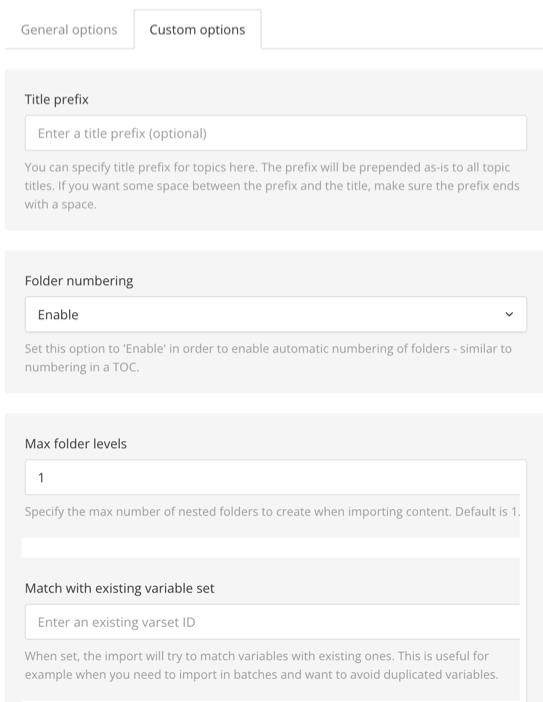
Titel-Präfix
Verwenden Sie diese Einstellung, wenn Sie Ihre importierten Topics mit einem Präfix markieren möchten. Geben Sie das Präfix in das Feld ein. Wenn Sie kein Präfix wünschen, lassen Sie das Feld leer.
Ordnernummerierung
Aktivieren Sie diese Einstellung, um den Ordnern für Ihre importierten Inhalte eine fortlaufende Nummerierung hinzuzufügen.
Maximale Ordnerebenen
Mit dieser Einstellung können Sie die maximale Anzahl an Ordnerebenen festlegen, die Paligo für Ihre importierten Inhalte erstellt. Der Standardwert ist 1. Das bedeutet, dass sich jede Gruppe von Topics in einem Ordner befindet. Wenn Sie den Wert auf 2 setzen, werden die Inhalte so organisiert, dass sich jedes Topic in einem eigenen Ordner befindet.
Sie können die Anzahl der Ordnerebenen auf eine beliebige Zahl festlegen, die Sie für Ihre Inhalte benötigen. Paligo erstellt für jede Ebene einen neuen Ordner, solange auf dieser Ebene Inhalte im Import vorhanden sind.
Anmerkung
Ignorieren Sie Übereinstimmung mit vorhandenem Variablensatz, da sie nur für DITA-, MadCap Flare-, Paligo-Exportdatei- (PEF) und DocBook-Importe gilt.
Klicken Sie auf OK.
Paligo importiert die Inhalte aus Zendesk (solange die Paligo-zu-Zendesk-Verbindung korrekt eingerichtet ist).
Wiederholen Sie diesen Vorgang für jede Kategorie in Ihrem Zendesk-Helpcenter.
Während des Imports konvertiert Paligo Ihre Zendesk-Kategorie in eine Publikation und ihre Artikel in Topics. Sie haben jetzt den Import in Paligo, aber an dieser Stelle handelt es sich nur um regulären Inhalt. Paligo versteht nicht, dass es eine Beziehung zu Ihrer Kategorie und Ihren Artikeln in Zendesk hat.
Um diese Beziehung zu erstellen, müssen Sie Ordnen Sie Ihre importierten Inhalte Ihren Zendesk-Inhalten zu.
Anmerkung
Die Architektur mit mehreren Abschnitten von Zendesk Enterprise wird für den Import in Paligo nicht unterstützt. Wenn Sie eine Architektur mit mehreren Abschnitten importieren müssen, wenden Sie sich bitte an den Kundensupport.
Anmerkung
Sobald Sie aus Zendesk importiert haben, können Sie den Inhalt in Zendesk nicht aktualisieren und erneut in dieselben Topics importieren. Durch den Import werden neue Topics in Paligo erstellt.
Die Importfunktion dient nur zur Migration von Inhalten von Zendesk nach Paligo. Sobald der Import abgeschlossen ist, sollten Sie alle Aktualisierungen in Paligo vornehmen und von dort aus wieder in Zendesk veröffentlichen.
Legen Sie Ihre Veröffentlichungseinstellungen fest
Bevor Sie Preflight zum Zuordnen Ihrer Inhalte verwenden, müssen Sie Paligo so einstellen, dass es in Zendesk veröffentlicht. Sie können auch Ihre Veröffentlichungseinstellungen festlegen.
Wählen Sie im Content Manager das Punktemenü (...) für die Importpublikation aus. Sie sollte denselben Namen haben wie die Kategorie, die Sie aus Zendesk importieren möchten.
Wählen Sie Veröffentlichen aus.
Wählen Sie im Dialogfeld „Dokument veröffentlichen“ HTML und dann ein Zendesk-Layout.

Wählen Sie mit Konto auswählen das Konto aus, das für die Veröffentlichung verwendet werden soll. Diese Einstellung wird nur angezeigt, wenn mehrere Konten für die Paligo-zu-Zendesk-Integration eingerichtet sind.
Wählen Sie die Zendesk-Kategorie, die Ihre ausgewählten Paligo-Inhalte erhalten soll.

Anmerkung
Paligo erkennt die Kategorien automatisch, wenn die Paligo-zu-Zendesk-Integration korrekt eingerichtet ist. Wenn Sie keine Kategorien sehen, prüfen Sie, ob Paligo sich mit Zendesk verbinden kann (siehe Paligo mit Zendesk verbinden oder Verbinden Sie Paligo mit Zendesk-Multibrand).
Verwenden Sie die Einstellung Verwaltet durch, um auszuwählen, welche Benutzertypen die Artikel bearbeiten und veröffentlichen können, die Paligo erstellt oder in Zendesk aktualisiert. Sie können zum Beispiel Agenten und Manager auswählen. Die Einstellung Verwaltet durch wird in Zendesk manchmal als Berechtigungsgruppe bezeichnet.
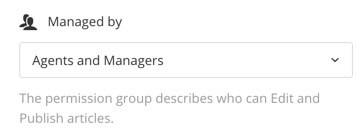
Diese Einstellung wird als Standard für alle Artikel verwendet, die Paligo in Zendesk veröffentlicht, aber Sie können auch unterschiedliche Einstellungen für einzelne Artikel vornehmen. Die individuellen Einstellungen haben Vorrang vor den Standardeinstellungen. Sie legen „Verwaltet durch“ für einzelne Artikel auf der Registerkarte Zendesk Preflight fest.
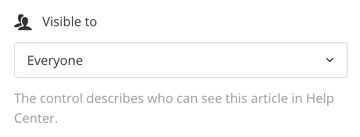
Verwenden Sie die Einstellung Sichtbar für, um auszuwählen, wer die Artikel sehen kann, die Paligo in Zendesk erstellt oder aktualisiert. Die Gruppe „Sichtbar für“ wird in Zendesk manchmal als Benutzersegmentgruppe bezeichnet. Klicken Sie auf das Feld Sichtbar für, um aus den im ausgewählten Konto konfigurierten Gruppen auszuwählen. Es können mehrere Gruppen ausgewählt werden. Über die Schaltfläche x können Sie unerwünschte Gruppen entfernen.
Anmerkung
Paligo verwendet die in der Integration konfigurierten Einstellungen von Sichtbar für als Standard für alle Artikel, wenn Sie in Zendesk veröffentlichen, sofern Sie keine spezifischen Gruppen im Fenster „Veröffentlichen“ konfigurieren.
Die Zendesk Preflight-Funktion bietet für jeden Artikel die Einstellung Sichtbar für. Die Artikeleinstellungen haben Vorrang vor den Standardeinstellungen und den in den Veröffentlichungseinstellungen konfigurierten Einstellungen.
Wählen Sie die zu veröffentlichenden Sprachversionen aus.

Anmerkung
Wenn keine Übersetzungen verfügbar sind, wird nur die Ausgangssprache angezeigt. Bei mehreren genehmigten Übersetzungen in verschiedene Sprachen können Sie auswählen, welche Sie mit aufnehmen möchten. Paligo veröffentlicht jede Sprachversion als separate Ausgabe.
Bei der PDF-Ausgabe können Sie sie als eine einzige, mehrsprachige Publikation veröffentlichen; aktivieren Sie hierzu das Kontrollkästchen Ausgewählte Sprachen kombinieren.
Wenn Ihre Inhalte für die Verwendung von Filterung/Profiling eingerichtet sind, verwenden Sie den Abschnitt Profiling-Attribute, um sie anzuwenden. [Optional]. Wenn Sie keine Filterung verwenden, ignorieren Sie diese Einstellung.
Wählen Sie Bearbeiten und dann den Wert für jeden Filter aus, den Paligo verwenden soll. Wählen Sie beispielsweise für „Zielgruppe“ die Option „Experte“, um Inhalte einzuschließen, die als für Experten gekennzeichnet sind.
Wenn Sie keinen Filter anwenden möchten, lassen Sie das Feld leer.
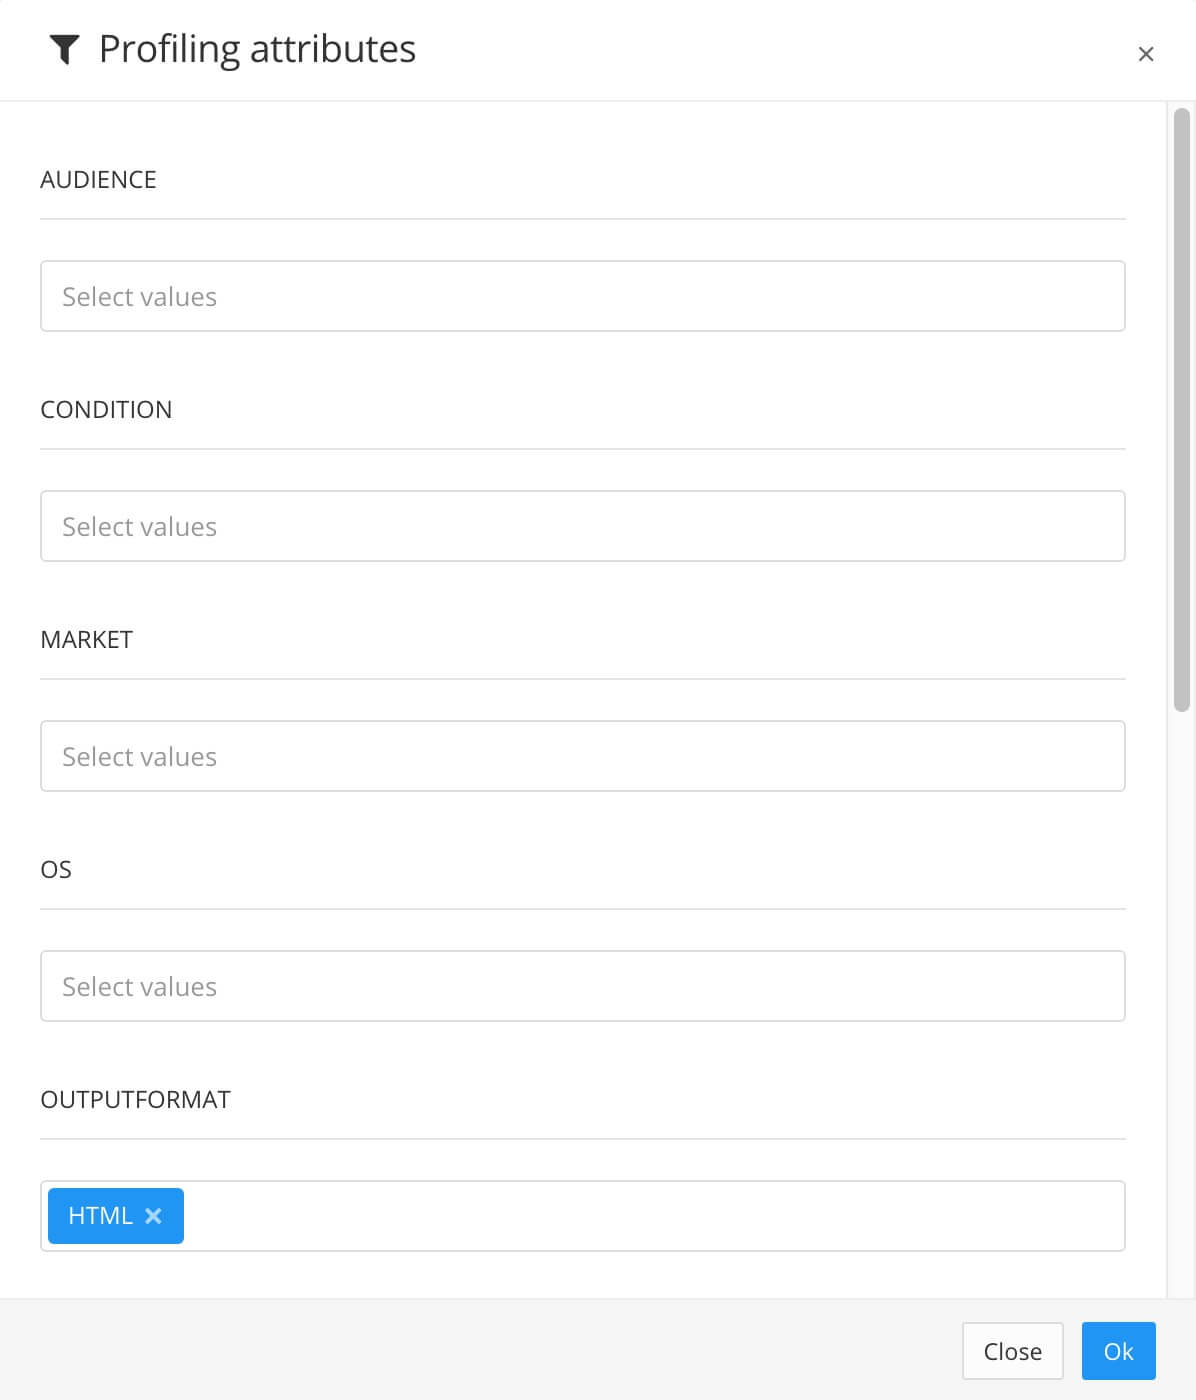
Wählen Sie OK aus, um das/die gewählte(n) Profiling-Attribut(e) hinzuzufügen.

Ignorieren Sie die Abschnitte Upload-Ausgabe und Ausgabedateiname, da diese für die Veröffentlichung in Zendesk nicht benötigt werden.
Legen Sie die optionalen Parameter fest (lassen Sie das Kontrollkästchen deaktiviert, wenn Sie diese Funktionen nicht wünschen):
Speichern Sie die Ausgabe in Paligo - Aktivieren Sie das Kontrollkästchen, um die Zip-Datei in der Ressourcenübersicht zu speichern. Deaktivieren Sie das Kontrollkästchen, wenn Paligo nur die veröffentlichte Ausgabedatei in Ihrem Browser herunterladen soll.
E-Mail an mich - Aktivieren Sie dieses Kontrollkästchen, wenn Paligo Ihnen eine E-Mail schicken soll, wenn die Publikation bereit ist. Dies ist bei sehr großen Publikationen von Vorteil, deren Verarbeitung und Veröffentlichung länger dauern können.
Debug-Build erstellen - Aktivieren Sie dieses Kontrollkästchen, wenn Paligo eine Protokolldatei und einen Link-Bericht einfügen soll. Wenn Ihre Inhalte ein Problem verursachen, kann der Paligo Support Sie bitten, diese Funktion zu aktivieren, damit er die Protokolldateien zur Ermittlung der Ursache nutzen kann.
Im nächsten Schritt werden Sie Ordnen Sie Ihre importierten Inhalte Ihren Zendesk-Inhalten zu.
Ordnen Sie Ihre importierten Inhalte Ihren Zendesk-Inhalten zu
Um Inhalte, die Sie importiert haben, mit den entsprechenden Inhalten in Zendesk zu verknüpfen, müssen Sie sie „zuordnen“. Das Mapping (Zuordnen) informiert Paligo über die Beziehungen zwischen:
Importierten Publikationen und Kategorien in Zendesk
Importierten Topics und Artikeln in Zendesk.
Verwenden Sie Zendesk Preflight, um Ihre importierten Inhalte zuzuordnen:
Wählen Sie im Dialogfenster „Dokument veröffentlichen“ die Registerkarte Zendesk Preflight aus.
Das Dialogfeld „Dokument veröffentlichen“ sollte noch angezeigt werden, wenn Sie Ihre Veröffentlichungseinstellungen gewählt haben.
Zendesk Preflight zeigt Ihre Publikation an, sie ist standardmäßig eingeklappt.
Wählen Sie Chevron > aus, um die Publikationsstruktur zu öffnen.
Sie werden sehen, dass die Abschnitte dupliziert sind. Es gibt Abschnitte mit einem grünen und weißen Plus-Symbol und dann dieselben Abschnitte, aber ausgegraut.
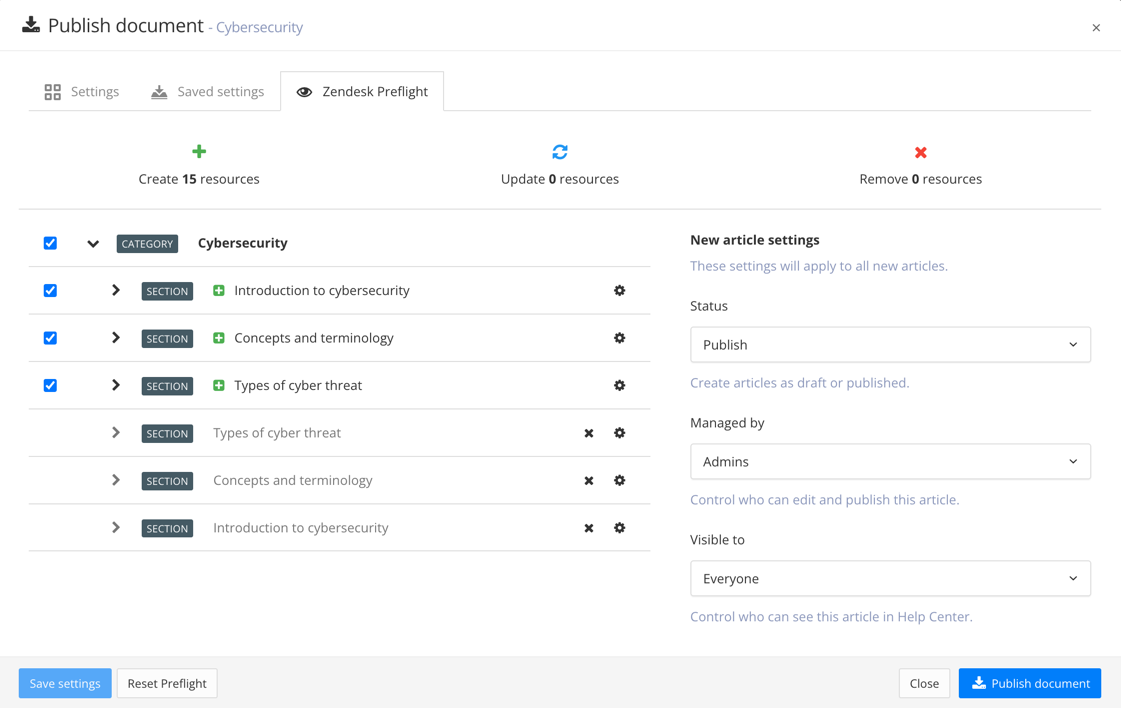
Die Abschnitte mit den Plus-Symbolen sind diejenigen, die Paligo Ihrem Zendesk hinzufügt, wenn Sie veröffentlichen.
Die ausgegrauten Abschnitte sind die Abschnitte, die bereits in Zendesk vorhanden sind.
Aber Sie möchten die Abschnitte in Zendesk nicht duplizieren. Stattdessen möchten Sie die Abschnitte in Paligo den Abschnitten in Zendesk zuordnen (siehe nächsten Schritt).
Wählen Sie das Zahnradsymbol
 für einen Abschnitt mit einem Plus-Symbol. Paligo zeigt ein Dialogfeld „Eigenschaften“ mit einer Mapping-Einstellung an.
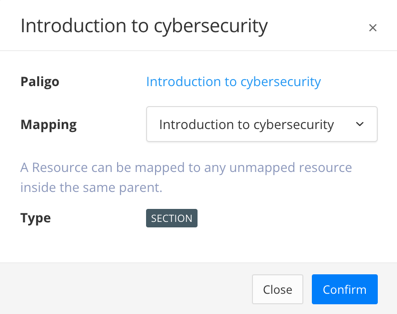
Wählen Sie im Dropdown-Menü Mapping den Abschnitt aus, der den gleichen Namen wie der aktuelle Abschnitt und ein blaues Wiederverwendungssymbol hat. Wählen Sie Bestätigen, um das Dialogfeld neu zuzuweisen und zu schließen.
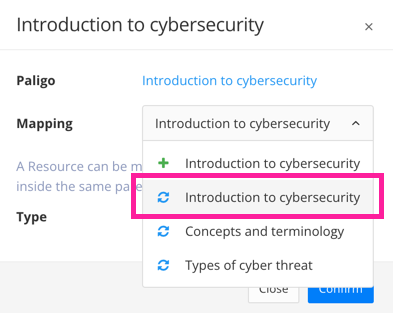
Dieses Mapping weist Paligo an, den Abschnitt in dem vorhandenen Abschnitt in Zendesk zu veröffentlichen, anstatt einen neuen Abschnitt zu erstellen.
Wiederholen Sie die Schritte 3 und 4 für die anderen Abschnitte. Wenn Sie fertig sind, sollte Zendesk Preflight nur Abschnitte anzeigen, die aktualisiert werden sollen. Es sollten keine ausgegrauten Bereiche vorhanden sein.
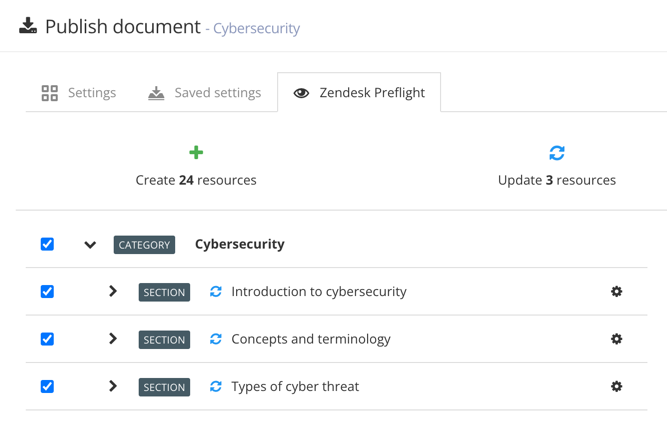
Erweitern Sie einen Abschnitt, um die Topics anzuzeigen, die in Zendesk zu Artikeln werden. Sie sollten sehen, dass Paligo neue Artikel hinzufügt, die mit Plus-Symbolen angezeigt werden. Die vorhandenen Artikel werden ebenfalls aufgelistet und sind ausgegraut. Genau wie bei den Abschnitten werden Sie die neuen Artikel den vorhandenen Artikeln zuordnen (siehe nächster Schritt).
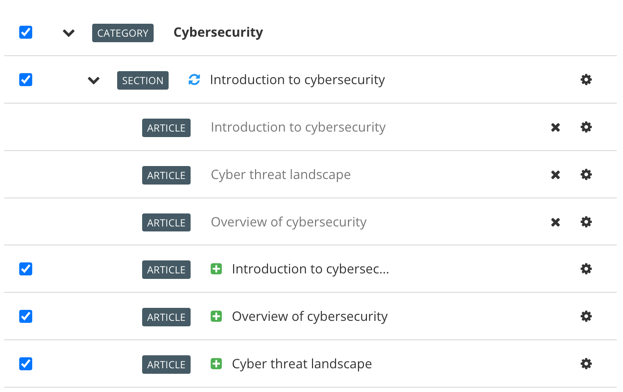
Wählen Sie das Zahnradsymbol für einen Artikel mit einem Plus-Symbol aus. Paligo zeigt ein Dialogfeld „Eigenschaften“ mit einer Mapping-Einstellung an.
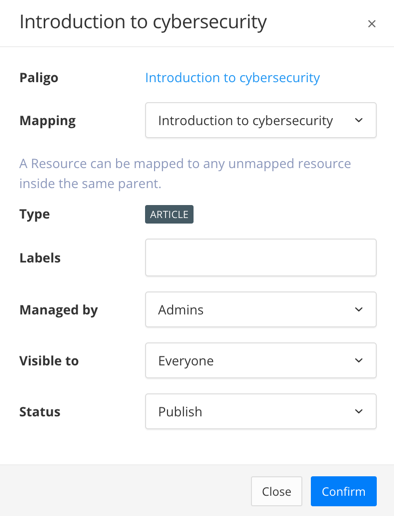
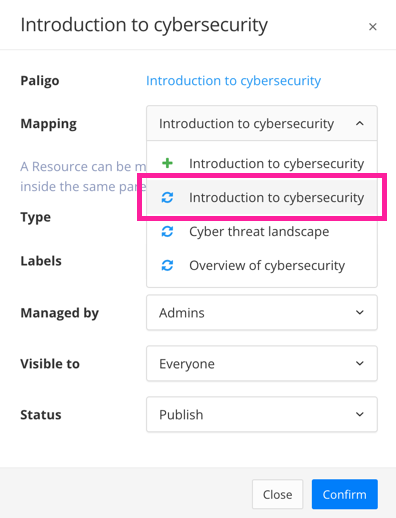
Wählen Sie im Dropdown-Menü Mapping den Artikel aus, der den gleichen Namen wie der aktuelle Artikel und ein blaues Wiederverwendungssymbol hat.
[Optional] Fügen Sie alle Beschriftungen hinzu und legen Sie den Status für den Artikel fest:
Beschriftungen
Geben Sie alle Beschriftungen ein, die Sie für den Artikel aufnehmen möchten. Beschriftungen sind ein Zendesk-Konzept und Sie können sich in der offiziellen Zendesk-Dokumentation darüber informieren.
Verwaltet durch
Wählen Sie aus, wer den Artikel bearbeiten und veröffentlichen darf, z. B. Agenten und Manager. Die Einstellung Verwaltet durch wird in Zendesk manchmal als Berechtigungsgruppe bezeichnet.
Sichtbar für
Wählen Sie aus, wer den Artikel sehen kann, wenn er in Ihrem Zendesk-Helpcenter veröffentlicht wird. Die Gruppe Sichtbar für wird in Zendesk manchmal als Benutzersegmentgruppe bezeichnet.
Status
Wählen Sie zwischen:
Den Artikel in Ihrem Zendesk-Helpcenter Veröffentlichen
Den Artikel in Ihrem Zendesk-Helpcenter als Entwurf speichern.
Wählen Sie Bestätigen aus.
Sie haben nun ein Topic in Paligo zugeordnet, um einen bestehenden Artikel in Zendesk zu aktualisieren, anstatt einen neuen Artikel zu erstellen.
Wiederholen Sie die Schritte für das Mapping von Artikeln für alle Artikel in Ihrer Publikation. Sie müssen jeden Abschnitt erweitern und, für jeden Artikel, den Paligo hinzufügen wird (Pluszeichen), zuordnen, um einen vorhandenen Artikel zu aktualisieren.
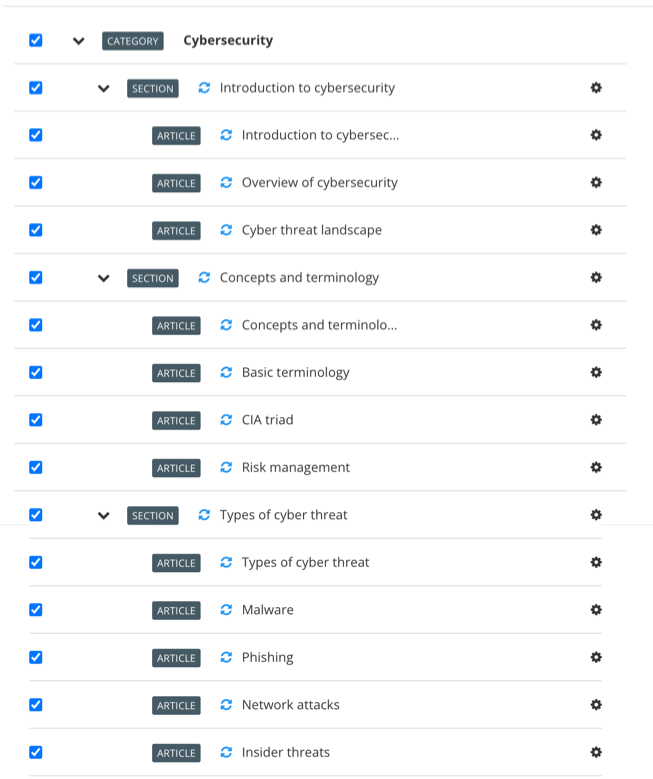
Wenn Sie fertig sind, sollte die Struktur in Zendesk Preflight anzeigen, dass Paligo die Abschnitte und Artikel in Zendesk aktualisieren wird. Es sollte nicht so eingestellt werden, dass Abschnitte oder Artikel hinzugefügt oder dupliziert werden.
Anmerkung
Verwenden Sie die blauen Kontrollkästchen links in der Liste, um auszuwählen, welche Kategorien, Abschnitte und Artikel veröffentlicht werden sollen.
Wählen Sie Dokument veröffentlichen aus.
Paligo veröffentlicht die Abschnitte und Artikel in Zendesk. Wenn Sie das Mapping korrekt eingestellt haben, sollte es die vorhandenen Abschnitte und Artikel aktualisieren.
Sie haben nun eine Kategorie importiert und zugeordnet. Als Nächstes sollten Sie den Import- und Mapping-Prozess für alle anderen Kategorien in Ihrem Zendesk-Hilfecenter wiederholen.
Wenn Sie Ihre Artikel von nun an aktualisieren müssen, sollten Sie die Änderungen in Paligo vornehmen und dann in Zendesk veröffentlichen. Sie müssen die Topics nicht erneut Artikeln zuordnen. In einigen Fällen kann jedoch das Mapping verloren gehen. Dies liegt in der Regel daran, dass ein Artikel in Zendesk gelöscht und anschließend wiederhergestellt wird. In diesem Fall verwenden Sie Zendesk Preflight, um das Topic und den Artikel neu zuzuordnen.
