[en] Set the General Styles for Admonitions
[en] The General admonition styles are designed to apply to graphical and non-graphical admonitions. You should set your general preferences and then use the Graphical or Nongraphical settings to apply further styles for those types of admonition.
-
Wählen Sie im oberen Menü Layout aus.
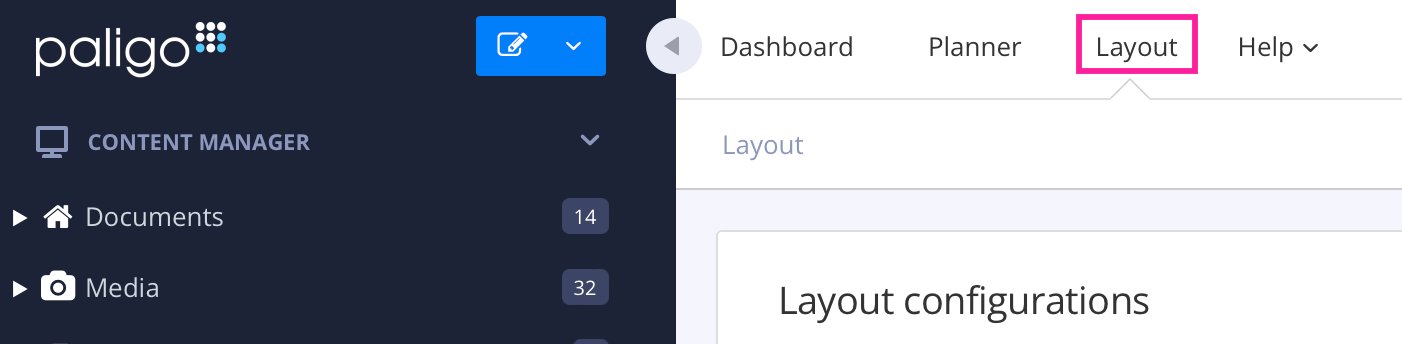
Paligo zeigt eine Liste von Layouts an. Die Liste ist leer, wenn keine benutzerdefinierten Layouts in Ihrer Paligo-Instanz vorhanden sind.
-
Wählen Sie das PDF-Layout, das Sie für die Veröffentlichung verwenden möchten. Alternativ können Sie auch ein neues erstellen (siehe Ein Layout erstellen).
-
[en] Select the Admonitions category and then select the General subcategory.
-
[en] Choose whether the admonitions will use graphical icons.
[en] Set Use graphics in admonitions to:
-
[en] Enabled to include a graphical icon in admonitions. For styling, Paligo will use a combination of the admonition General and admonition Graphical settings. It will ignore the Nongraphical settings.

-
[en] Disabled for admonitions without graphical icons. For styling, Paligo will use a combination of the admonition General and admonition Nongraphical settings. It will ignore the Graphical settings.

-
Standard – um den Wert für diese Einstellung aus dem Basislayout zu übernehmen. Das Basislayout kann ein von Paligo bereitgestelltes integriertes Layout oder ein anderes kundenspezifisches Layout ein. Weitere Informationen finden Sie unter Layoutbeziehungen – Basis, Neu, Duplizieren.
-
-
[en] Choose whether Paligo will add a
titleto any admonition that does not already have atitle. Set Use auto-title in admonitions to:-
[en] Activate to get Paligo to generate a title. The title is the name of the admonition type, for example, Note, and is translated automatically into the relevant languages.
-
[en] Deactivate to prevent Paligo from generating titles automatically.
-
Standard – um den Wert für diese Einstellung aus dem Basislayout zu übernehmen. Das Basislayout kann ein von Paligo bereitgestelltes integriertes Layout oder ein anderes kundenspezifisches Layout ein. Weitere Informationen finden Sie unter Layoutbeziehungen – Basis, Neu, Duplizieren.
-
-
[en] Set the Default font family for admonition text. This is the style of lettering for each admonition's main body content.
[en] Choose a typeface from the list of available fonts.
-
[en] Set the Default font size for admonition text. This is the size of the main body text in each admonition.
-
[en] Set the Default font size for admonition title. This is the size of the text in each admonition's
titleelement. -
[en] Set the Capitalization for admonition title. This controls whether title characters are shown in upper case, lower case, or a combination of the two.
-
[en] Set the left and right margins for the main body text of your admonitions.
-
Randbereich links für den Fließtext von Mahnungen
Über diese Einstellung legen Sie eine linksseitige Einrückung für den Fließtext von Mahnungen fest.
-
Randbereich rechts für den Fließtext von Mahnungen
Über diese Einstellung legen Sie eine rechtsseitige Einrückung für den Fließtext von Mahnungen fest.
-
-
[en] Set the margins for the admonition titles.
-
Randbereich links für den Titel von Mahnungen
Über diese Einstellung legen Sie eine linksseitige Einrückung für den Titel von Mahnungen fest.

-
Randbereich rechts für den Titel von Mahnungen
Über diese Einstellung legen Sie eine rechtsseitige Einrückung für den Titel von Mahnungen fest.
Anmerkung
Wenn Sie kurze Titel für Ihre Mahnungen verwenden, können Sie die Auswirkungen der Randbereichseinstellung möglicherweise nicht erkennen. Dies liegt daran, dass der Titeltext nicht weit genug über das Feld für die Mahnung hinausreicht, um den Randbereich zu erreichen.
-
-
[en] Use the following settings to set a background color for each type of admonition.
-
Hintergrundfarbe für „Anmerkung“
-
Hintergrundfarbe für „Hinweis“
-
Hintergrundfarbe für „Warnung“
-
Hintergrundfarbe für „Gefahr“
-
Hintergrundfarbe für „Vorsicht“
-
Hintergrundfarbe für „Tipp“
-
Hintergrundfarbe für „Wichtig“
-
Deaktivieren Sie das Kontrollkästchen für Standardfarbe verwenden und wählen Sie eine Farbe Ihrer Wahl aus.
-
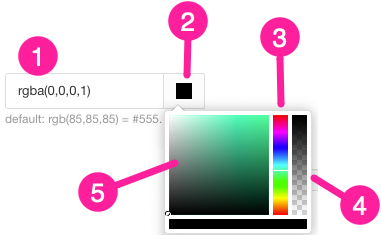
Sie können die Farbe wie folgt festlegen:
-
Eingabe eines RGBA-Codes für die gewünschte Farbe (1).
-
Auswahl des Farbquadrats zur Anzeige des Farb-Selektors (2).
-
Wählen Sie die Farbe aus, indem Sie den Spektrumbalken verwenden (3).
-
Legen Sie die Transparenz fest, indem Sie den Durchsichtigkeitsbalken verwenden (4).
-
Wählen Sie den Farbton aus, indem Sie die Hauptfarbpalette verwenden (5).
-
-
-
-
[en] Use the following settings to set the text color for the various types of admonition.
-
[en] Font color for 'Note'
-
[en] Font color for 'Notice'
-
[en] Font color for 'Warning'
-
[en] Font color for 'Danger'
-
[en] Font color for 'Caution'
-
[en] Font color for 'Tip'
-
[en] Font color for 'Important'
[en] Again, clear the Use default color checkbox for each color that you want to set. Use the color box to display the color selector and choose the color you want.
-
-
Drücken Sie Speichern.
[en] You have now set the General settings for your admonitions. If you have chosen to use graphical admonitions, you can apply more settings in the Graphical category. If you have chosen to use non-graphical admonitions, you can apply more settings in the Nongraphical category. The General settings take priority over the Graphical and Nongraphical settings.
[en] When you use this Layout to publish to PDF, Paligo will apply your choices to the admonitions in your content.