Booklet
Booklets are documents with multiple pages arranged on sheets of paper that, when folded, present the correct page order. You create the booklet design (such as 2-fold, 3-fold, 4-fold), by setting a grid that decides the number of columns and rows for your PDF output.
![]() |
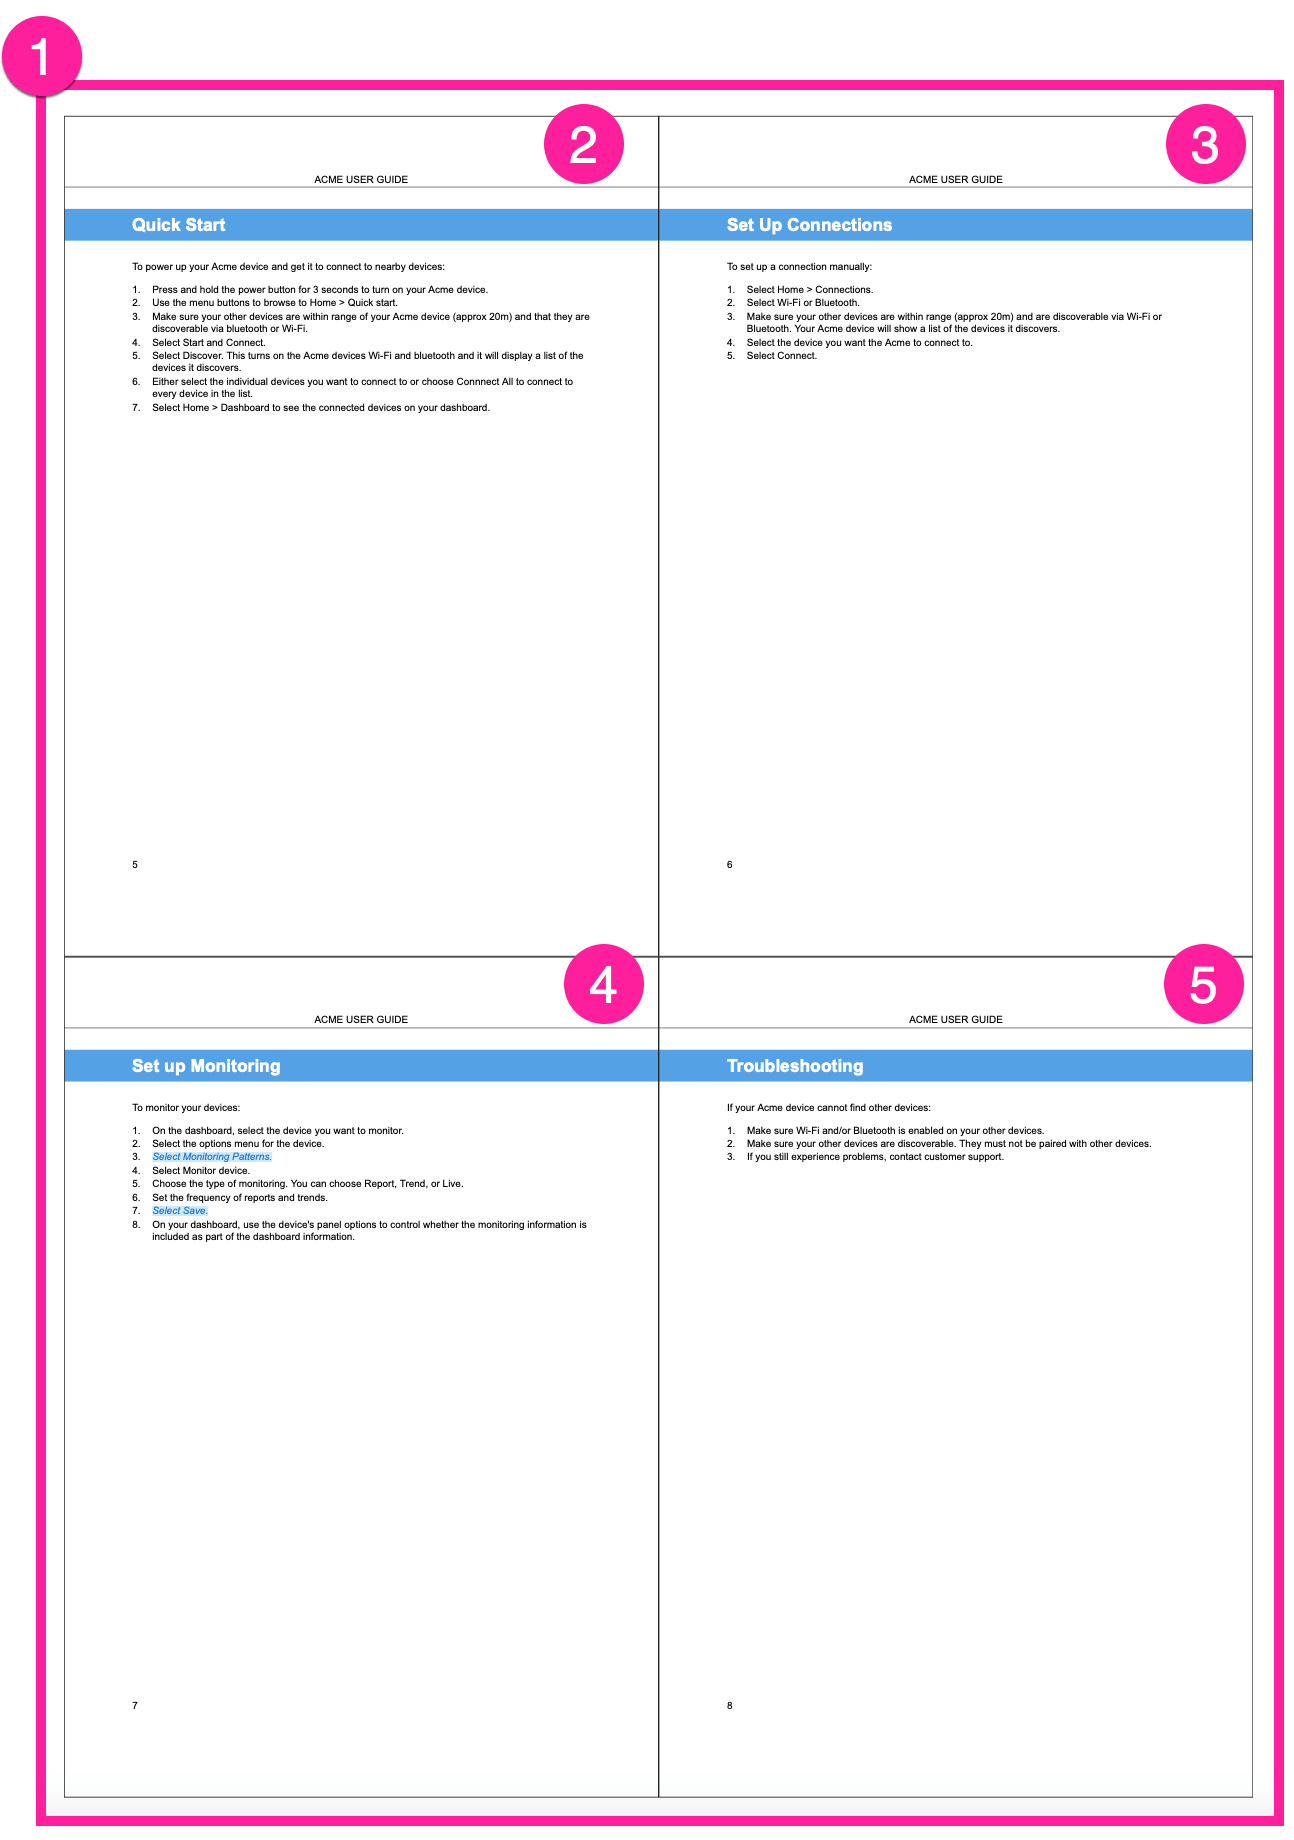
Above a customized booklet with 4 pages (2, 3, 4, and 5) on a sheet (1) achieved by using a grid with two columns and two rows.
Generating a booklet is a post-processing step that uses the regular PDF output file as input in the grid cells. All manipulations are performed on PDF level using pdfjam.
The page size (inside the grid cells) is set under General → Documents → Page size in the PDF layout. The print size is automatically adjusted to fit the grid and allow room for spacing. For example if you use a standard 2x1 booklet and each grid cell is set to:
-
A4 the print size will be A3 (without spacing added)
-
US Letter (half) the print size will be US Letter (without spacing added)
You should consider the readability when designing the grid and also consider font sizes and other appearance-related settings so that the booklet has an appealing design. Use your PDF-viewer and printer to review the result.
Two different ways of creating a booklet in Paligo:
-
Standard 2x1 Booklet gives you a fixed layout with two columns and one row on each sheet.
-
Customize a Booklet offers the possibility to design your own booklet, by defining the number of rows and columns.
Tip
To set up duplex printing needed for "mirroring" the header and footer, see Use Double-Sided Pages (PDF).
The Standard 2x1 Booklet uses two columns and one row on each sheet. This fixed standard does not allow changes the number of rows and columns. By activating the setting "Make a booklet" the pages are automatically rearranged and rotated by pdfjam as needed to create a booklet with two columns and one row on each page.
![]() |
This image shows the rotated and rearranged pages in a Standard 2x1 Booklet.
-
Select the Layout tab in the top menu.
Paligo displays a list of Layouts. The list is empty if there are no custom Layouts in your Paligo instance.
-
Select the Layout you want to update or Create a Layout.
Tip
You can copy the URL of the Layout Editor and paste it into a new tab in your browser. This can be useful if you frequently switch between your Paligo content and the Layout settings.
-
Select General and choose Booklet from the left menu.
-
Select Yes to activate the function Make a booklet.
-
Select Yes to get a thin black line (1) around each grid cell in Combine several pages per sheet: draw a frame (optional).
The frame is often used to verify the size and spacing of the paper printout and turned off for the final PDF.
-
Define the horizontal space (2) between the grid cells in Combine several pages per sheet: add horizontal space between pages (optional).
-
Provide an extra margin (3) between the outer edges of the grid and the PDF page in Add extra margins on page (optional).
Note
This can be useful when using print services, as they may require extra space that can be cut off during the printing process.
To the left no optional settings made. To the right: 1 = Frame added, 2 = Horizontal space added, 3 = Extra margin added
-
Select Save.
To be able to set the grid that defines the number of rows and columns, you need to design your own booklet. When you publish a customized PDF layout, Paligo will create a booklet that uses your grid and spacing settings.
Note
The pages will not be rearranged and rotated by pdfjam.
-
Select the Layout tab in the top menu.
Paligo displays a list of Layouts. The list is empty if there are no custom Layouts in your Paligo instance.
-
Select the Layout you want to update or Create a Layout.
Tip
You can copy the URL of the Layout Editor and paste it into a new tab in your browser. This can be useful if you frequently switch between your Paligo content and the Layout settings.
-
Select General and choose Booklet from the left menu.
-
Enter the number of columns to be used in Combine several pages per sheet: number of columns.
-
Enter the number of rows to be used in Combine several pages per sheet: number of rows.
This will define the amount of grid cells on a single sided sheet.
-
Select Yes to get a thin black line (1) around each grid cell in Combine several pages per sheet: draw a frame (optional).
The frame is often used to verify the size and spacing of the paper printout and turned off for the final PDF.
-
Define the horizontal space between the grid cells in Combine several pages per sheet: add horizontal space between pages (optional).
-
Define the vertical space between the grid cells in Combine several pages per sheet: add vertical space between pages (optional).
The arrows show horizontal and vertical spacing.
-
Provide an extra margin between the outer edges of the grid and the PDF page in Add extra margins on page (optional).
Note
This can be useful when using print services, as they may require extra space that can be cut off during the printing process.
The arrows show extra margin.
-
Select Save.
When you use the Booklet feature for PDFs, we recommend that you preview your booklet in the PDF layout.
-
Select the Layout tab in the top menu.
Paligo displays a list of Layouts. The list is empty if there are no custom Layouts in your Paligo instance.
-
Select the Layout you want to update or Create a Layout.
Tip
You can copy the URL of the Layout Editor and paste it into a new tab in your browser. This can be useful if you frequently switch between your Paligo content and the Layout settings.
-
Select General in the sidebar.
-
Select Booklet.
To learn about the Booklet settings, see Customize a Booklet.
-
Select Choose document and then choose the publication you want to preview.
Paligo loads the publication into the preview panel.
The preview shows how Paligo will rotate and organize the pages for printing as a booklet. For example, the preview below shows there will be 4 content pages printed out on 1 piece of paper.
There are two pages printed on each side of the paper:
-
Side A has the front cover (recto) and back cover (verso). In the image, these are the top left and top right pages.
-
Side B has the front cover (verso) and back cover (recto). In the image, these are the bottom left and bottom right pages.
This single piece of paper can be folded along the center line vertically to create the 4 cover pages.
If your preview looks incorrect, it is likely due to an incorrect value in the Set page count for print to a number divisible by 4 setting (in the General section, Document category. For details, see Set Page Count (PDF) ).
For example, the following preview shows a booklet with an incorrect page count. Here, Paligo is adding a blank page next to the front cover, where the back cover should be. The back cover is positioned incorrectly as it will be on the inside of the booklet, rather than the outside when the page is printed. This is all because the Set page count for print to a number divisible by 4 is incorrect (it is set to document 4 1, but it should be set to document 4 2).
-