HTML and HTML5 Styling
HTML and XHTML Styling
If you are producing "clean" HTML or XHTML outputs, you can style and customize them in several ways:
Edit the settings in the HTML Layout.
Create a custom CSS file and upload it to your layout. It will be applied the next time you publish with the layout.
HTML Layout Editor Options
The tree of items you can choose to style in the Layout Editor is divided into several sections. Each section is described below, with the items you can style and the options available for them.
Many of the items and options are self-explanatory and have explanations right in the Layout Editor. So only the items that may not be immediately transparent are explained below.
The options here are only for the clean HTML/XHTML, not for HTML5 Layout Editor Options. However, it also has options that apply when you choose to create a Zendesk layout. (Last section)
Learn how to set the footnote appearance for HTML, HTML5 and SCORM output, see Footnote Settings (HTML).
General (HTML)
Category | Description |
|---|---|
CSS | Upload your own CSS to modify the default layout. |
SEO-friendly permalinks | Use to control whether Paligo uses the topic ID as the URL in the output or a more user-friendly URL. User-friendly URLs are also better for Search Engine Optimization (SEO). |
Use a short and flat URL structure for output files | If you have SEO-friendly permalinks enabled, output paths will have a nested folder structure, by default. Enabling this option will instead create a flat URL structure, generating shorter URL paths. Default: Disabled |
Use permalinks made with id and SEO name | If you have enabled a flat URL structure (see Use a short and flat URL structure for output files), the default output file name is based on the title only. With Use permalinks made with id and SEO name, you can set the file names to be a combination of the topic id and the title, for example, '123-my-topic.html'. Default: Disabled |
Allow reserved characters in permalinks | Some characters, such as commas and semicolons are classed as "reserved" characters. Use this setting to control whether reserved characters can be used in output file names. Set it to Enabled to allow reserved characters or Disabled to prevent them being used. Default: Enable. |
Use resource name instead of title for the HTML output filename | Use to set Paligo to use the resource (topic) name (instead of the title inside it) to create the output filename. Default: Disabled (Output filename is created from the topic title) Note If you only need to use the resource name for individual topics, rather than all topics, use the |
Keep the letter case of the title for the HTML output filename | Use this setting to control whether output names are all lower case or can use upper case letters too. By default, the output file names only use lower case letters, for example, my-topic.html. Set to Disabled for lower case only or Enabled to allow upper case letters. We recommend that you only set this to Enabled if you have a specific reason for using upper case letters. Default: Disable (output file names are all lower case). |
Make extra clean XHTML | The HTML output by default creates a clean valid XHTML. But it can be further cleaned by using this parameter to use e.g divs with classes instead of elements to denote emphasis, and similar. Default: disabled (0). |
Use inline style attributes | In some cases, the HTML output will include a style attribute, such as list style type on lists. If you want to exclude such attributes too, to only apply external CSS with classes, using no inline CSS, disable this option. Default: enabled (1). |
Create single page XHTML | Multipage: 0, single page: 1. Default: multipage (0) |
Create a topic for reused publications | If you reuse publications within another publication, you can select whether that publication should be treated as a top-level topic, or if only its child topics should be reused. This setting needs to be enabled for the filtering to work for the parent publication. Default: Enabled. |
Only create topic for reused publications if no top-level topic | With this option enabled, you can mix reused publications where there is a top-level topic in some (in which case no title topic will be created for the publication), together with publications that have no top-level topic (in which case a title topic will be created for the publication). Default: Disabled |
Use angle bracket delimiters around email | When enabled, Paligo adds angle brackets around email addresses in your content. Default: Enabled. |
Bibliography auto-title | Use to control whether Paligo adds a "Bibliography" title for your bibliographies. If you have a bibliography in a separate topic and it has two "Bibliography" titles, you should disable this feature. (The two titles are because one title is for the topic and the other title is auto-generated for the bibliography). For details, see Deactivate Bibliography Auto-Titles. |
Re-sort sorted tables automatically on publish | Even if you have sorted a table in the editor, re-sorting them on publish can be useful for example if you publish to multiple languages (in which case the sort order may be different), or if you have missed updating the sort before you publish. Note This will only affect tables that you have sorted with the sort commands in the editor first. Default: enabled. |
Exclude label for abstract | If enabled, the label for an abstract is excluded from output. This is useful if you do not need it, and if publishing to multiple formats where hiding it with CSS does not work. Default: disabled. |
Classes and attributes (HTML)
Category | Description |
|---|---|
Output taxonomies as class names | If enabled, you can get your taxonomy categories into your output as class names for further processing (e.g by css and javascript). |
Value structure for taxonomy class names | You can set whether class names from taxonomies should output the value and all its descendant values in a taxonomy tree, just the value itself, or the value and its parent. Default: Value and descendants |
Underscore delimiter for taxonomy class names | When enabled, an underscore ('_') will be used to separate the parts of a taxonomy value output for class names in HTML5, instead of a dash ('-'). For most common purposes this is not necessary, but can be useful if you need to further process the separate parts of the value. Default: disabled (dash is used) |
Taxonomy filtering strategy | You can set whether taxonomies should be used for filtering, and whether to output the value and all its descendant values in a taxonomy tree, or just the value itself. If you want to enable taxonomies for filtering, the most recommended value is to select "Descendants" to take advantage of the hierarchy of a taxonomy. Default: Disabled |
Output | If enabled, you can get your role attributes into your output as class names for further processing (e.g by css and javascript). |
Output profile/filtering attributes as class names | If enabled, you can get your profile/filtering attributes into your output as class names for further processing (e.g by css and javascript), such as creating "on-the-fly" filtering. |
Use | If enabled, the language attribute |
Glossary popovers | When enabled, glossary terms will display the definition in a pop over in HTML5 Help Center output, when the user hovers over it. Note: This currently has no effect on legacy HTML5. Default: enabled for Help Center output. |
Verbatim (code and software) HTML
Category | Description |
|---|---|
Use graphics for code callouts | If you'd prefer, you can use a graphic for the code callout, an svg image will then be used. Max 30 callouts with this option. |
Use unicode symbol for code callouts | Another option is to use a unicode symbol for callouts. If this is set a symbol similar to the graphic and Font Awesome version will be used. Max 20 callouts with this option. Note If all of the above code callout options are disabled, a simple plain text output will be used for the callouts. By default a number within parentheses like this (1), but this can be modified in your CSS. |
Use Font Awesome glyphs for code callouts | If you use calloutlist for annotating code samples, you can use Font Awesome for the "callout bugs". This is the default for HTML5. |
Images (HTML)
Category | Description |
|---|---|
Image Size | To find out more, see Adjust Image Resolution. |
Zendesk
Category | Description |
|---|---|
Fix cross links outside of publication scope | When publishing to Zendesk, Paligo will try to resolve even cross-references pointing to content that is not part of the current publication, so that you can publish to separate categories one at a time, but have links between them resolved. |
Create article for the section topic | When publishing to Zendesk, Paligo will by default create a Zendesk article out of the content at the top-level topic, with the same title as the Zendesk 'section' created. If you only use the top-level topic as a title for the section, you can disable this. Then only the section title will be created for that topic, and only the topics below it become articles. Warning
Note Disabling this will not remove previously published 'section' articles. Default: enabled |
Use separate styling for label, number, and title in formal elements | If enabled, each part of the title for formal elements, like a table, example, or figure, will get a span element with a specific class name, so they can be styled differently or excluded, using CSS. Default: disabled. |
Remove Header and Footer (HTML Output)
For HTML outputs (not HTML5), you have the option to suppress navigation. When enabled, this will remove the header and footer navigation from the HTML output. This feature is useful if you are embedding your Paligo content in a custom application that already has its own navigation features.

The HTML output header navigation is hidden by default via CSS:
.navheader {display:none;}
To enable or disable the navigation suppression:
Select Layout in the top menu.
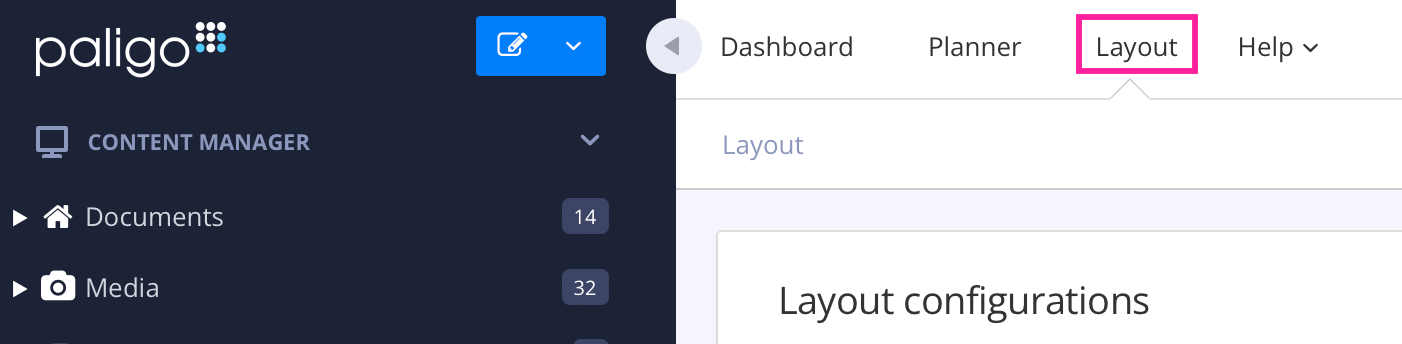
Paligo displays a list of Layouts. The list is empty if there are no custom Layouts in your Paligo instance.
Select the Layout you want to update or Create a Layout.
TipYou can copy the URL of the Layout Editor and paste it into a new tab in your browser. This can be useful if you frequently switch between your Paligo content and the Layout settings.
Select TOC and chunking in the sidebar.
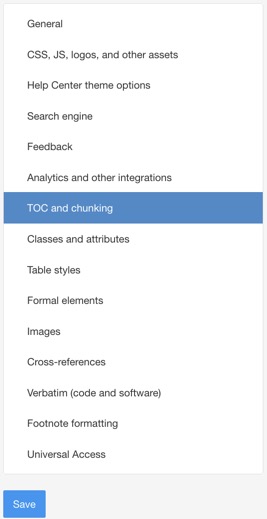
Set Suppress navigation to:
Enable to turn on navigation suppression so that the navigation is not shown.
Disable to turn off navigation suppression so that the navigation is shown.
The default is Disable.
NoteIf you enable Suppress navigation, make sure that you provide a way for users to access the pages in your HTML output. You could use a custom application to provide the navigation or you can rely on the HTML output's table of contents.
If you are going to rely on the table of contents, set the TOC section depth to a higher value than the Chunk section depth. This will mean that all chunked topics will appear in the table of contents, and so users can navigate to them. (Chunked topics are topics that appear on their own page in the HTML output).
If the Chunk section depth is higher than the TOC section depth, there may be pages that are not shown in the table of contents, and so users cannot navigate to them.
Select Save.
When you publish to HTML using this layout, the output will include or exclude the header and footer navigation, based on the setting in the layout.
HTML Styling Workflow
To customize and style HTML outputs, use a CSS stylesheet. There are also some general settings in the HTML layout that affect the output as a whole.
We recommend that you follow these steps to style your HTML:
Create your content in Paligo topics and add it to a publication. Some parts of the content can be styled by using attributes, for example, you can set image sizes. But you will apply most of the styling in the HTML layout and in a CSS stylesheet.
Create an HTML5 (or plain HTML) layout or edit an existing one.
Use the layout settings to choose your publishing settings. These are "overall" settings that apply to the content as a whole. You do not set styles such as headings, font sizes, font colors etc., in the layout. For HTML, you define those in a CSS stylesheet that you can then upload to your layout.
Use a code or text editor to create a CSS file. Give it a suitable name and save it with the
.cssextension.Give your CSS a simple rule to start with, so that the file is not empty. The rule does not have to contain any styling yet, for example, you could add:
body {}- Note
You can also use JavaScript to customize your published output. You can upload your custom javascript to the HTML layout too.
Select Save.
Publish any publication that contains a sample of the content that you want to style. When you publish, use the HTML layout that you edited in steps 2-7.
When your content is published, unzip the zip file that is downloaded in your browser.
Open the
Index.htmlfile to display your HTML output.In the unzipped files, go to the
out/en/cssfolder to find the custom CSS file uploaded to your layout. If the Persistent CSS file name option is enabled for your layout, the file is called "layout-custom-style.css", otherwise, it has a random number ID as its name.Noteenis the folder for English content. For other languages, there is a different language code, see ISO Language Codes.Open the CSS file in a text or code editor and add rules in the CSS. Then refresh your browser to see the effects on your help output.
TipUse the browser tools to inspect elements and test style changes directly in the browser, before you add styles to your CSS file. For tips on using the browser tools, see Style with CSS.
When you are happy with your styling, upload your customized CSS file to your layout again. Paligo will apply your new styles the next time you publish.
For tips on styling a HTML5 help center, see HTML5 Help Center Styling.