Prepare HTML Multi-File for Import
To import multiple HTML files at once, you need to organize your HTML content in a particular way. You also need to create or edit an "index.html" file so that it contains an unordered list that can act as a table of contents, with links to the various HTML files you are importing.
Important
When importing HTML, the folder names are case-sensitive.
Note
Ensure that the source files are valid by using an HTML validator to test your HTML file, like Tidy or W3C. This will help to identify and potentially fix any structural problems in your HTML before you attempt to import it.
HTML is not a structured format. The import will handle many flavors of HTML, but because of the many proprietary variants there is no guarantee it will work for yours. If you have problems, inquire about the possibilities to tweak the content.
This HTML format only imports one file at a time. To import multiple HTML files, use the "Confluence" import.
If it is not an actual Confluence import, the "index.html" needs to be manually edited to incorporate a ul class="toc" that contains the publication structure to be imported.
Tip
To learn about relative references, see www.w3schools.com.
Prepare your HTML content files. Make sure they have valid HTML structure, for example:
<!DOCTYPE html>
<html>
<head>
    <title>Sample HTML Page</title>
</head>
<body>
    <h1>This is a Heading Level 1</h1>
    <p>This is some introductory text for our sample HTML page.</p>

    <h2>Heading Level 2</h2>
    <p>More text can go here to explain things in detail.</p>

    <h3>Heading Level 3</h3>
    <ul>
        <li>Item 1</li>
        <li>Item 2</li>
        <li>Item 3</li>
    </ul>

    <h3>Heading Level 3</h3>
    <ol>
        <li>First item</li>
        <li>Second item</li>
        <li>Third item</li>
    </ol>

    <h2>Another Heading Level 2</h2>
    <p>More text goes here. Below is an image:</p>
    <img src="https://example.com/sample-image.jpg" alt="Sample Image">

    <h2>Table Example</h2>
    <table border="1">
        <tr>
            <th>Header 1</th>
            <th>Header 2</th>
            <th>Header 3</th>
        </tr>
        <tr>
            <td>Row 1, Cell 1</td>
            <td>Row 1, Cell 2</td>
            <td>Row 1, Cell 3</td>
        </tr>
        <tr>
            <td>Row 2, Cell 1</td>
            <td>Row 2, Cell 2</td>
            <td>Row 2, Cell 3</td>
        </tr>
    </table>
</body>
</html>
Tip
Don't forget that the
<title>tag in HTML is not used as the main heading, it is only for the title of the document. Use<h1>for the main heading, and then lower-level<h2>,<h3>tags for subheadings.Organize your HTML multi-file content like this:
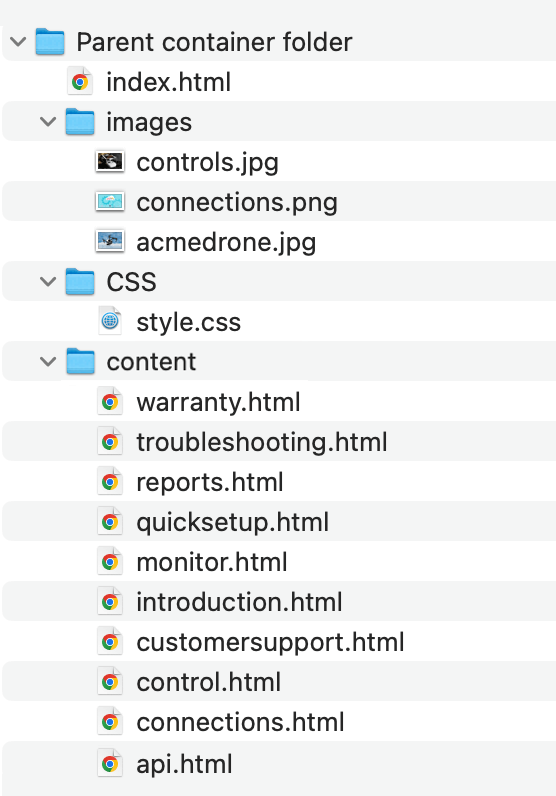
Parent container folder
It is important that the "container" folder includes one index file at the root level, with all other HTML pages inside a subfolder.
Index.html- It serves as the default site for your webpage.Images folder - The folder name can be anything, but is case-sensitive, which means that the
@srcattribute must match the name and case of the actual folder otherwise the images will not be imported.Image files (for example
controls.jpg,connections.png)
CSS folder
CSS files (for example
style.css)
Content folder - When importing HTML, the folder names are case-sensitive.
HTML files (for example warranty.html,
troubleshooting.html))

Example of a valid structure to import an HTML multi-file.
Important
Make sure your content folder only contains HTML files. It should not contain other types of files, such as .doc, .js or .css.
Now you need to edit the index.htmlfile. Use a text editor or code editor to open the file and add this structure to it:<!DOCTYPE html><html> <head> <title>Import</title> </head> <body> <ul class="toc"> <li><a href="enter relative link path here">Link text</a></li> <li><a href="enter relative link path here">Link text</a></li> <li><a href="enter relative link path here">Link text</a></li> <li><a href="enter relative link path here">Link text</a></li> <li><a href="enter relative link path here">Link text</a></li> </ul> </body> </html>Where:
doctype,html,head,title, andbodyare the basic structure as used in all HTML files.uldefines the start of an unordered list (bullet list) and it has to have the class name "toc". This class is important for the import process and the import will not work correctly without it.lidefines a list itema hrefdefines a link. This index.html file needs a list item and link for every html page that you want the import to bring into Paligo. The link needs to be a relative link and should be to an html file that is stored in the "content folder" inside the "container" folder.
Important
When adding a link, be aware that the folder names are case-sensitive.
When you have added the links, save the
index.htmlfile.Next, use your computer's operating system or a third-party application to make a zip file of the "container" folder.
Tip
To learn how to zip a file, see the operating system's documentation:
Use the Import Wizard to import the zip file. Select the Confluence format to be able to import multiple files.